Today is a big day for TP-Link, as the company revealed that it has opened preorders for its first Wi-Fi 8 hardware. The previously announced Archer 8 Ultra router makes the company’s first entry into what will become a fully stocked portfolio covering Wi-Fi 8 standalone and mesh routers, access points, and client adapters. Interestingly, TP-Link makes it clear that preorders kicked off today in the United Kingdom, Germany, Australia, and other global markets.
Given that the United States is a key consumer market for TP-Link, the fact that the country is left off the preorder list is telling, but not exactly a surprise to anyone who has been following the wireless industry over the past six months. TP-Link has sat on the sidelines as competitors including Netgear, Asus, and Amazon gained Conditional Approvals from the Federal Communications Commission (FCC) to sell their hardware in the U.S. Without the Conditional Approval, companies are effectively banned from selling new wireless hardware in the country that wasn't already approved by the FCC.
So, while earlier Wi-Fi 7 gear from TP-Link that received FCC certification can still be sold, any new Wi-Fi 7 or Wi-Fi 8 products are effectively blocked from the market. The company has made several critical moves to position itself as a U.S. company, including incorporating TP-Link Systems in California, but those moves have been challenged in legal filings.
At this point, there haven’t been any clear signs that the U.S. government will lift its freeze on TP-Link hardware, so until that time comes, the Archer 8 Ultra will remain unavailable stateside. And it’s a shame, because the Archer 8 Ultra, which utilizes a Broadcom Wi-Fi 8 chipset, will deliver up to 33 percent more real-world throughput compared to TP-Link’s Wi-Fi 7 hardware, and 24 percent more consistent throughput when operating in high-interference conditions.
The Archer 8 Ultra will feature two auto-sensing 10 Gbps WAN/LAN ports and four 2.5 Gbps LAN ports. TP-Link says that the router covers up to 3,600 square feet and will support up to 200 devices.
"Wi-Fi 8 sets a new foundation, and we’ve built beyond it,” said Jim Poder, Senior Vice President of R&D at TP-Link. “Archer 8 Ultra combines our Wi-Fi 8 StabilityEngine with intelligent antenna technology and AI-powered optimization to deliver what matters most: a smarter, more reliable network that’s easier to use.”
TP-Link’s Wi-Fi 8 family will expand in Q1 2027 with a Deco 8 Ultra mesh router, and a Roam 8 travel router in Q2 2027. Throughout the year, further additions will come in the form of new PCIe/USB wireless adapters, access points, and range extenders.
The Thunderbolt 5 market is starting to heat up, as we’re seeing more players enter the increasingly crowded field. We’ve previously looked at docks in the sub-$400 price category, and premium offerings crossing the $600 barrier.
Today, we’re focusing on two new entries in the sub-$400 category: the VectoTech V-Core and the Orico TB5, priced at $349 and $399, respectively. Both offer a wealth of USB and Thunderbolt ports, 2.5 GbE Ethernet, and internal M.2 slots. While their specs look similar on paper, at the end of our testing, there was a clear winner.
VectoTech V-Core
Design of the VectoTech V-Core Thunderbolt 5 Dock
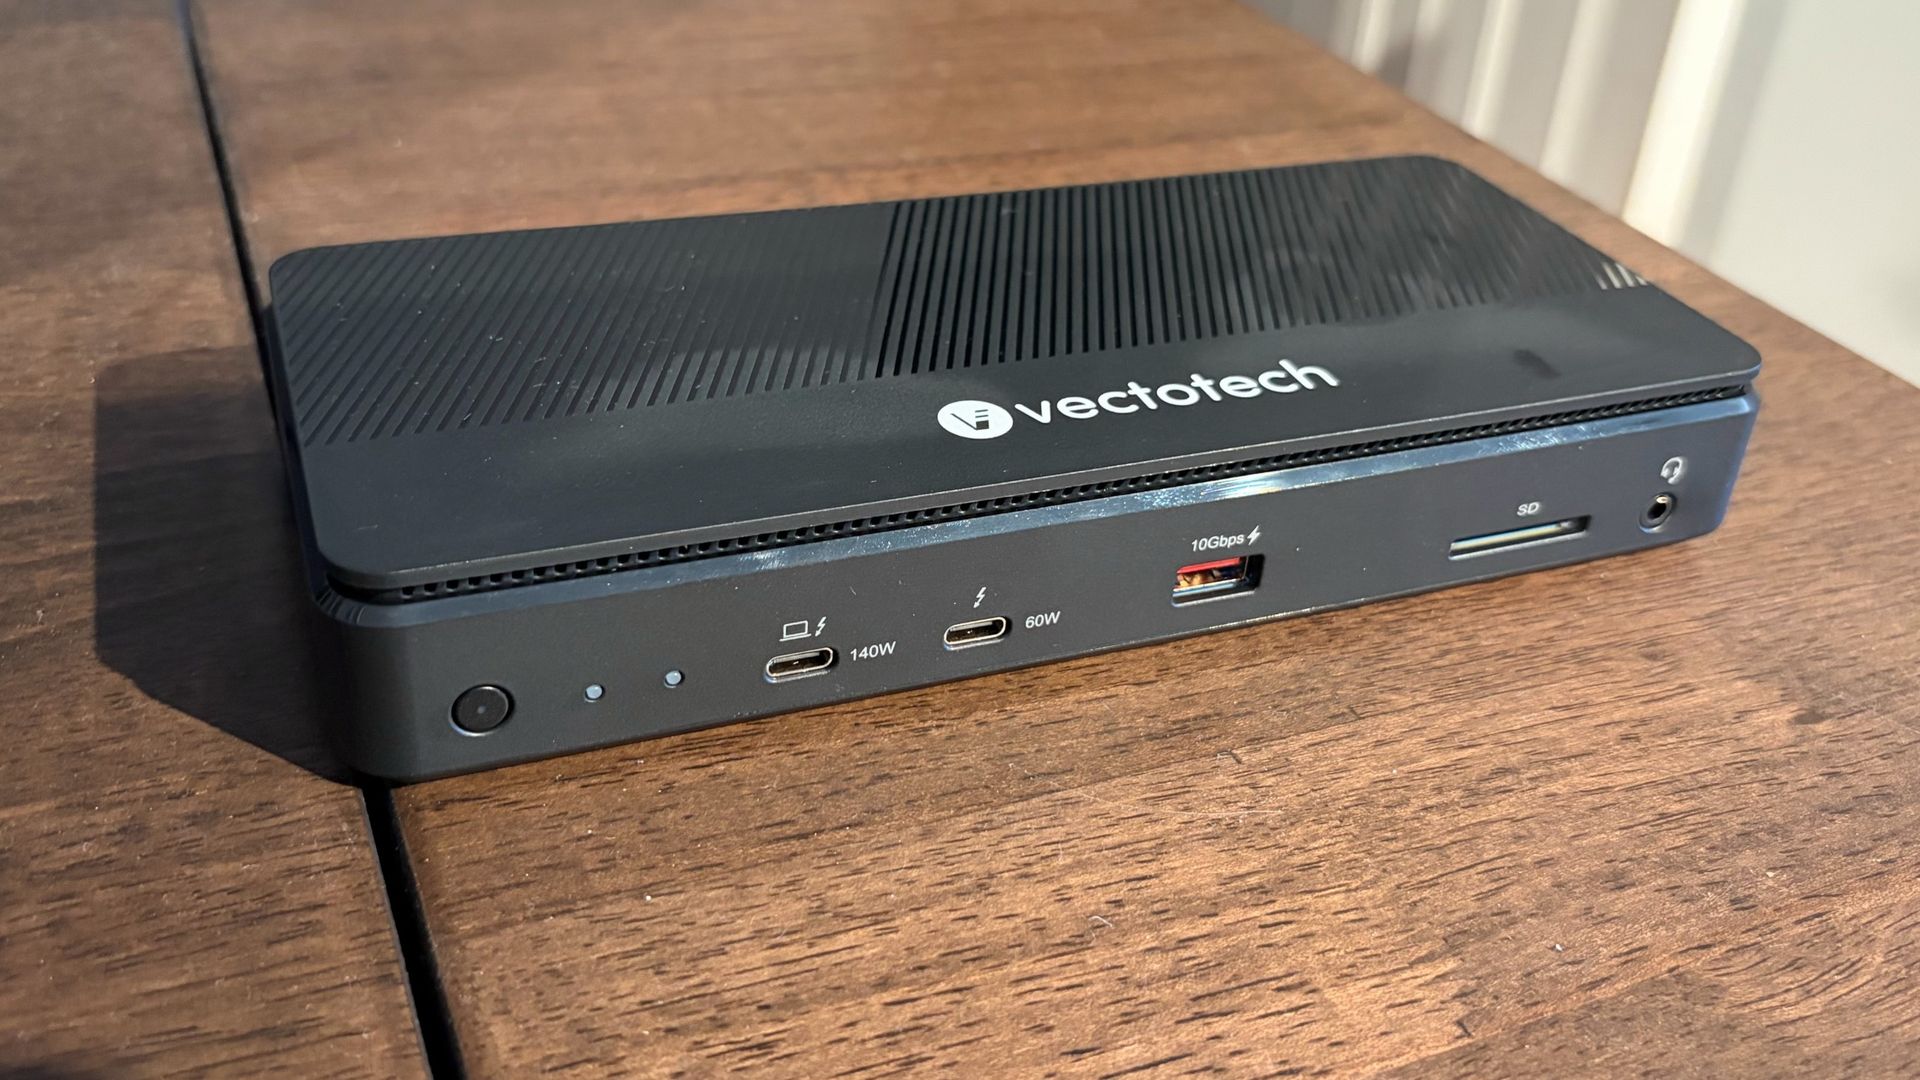
The V-Core has what I’d call a traditional, candybar form factor. It’s meant to sit flat on your desk, unlike chunkier docks that can also operate vertically. At first glance, I thought the V-Core was made of lightweight aluminum. However, it wasn’t until I started fumbling around, trying to figure out how to access the internal M.2 SSD slot, that I discovered the unfortunate truth: the V-Core is constructed almost entirely of plastic. That includes the lower and top chassis, and much of the internal structure.
Tom's HardwareTom's Hardware
It’s a stark departure from every other Thunderbolt dock that I’ve tested, which are made from aluminum to help dissipate heat – which can be intense when a dock is under load. In addition, the top cover wiggled around when snapped into place (it uses a friction fit to attach to the main chassis).
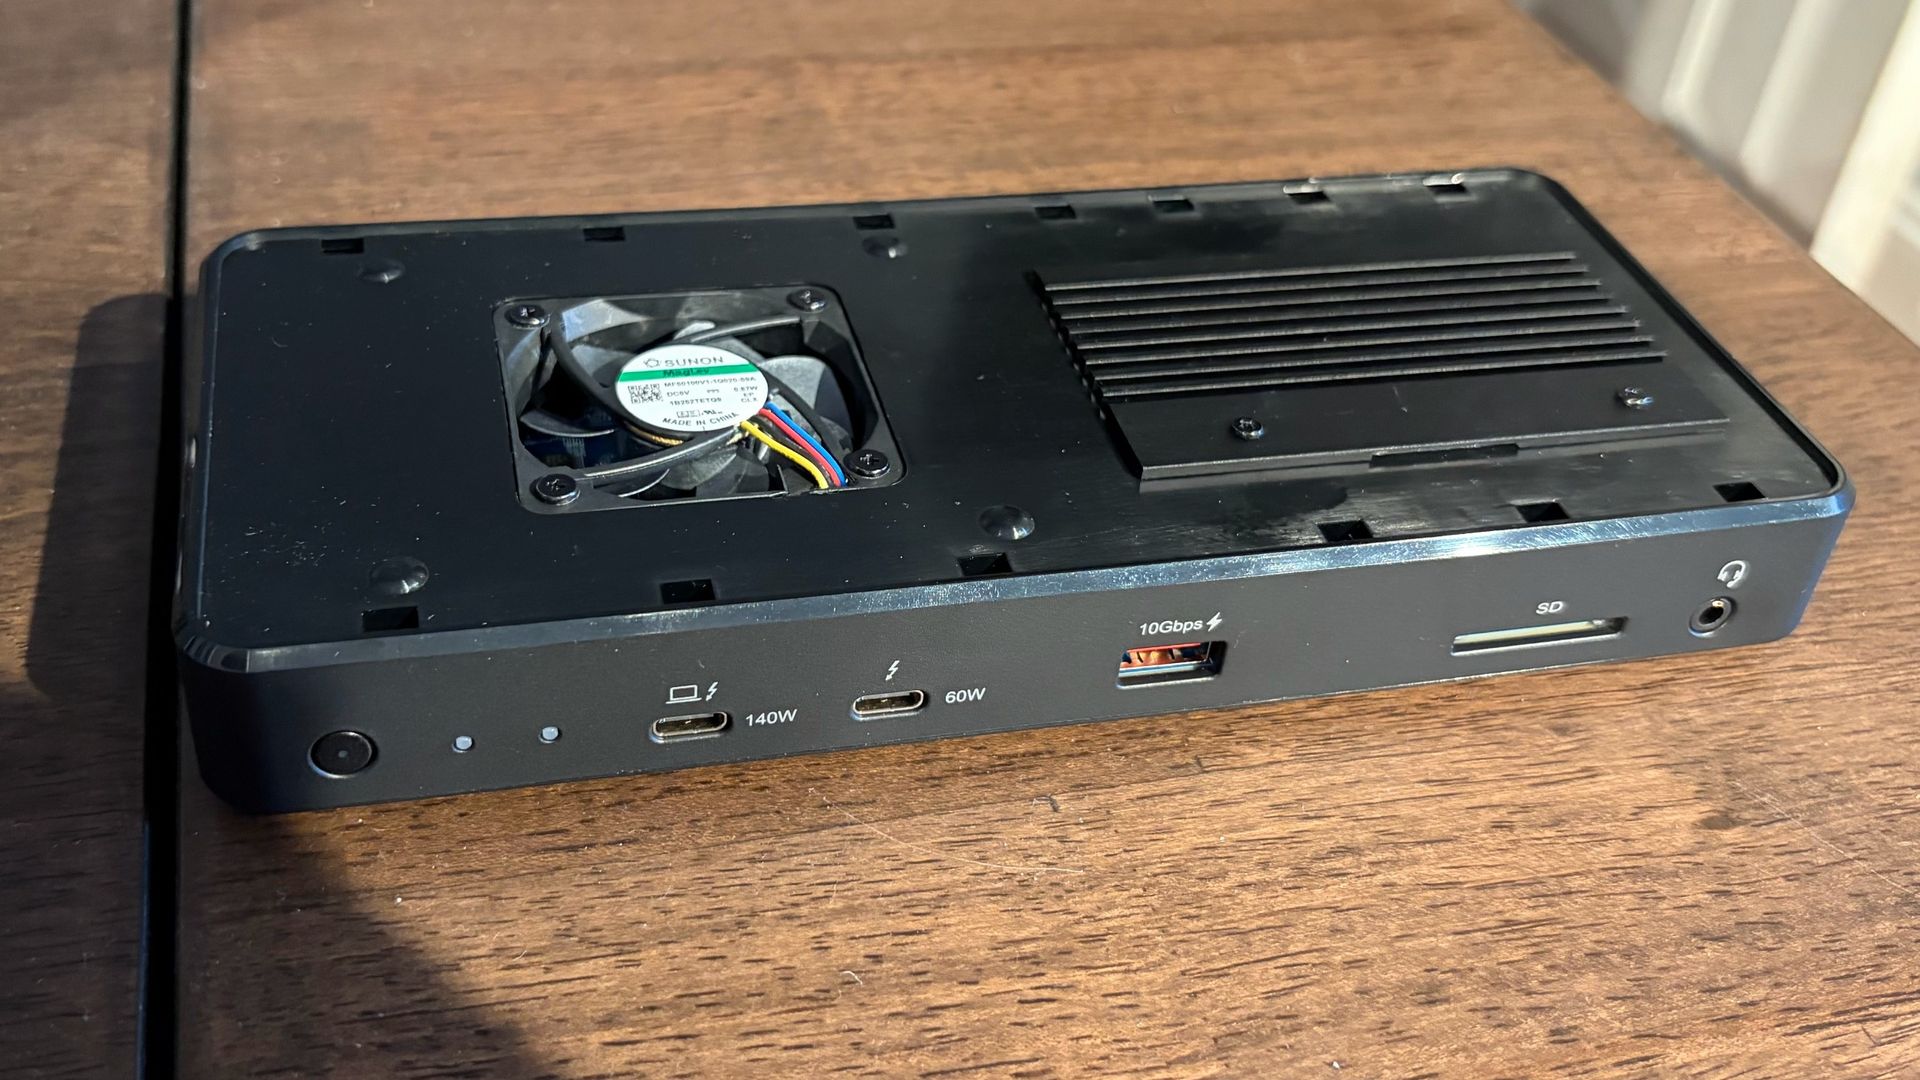
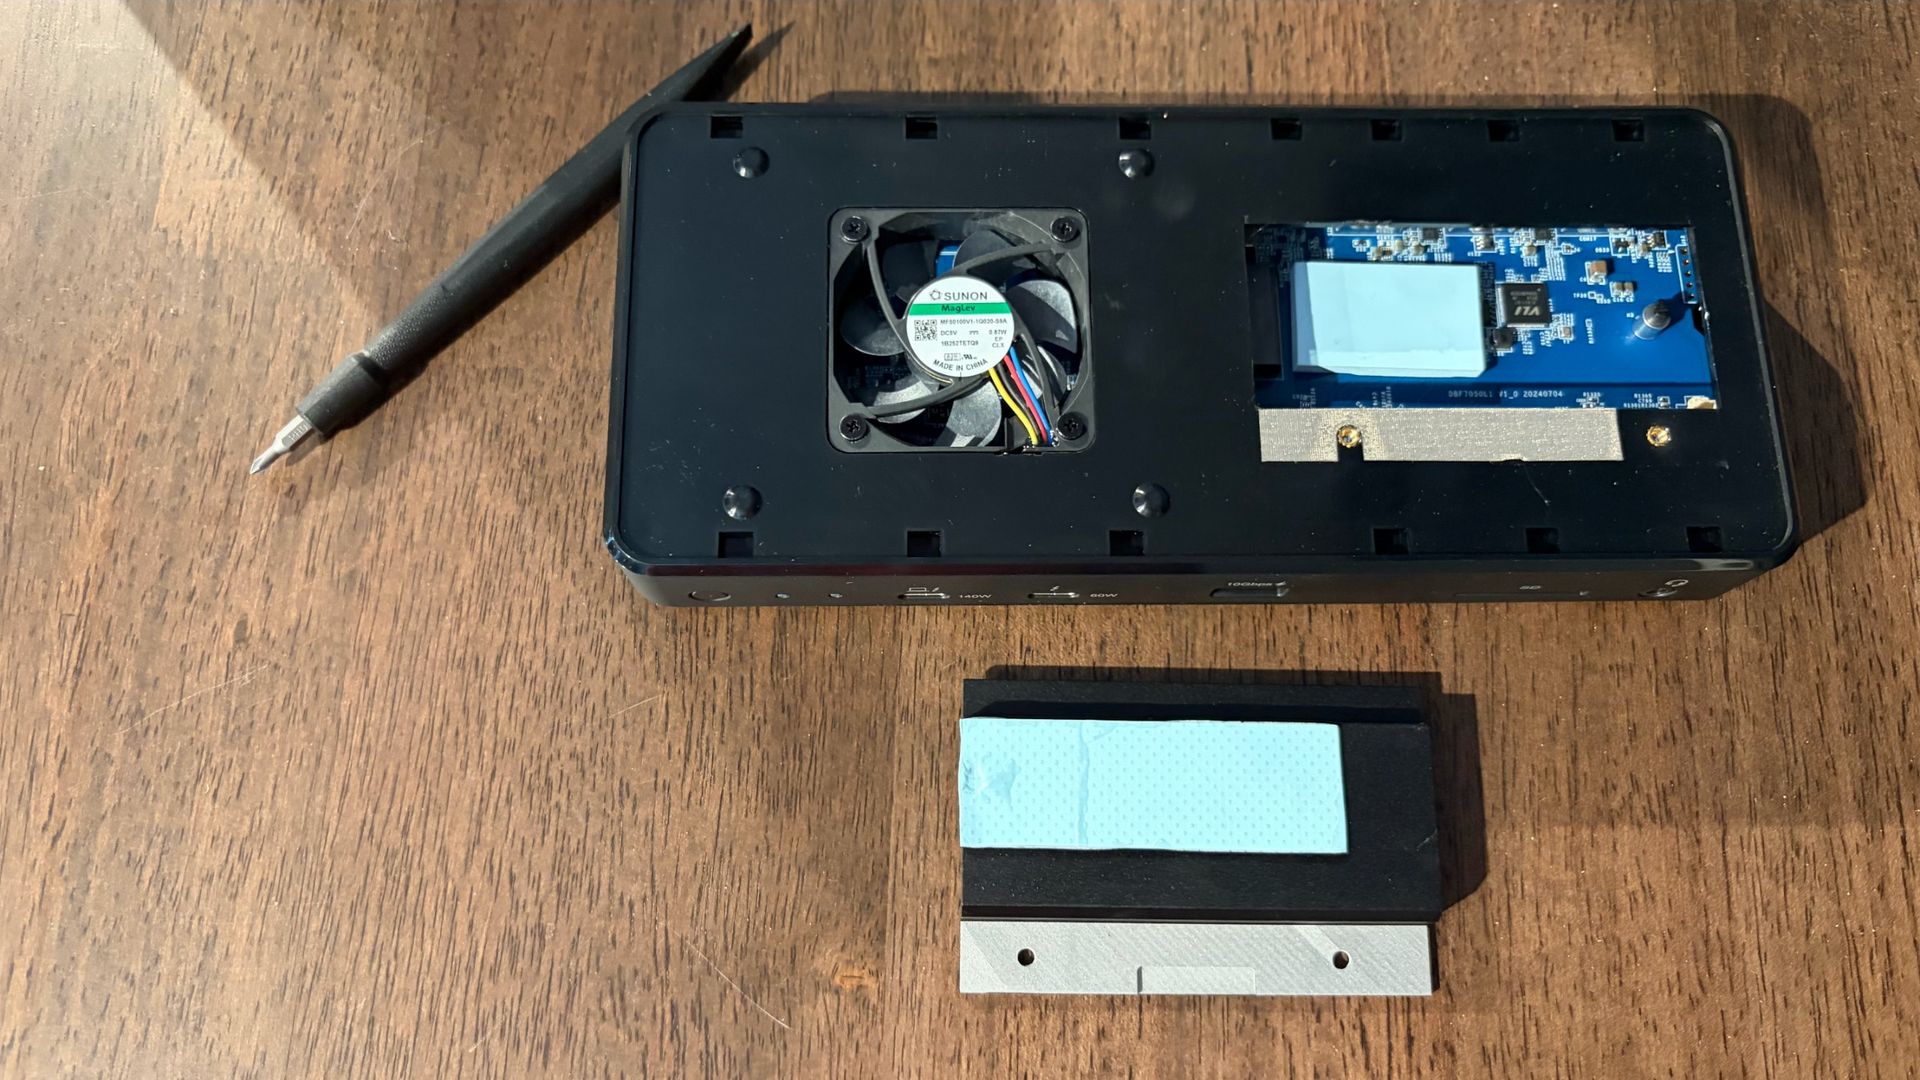
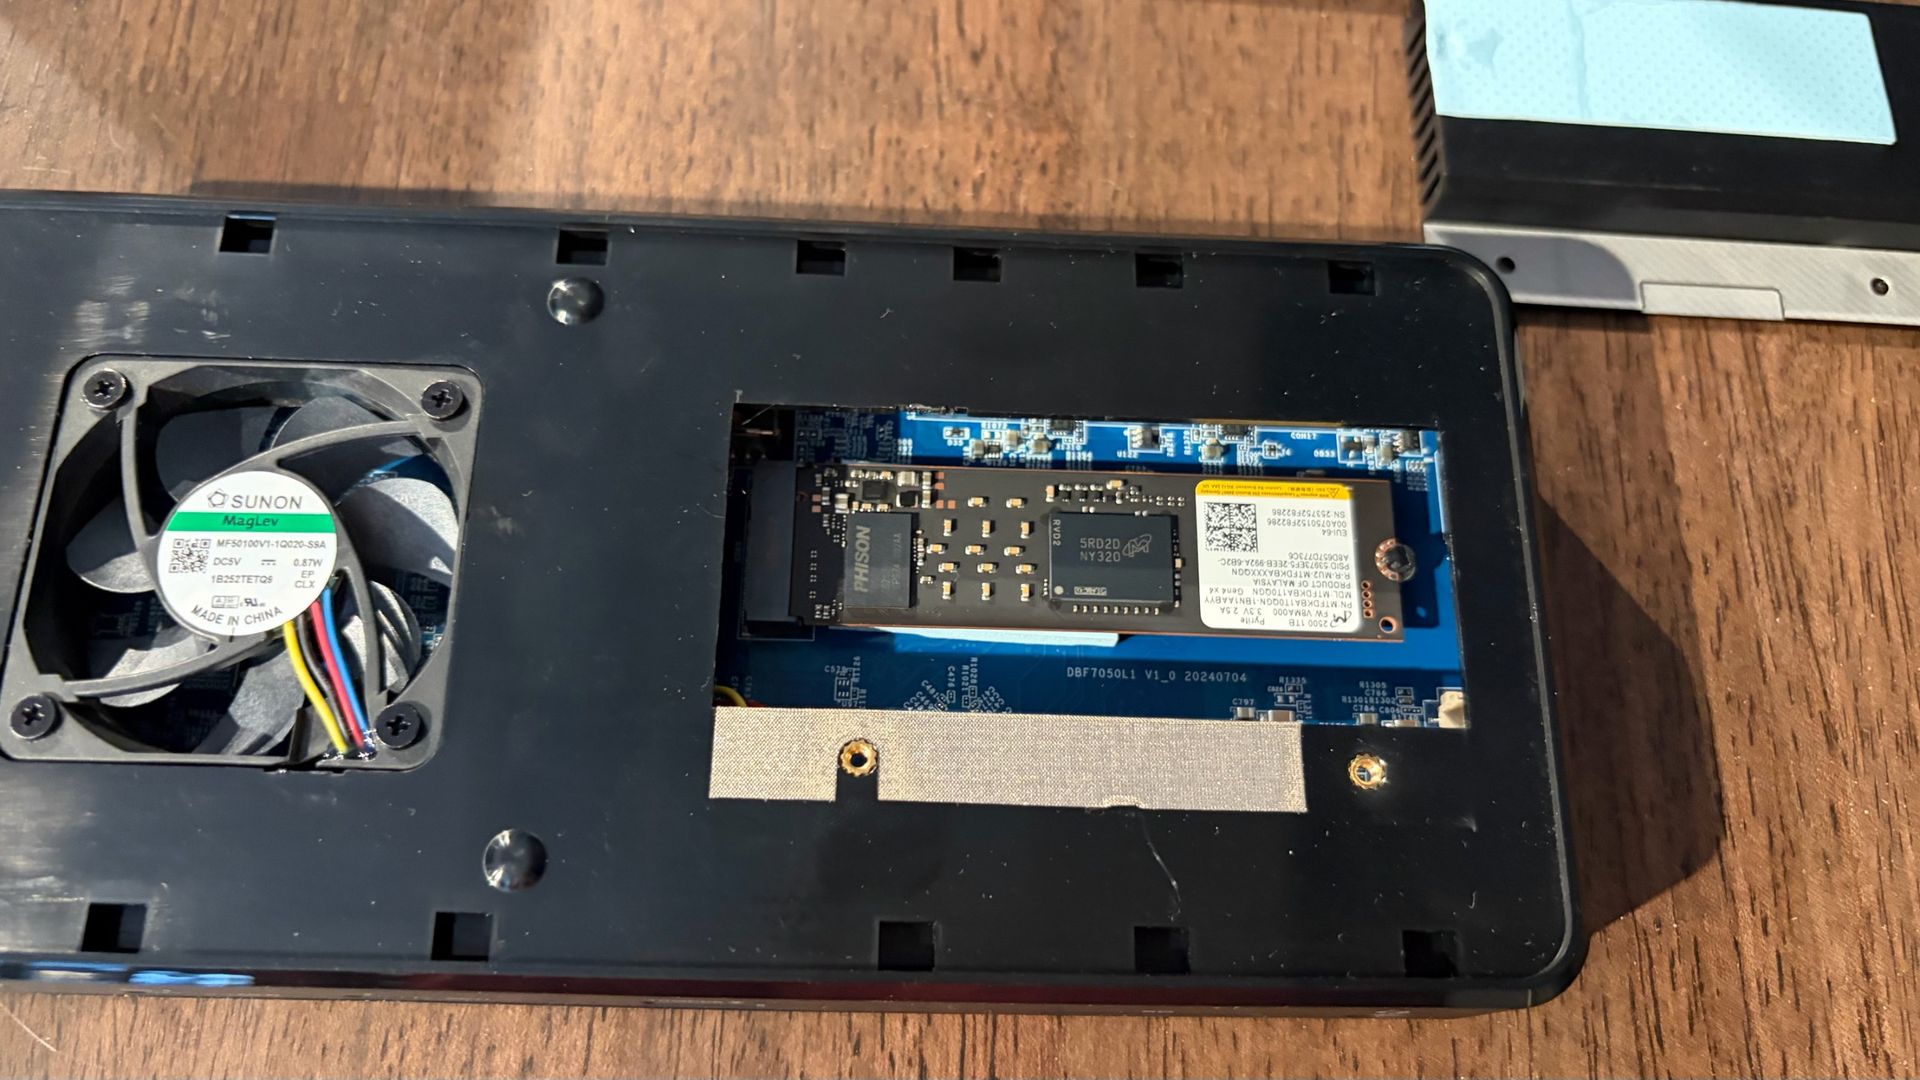
With the top cover removed, you can see an internal cooling fan, which is essential for cooling Thunderbolt 5 docks with internal SSD bays, and a large black aluminum heatsink held in place with two screws. After removing the screws, the heatsink lifts off, revealing an M.2 slot that supports up to an 8TB 2280 SSD. Here’s another nitpick: Instead of using a screw to secure the SSD, VectoTech uses a tiny, spinning plastic retaining clip.
This is a feature that’s handy to have on motherboards when you’re often reaching inside a case, sometimes while the case is vertical. But it makes less sense in a small dock – especially when this particular latch is smaller than we’ve seen on other M.2 mounts. It didn’t inspire much confidence that it would hold the SSD in place, at least not compared to traditional screws. That said, VectoTech offers thermal pads that cover both the top and bottom of your SSD.
Tom's HardwareTom's HardwareTom's Hardware
When it comes to ports, the VectoTech V-Core left me scratching my head a bit: There are no native HDMI or DisplayPort ports on the dock. Most Thunderbolt docks include at least one of the two common video ports, so it was disappointing to see this omission here. It’s not the end of the world, however; you can always use an HDMI-to-USB-C or DisplayPort-to-USB-C adapter with the dock (at an additional out-of-pocket cost).
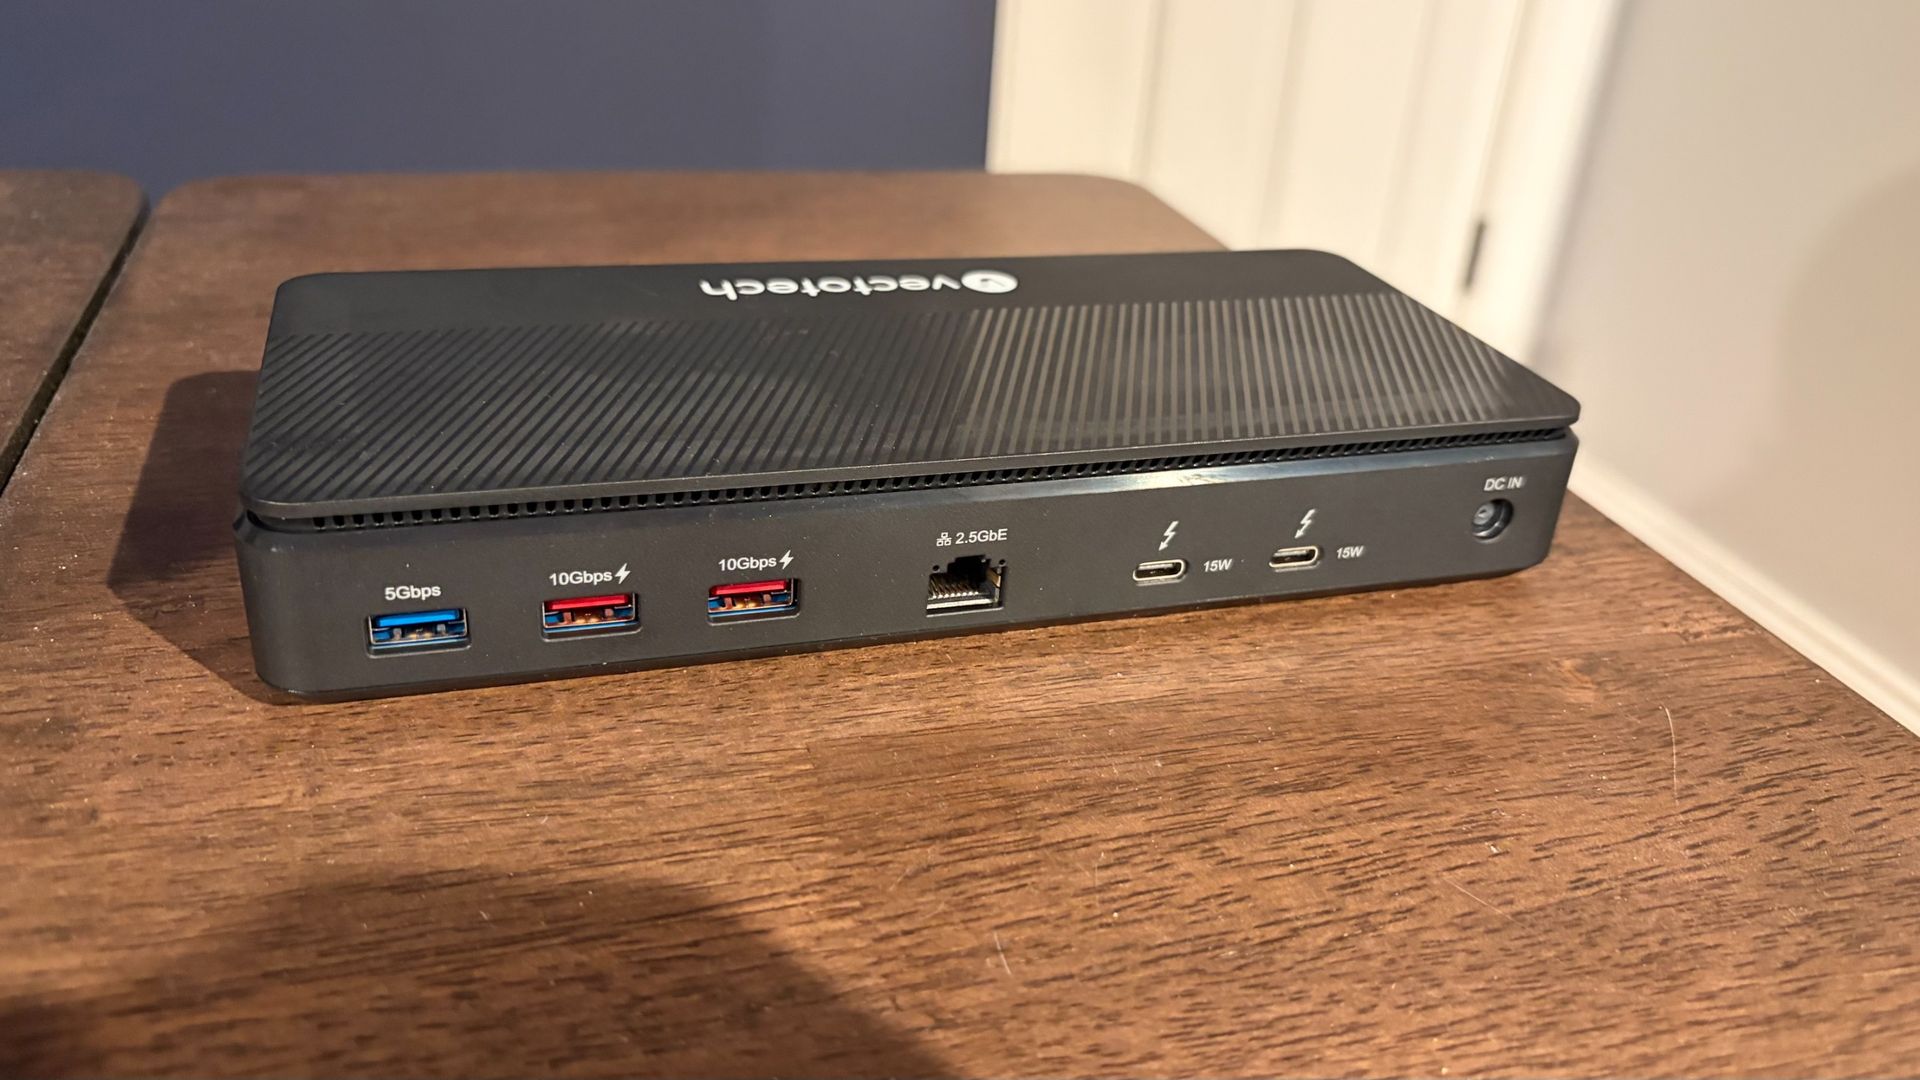
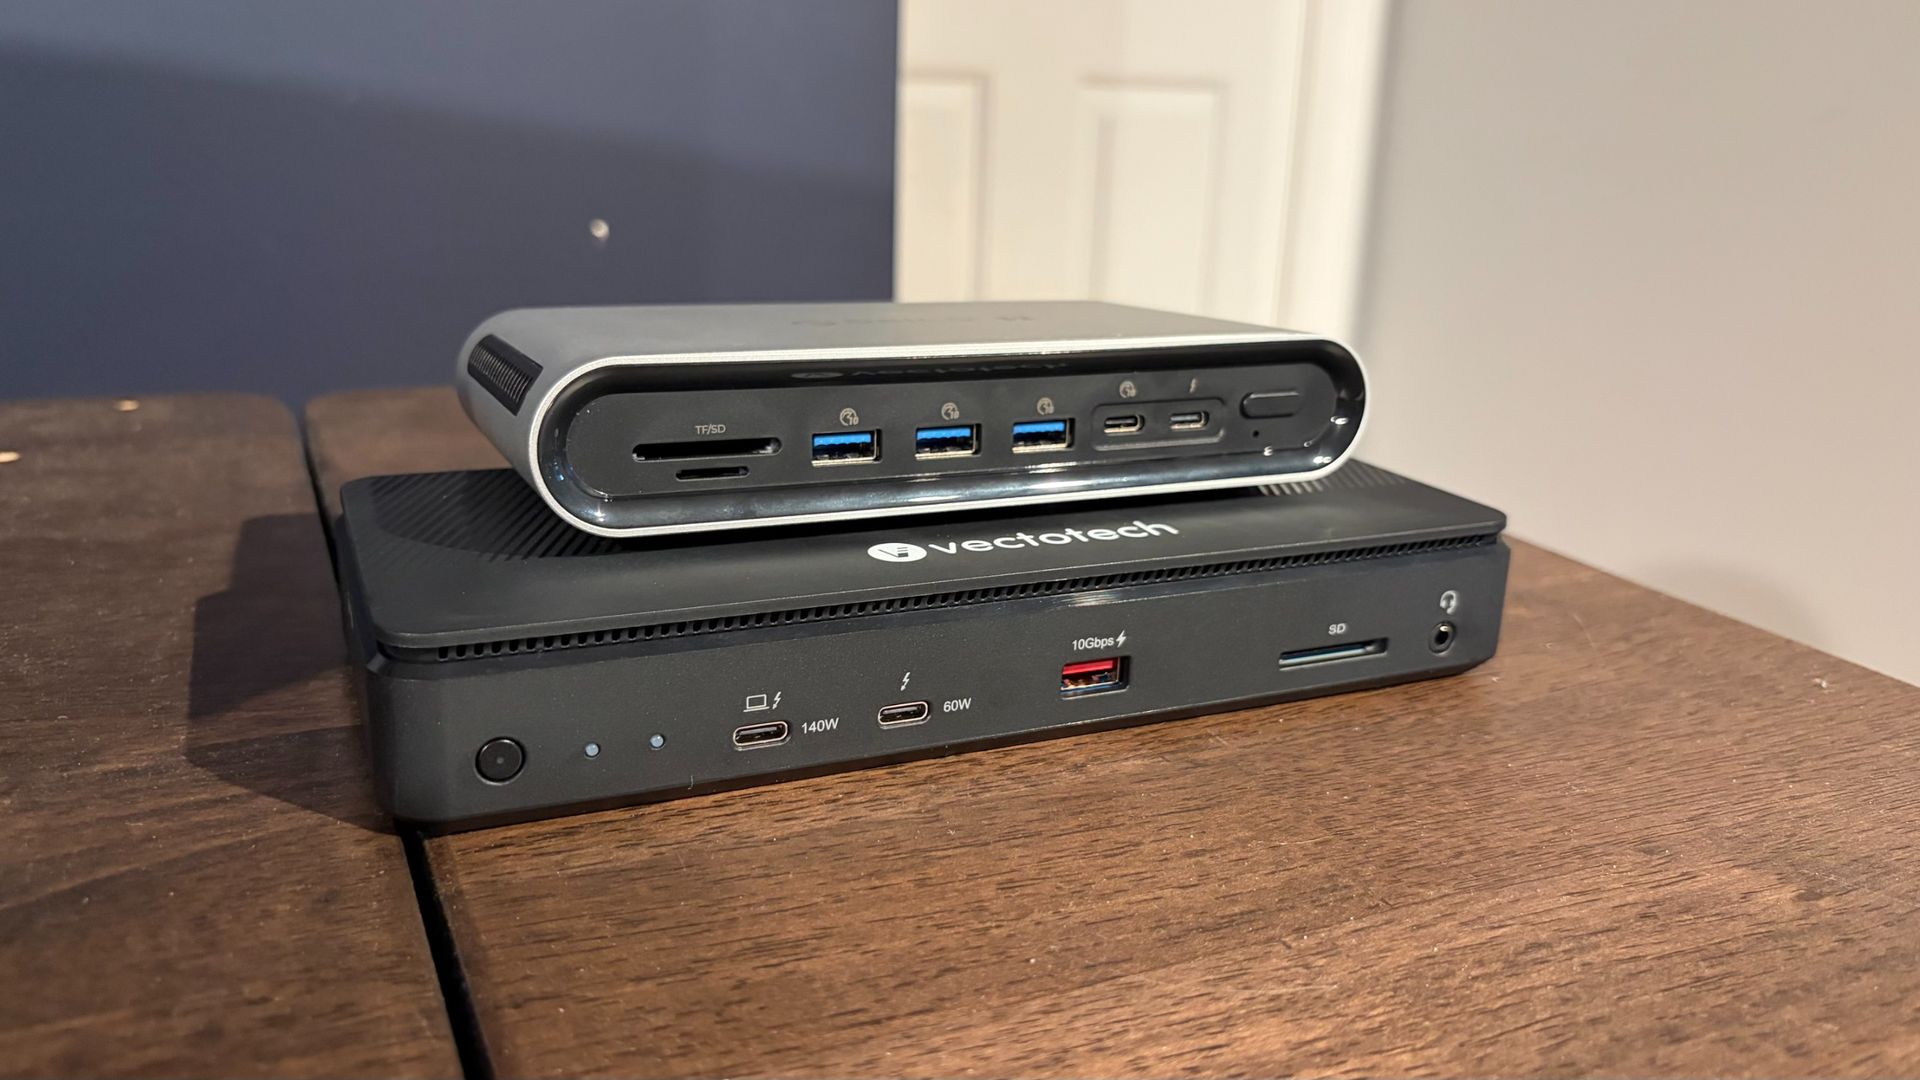
Instead, you’ll find two Thunderbolt 5 ports on the front (one upstream, one downstream), a USB-A port, an SD 4.0 reader (no microSD), and a 3.5 mm headphone jack. Moving to the back, there are three additional USB-A ports, two downstream Thunderbolt 5 ports, and a 2.5 GbE port.
Orico TB5
Design of the Orico TB5 Thunderbolt 5 Desktop Workstation
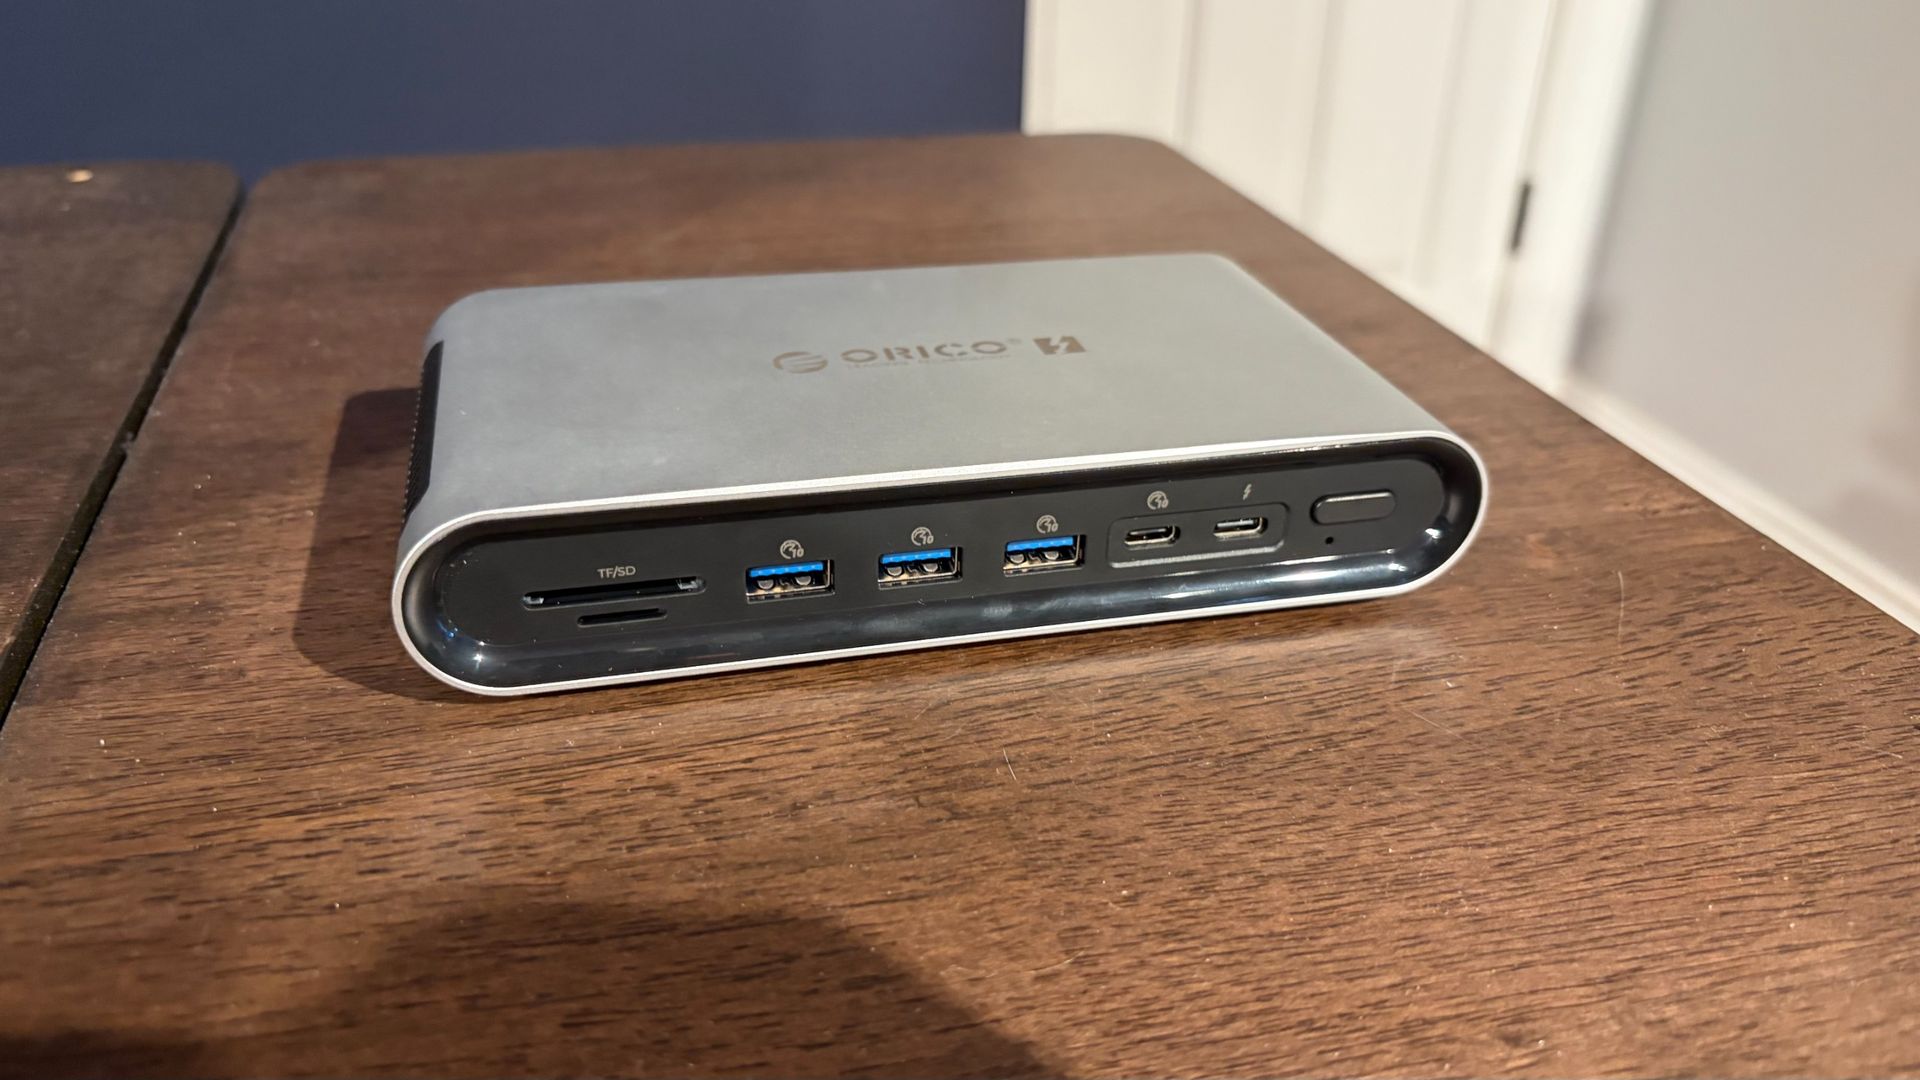
Unlike the V-Core, the Orico TB5 has a chassis primarily constructed of a single piece of thick aluminum. The outer chassis has an oblong shape, with ventilation cutouts on the right and left sides.
Tom's HardwareTom's Hardware
The front and rear fascias are plastic, and where you’ll find the assortment of ports.
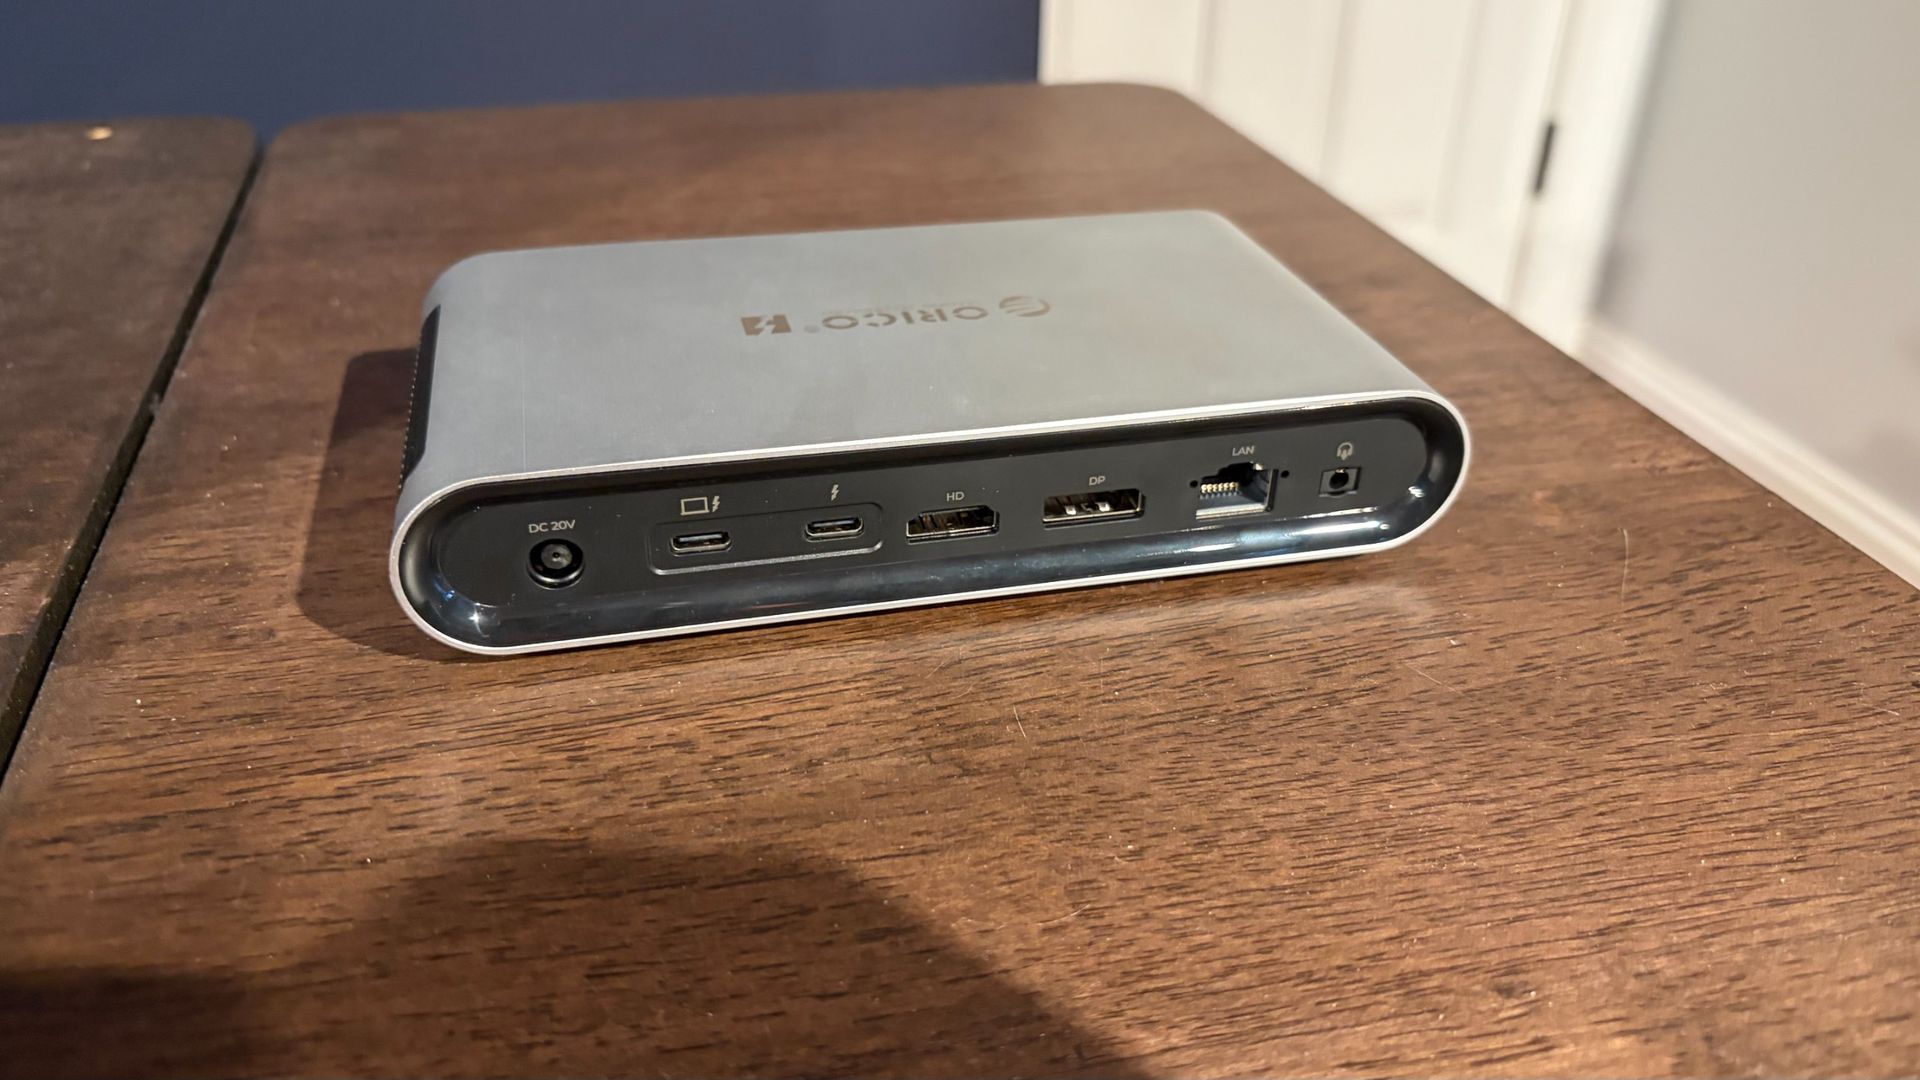
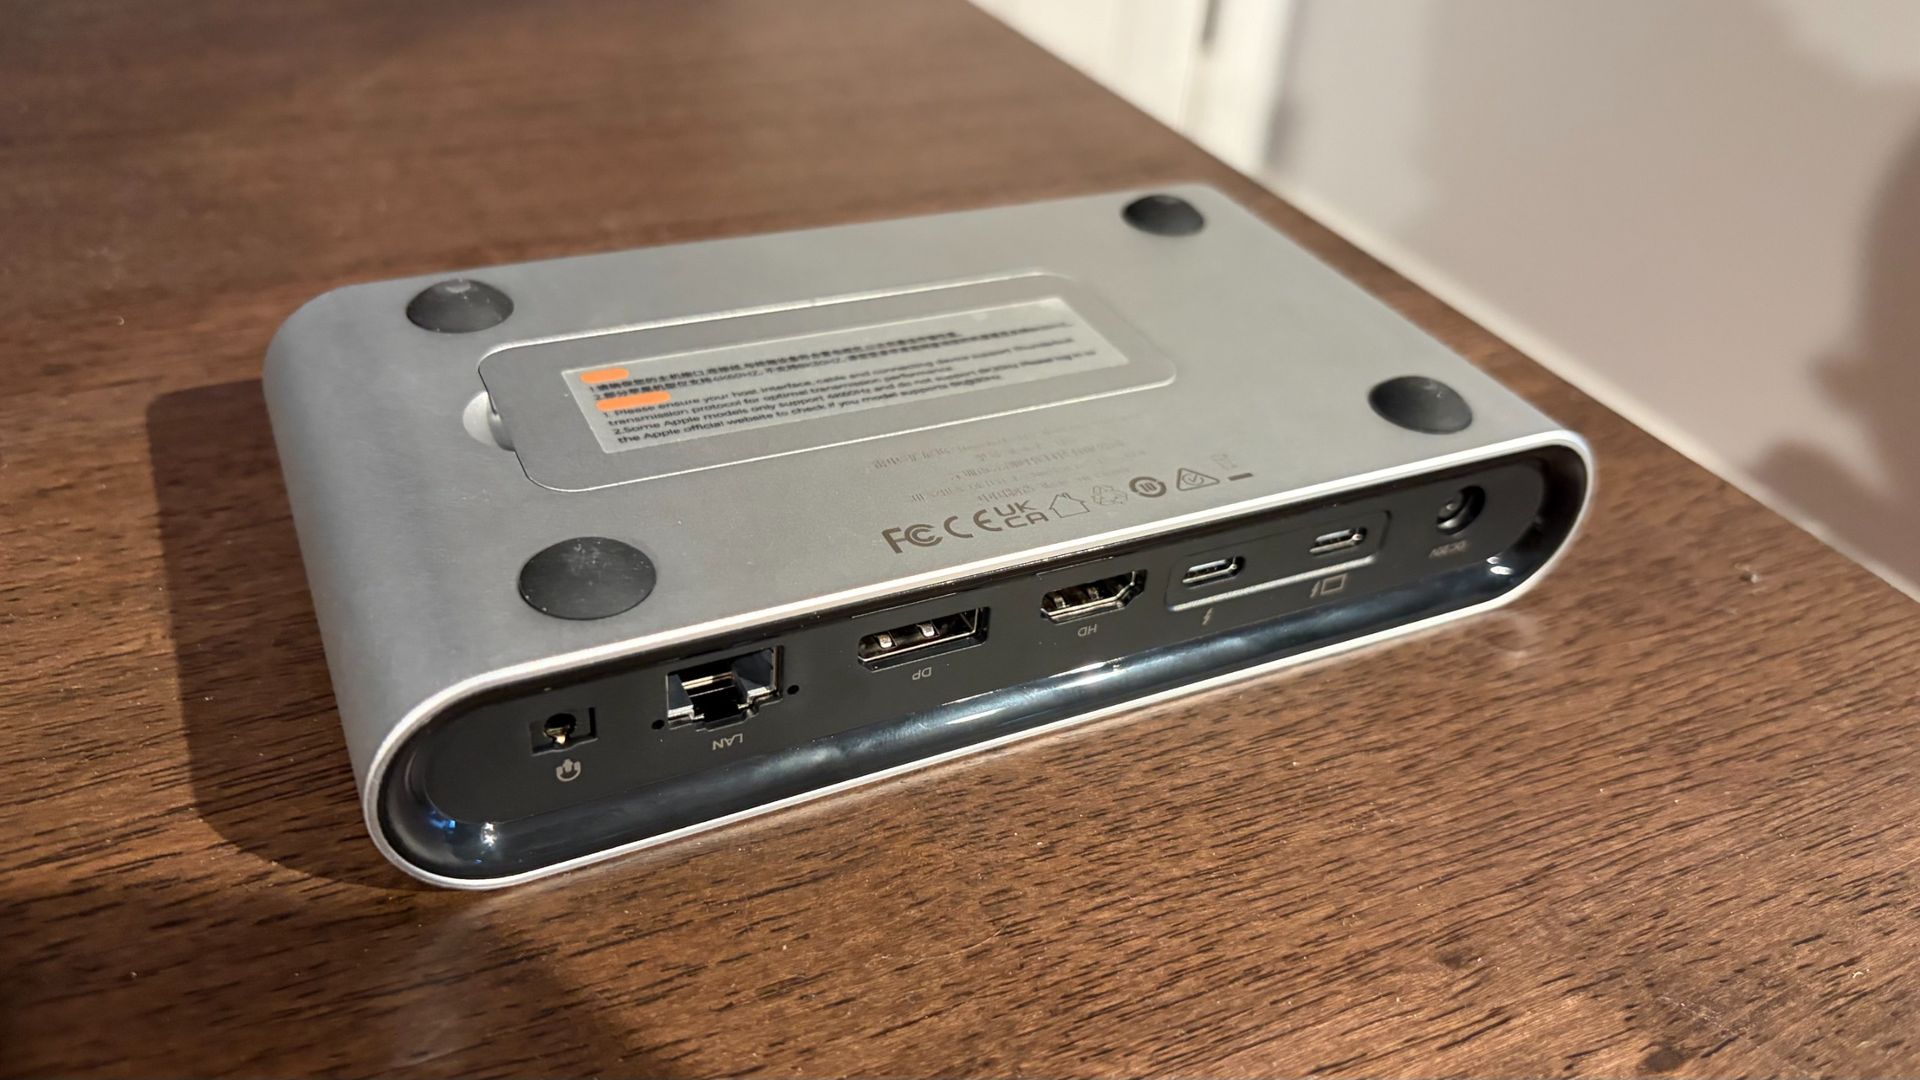
Up front, you’ll find an SD 4.0 slot, a microSD 4.0 slot, three USB-A ports (10 Gbps), one USB-C port (also 10 Gbps), and one Thunderbolt 5 downstream port. On the back, there’s one Thunderbolt 5 upstream port, one Thunderbolt 5 downstream port, one USB-C port, one DisplayPort, one HDMI port, a 2.5 GbE port, and a 3.5mm audio combo jack.
Tom's HardwareTom's Hardware
I was somewhat surprised to see both HDMI and DisplayPort in this relatively compact Thunderbolt 5 dock, but they are welcome additions here. It’s hard to be disappointed with Orico’s choice of ports on the TB5, as there’s a nice balance of USB-A, USB-C, and video outputs.
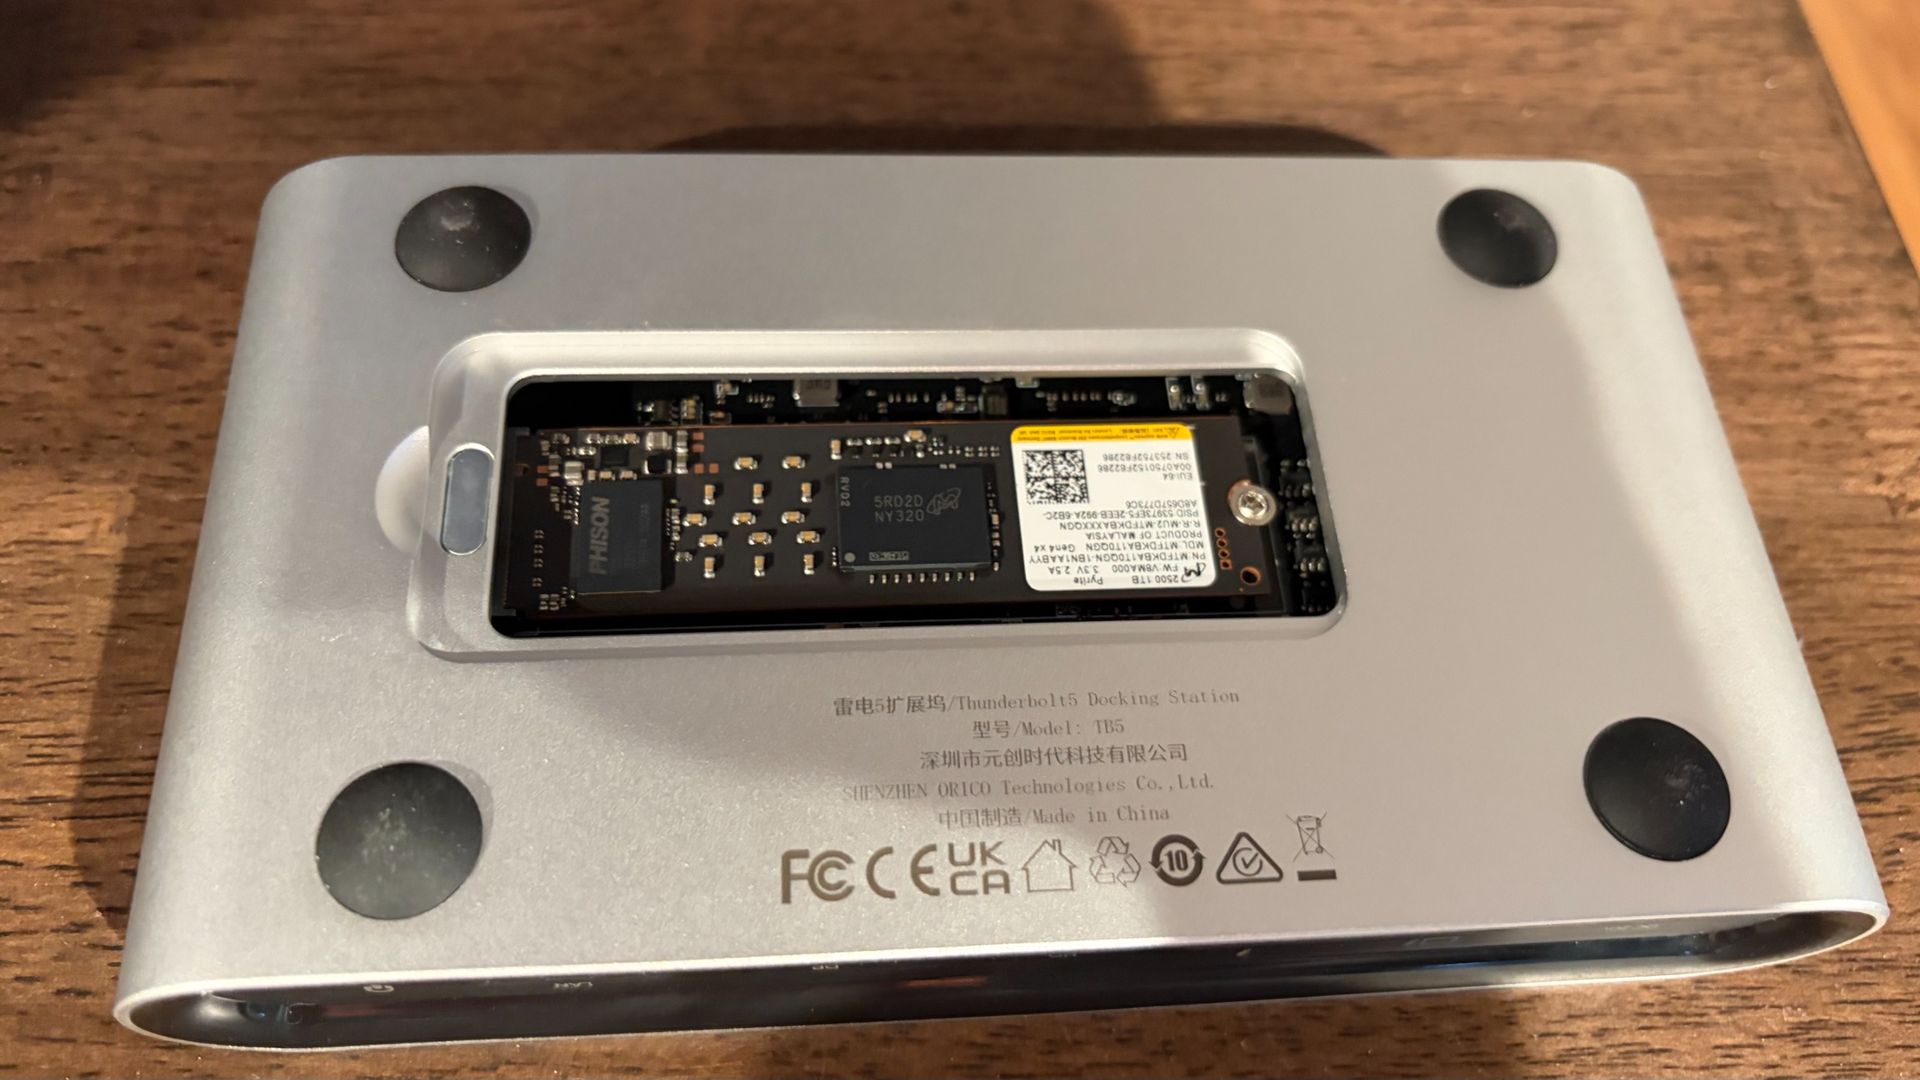
But my absolute favorite design feature of the TB5 is on its underside. Most Thunderbolt docks that feature an internal SSD slot require you to remove a screw to access the M.2 slot. However, the TB5 uses a magnetic cover that is easily removed with a fingernail, yet strong enough to remain attached when moving the dock around. It’s a small touch, but appreciated when swapping SSDs. The M.2 slot can accommodate 2280 form-factor SSDs.
Testing
Testing the VectoTech V-Core and Orico TB5 Thunderbolt 5 Docks
The lack of native DisplayPort and HDMI ports didn’t hamper my testing with the V-Core. My primary desktop rig uses a 49-inch WQHD monitor with native USB-C support, and it connected to the V-Core without issue at its native 240 Hz refresh rate with a Windows 11 PC and a Mac running macOS 27. I also tested the same monitor using the HDMI-to-USB-C and DisplayPort-to-USB-C adapters that I have on hand. Again, I had no issues with this setup.
The dock itself did get very hot; just as hot as the many aluminum-shelled Thunderbolt 5 docks I’ve tested. Although I didn’t experience any slowdowns or errors after extended use, I do wonder about heat soak with the plastic enclosure over time. The internal fan definitely helps, but it’s a concern that lingers at the back of my mind.
I tested the Orico TB5 across USB-C, DisplayPort, and HDMI connections without any performance issues or hiccups. Like the V-Core, the TB5 also includes an internal cooling fan.
Everything that I threw at both docks worked without issue. I hooked up USB mice and keyboards, my iPhone Air, a 1TB USB-C thumb drive, an Orico Thunderbolt 5 SSD dock, multiple portable USB-C monitors, and a DJI Mini 5 Pro drone. I also tested the 2.5 GbE LAN on both docks on my TP-Link Deco BE63 home network.
(Image credit: Tom's Hardware)
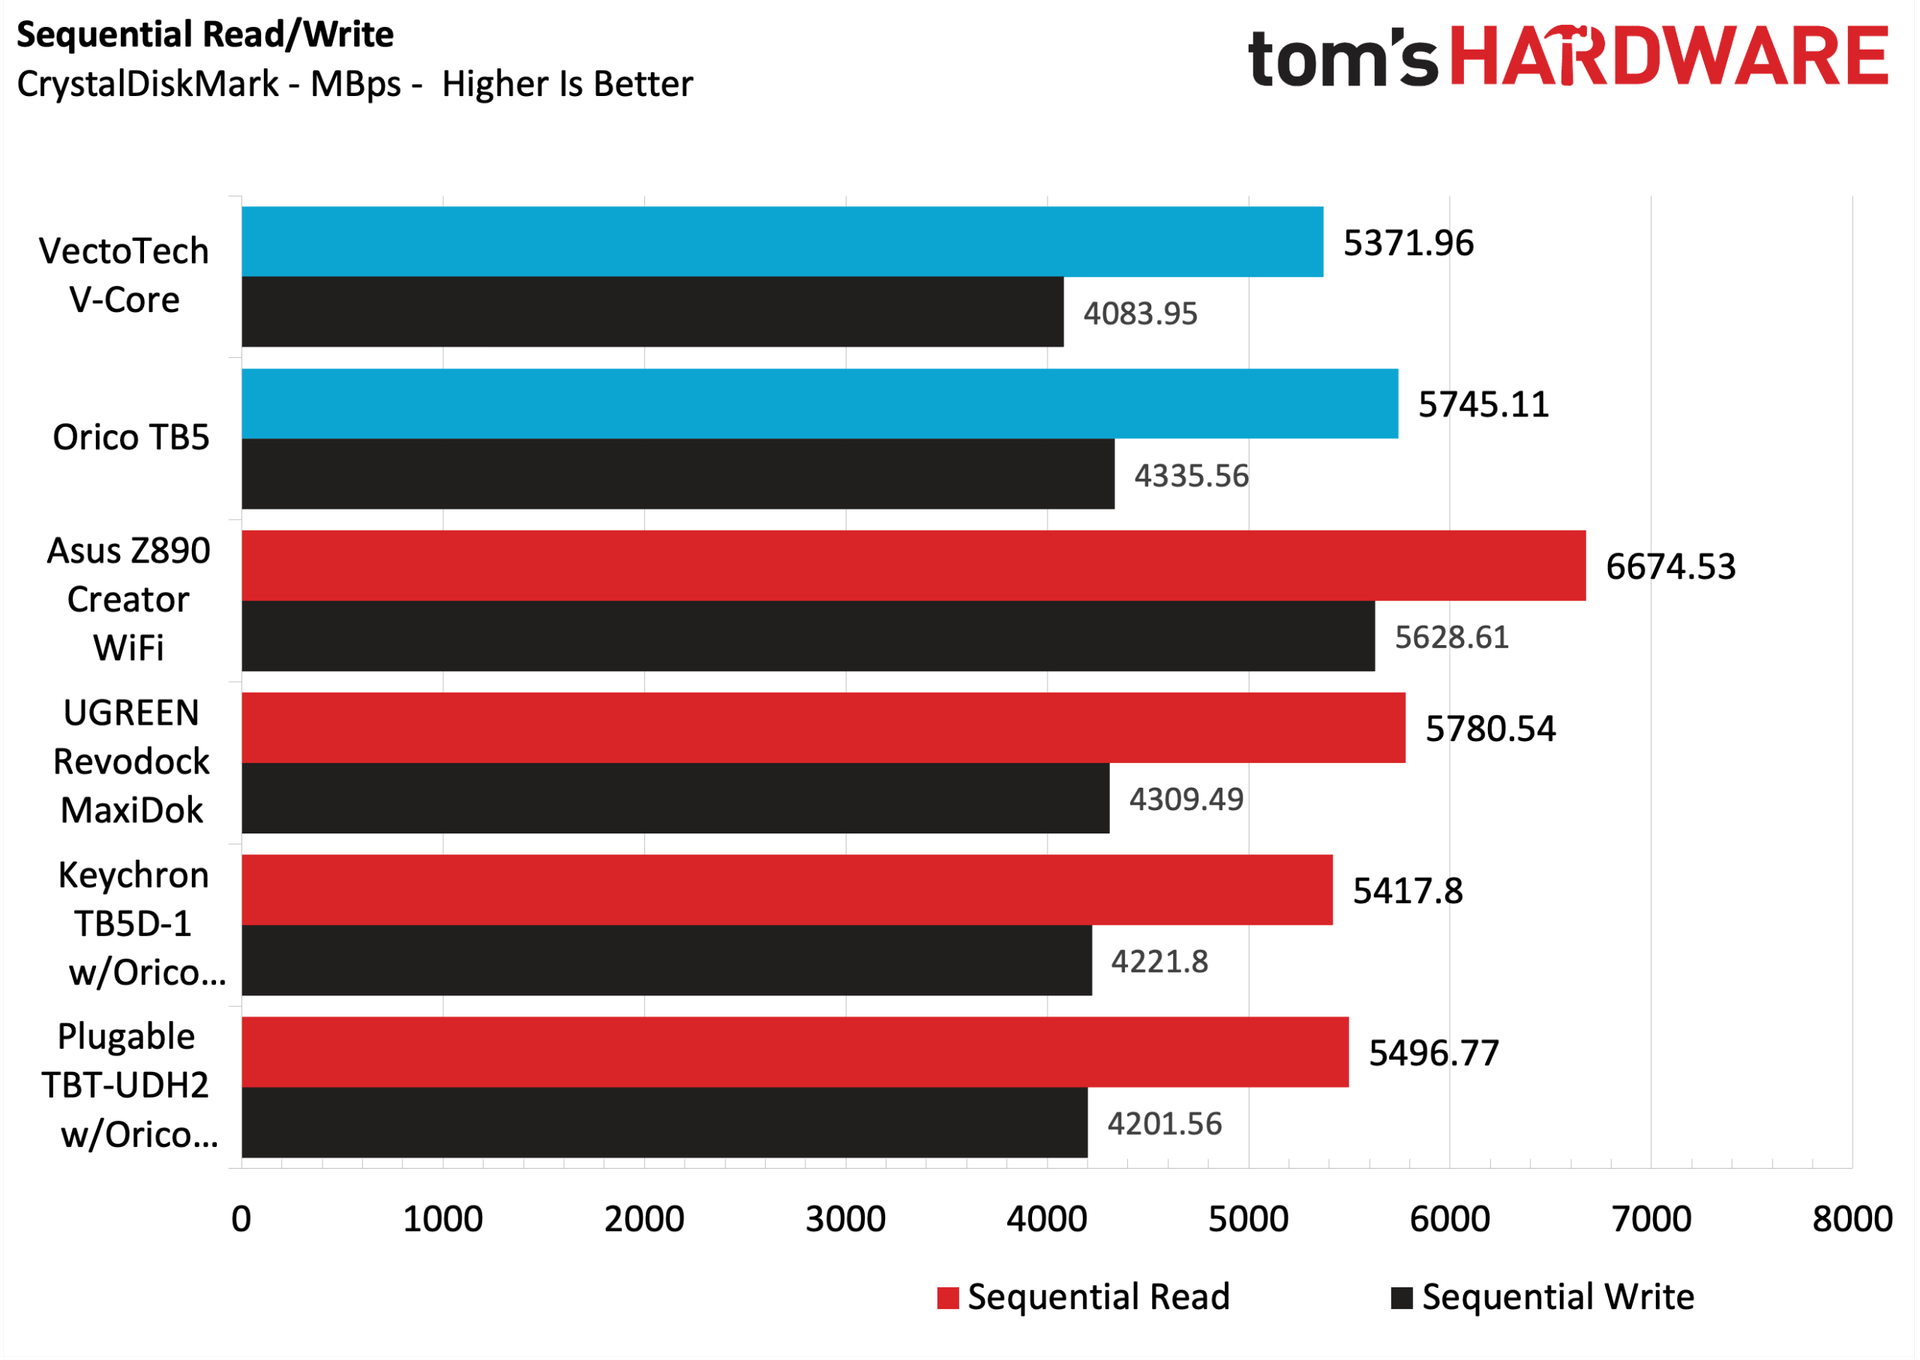
Among recent Thunderbolt 5 docks we've tested, the V-Core was at the back of the pack in both sequential read and write speeds (5,371.96 MBps and 4,083.95 MBps, respectively). Orico’s TB5, on the other hand, landed in second place, behind the UGREEN Revodock MaxiDok in sequential reads (5,745.11 MBps), and led the pack in sequential writes (4,335.56 MBps).
When testing the 2.5 GbE LAN on both docks, both maxed out at around 2,300 Mbps using iPerf3, which is right in line with what we would expect after taking into account TCP/IP packet overhead.
Bottom Line
Bottom Line
The VectoTech V-Core and the Orico TB5 are similarly priced and feature a similar form factor, but Orico’s TB5 is by far the superior entry here. For starters, it just feels like a more premium product, with its aluminum enclosure versus the V-Core's plastic. And accessing the internal M.2 slot on the TB5 is much easier, requiring a simple tug on the magnetic access door, versus prying off the plastic cover on the V-Core, removing two screws, and then prying off the internal heatsink.
In other ways that matter to most people, the TB5 includes native DisplayPort and HDMI connections for your monitors. The V-Core is USB only (necessitating a USB-C adapter for most monitors). And finally, while the V-Core was at the back of the pack in storage performance compared to its peers, the TB5 trended near the front.
Right now, the VectoTech V-Core is priced at $349 on Amazon, versus $399 for the Orico TB5. A $50 premium is certainly enough to consider going with the cheaper option. But more and better ports, faster throughput, and a better, more premium design make the Orico worth paying extra for.
It’s been nearly two years since Apple updated the Mac mini. And for better or worse, things have changed a lot during that time. The last Mac mini with an M4 processor went on sale in early November 2024, with a starting price of $599. The latest Mac mini that we’re testing today starts at $899, which we can directly blame on the rising costs of components due to the voracious demand for everything related to artificial intelligence (AI).
A $300 price hike in less than two years is unprecedented, but it’s a sign of the times, and we have to factor those realities when evaluating any product today. So with that context in mind, we’ll take a look at Apple’s newest Mac mini, which looks very familiar on the outside, but has undergone some internal hardware upgrades, to deliver some significant performance improvements over its predecessor.
Design of the Apple Mac mini (M6)
The Mac mini hasn’t changed on the design front, and that’s mostly a good thing. I’m always impressed with not only the minimalist style of this small form-factor computer, but also its tiny size. It has a 5-inch x 5-inch footprint, while standing just 2 inches tall. My only gripe is the power button, which remains stubbornly on the bottom of the system (back left corner). You’ll need to lift the system any time you want to turn it on (or force it to shut down in the event of a crash), and you’ll need to double-tap the power button when setting up Touch ID with an Apple Magic Keyboard for the first time. However, this is just a minor annoyance, as interacting with the power button on a modern Mac is a rarity.
Despite its trim dimensions, you do get a fairly decent number of ports on the exterior of the Mac mini. However, let’s get this out of the way first: Apple doesn’t give you any USB-A ports on the Mac mini, so keep that in mind before purchasing. So, if you have USB-A devices around, you’ll either need to keep some cheap USB-A to USB-C adapters on hand, or invest in a USB-C or Thunderbolt dock for connecting legacy devices.
Instead, our Mac mini review unit features two USB-C ports (10 Gbps) and a 3.5 mm headphone jack up front, along with three Thunderbolt 4 ports on the rear (M5 Pro systems swap the Thunderbolt 4 ports for Thunderbolt 5). You’ll also find a 2.5 GbE port (up from 1 GbE), an HDMI port, and the power port on the back. We should note that while our review unit was specced with the 2.5 GbE LAN, you can individually option a 10 GbE port for $100 extra. A 10 GbE USB-C adapter would set you back around $100, so Apple’s upgrade is surprisingly reasonably priced, and you don’t lose a port in the process.
When it comes to wireless connectivity, the Mac mini uses Apple’s new in-house N1 wireless chip instead of relying on a third-party design. It provides tri-band Wi-Fi 7 and Bluetooth 6 support, which is an upgrade from the Wi-Fi 6E and Bluetooth 5.3 on the previous generation.
One thing to keep in mind with the Mac mini is that what you see is what you get when you purchase one. There are no internal upgrades available for the system once you’ve purchased it, so choose wisely before you click the buy button. Base systems come with an M6 chip (12-core CPU, 12-core GPU), 16GB of RAM, and a 256GB SSD. Our review unit features the M6 chip, 24GB of RAM, and a 512GB SSD. If you want to add storage post-purchase, we’d suggest taking a look at one of the best external SSDs.
Apple Mac mini (M6) Specifications
Processor
Apple M6 (2 super cores, 4 performance cores, 6 efficiency cores)
Graphics
12-core GPU
Memory
24GB LPDDR5X unified memory
Storage
512GB SSD
Networking
2.5 Gigabit Ethernet, Wi-Fi 7, Bluetooth 6
Front Ports
2x USB Type-C (10GB/s), 3.5 mm headphone jack
Rear Ports
3x Thunderbolt 4 ports (USB-C), HDMI, Ethernet
Power Supply
Internal, 155W
Operating System
macOS 27 Golden Gate
Dimensions
5 x 5 x 2 inches
Price as Configured
$1,399
Productivity Performance on the Apple Mac mini (M6)
Although the Mac mini is available with a more potent M5 Pro processor, our review unit came with the base M6 processor (12 CPU cores, 12 GPU cores). It also incorporates 24GB of LPDDR5X memory and a 512GB SSD.
This is the first system we’ve tested with the new 2-nanometer M6 processor. So, we were eager to see how it would perform against not only the M4 Pro in the previous Mac mini, but also the M5, which can be found in the current-generation MacBook Air and base MacBook Pro.
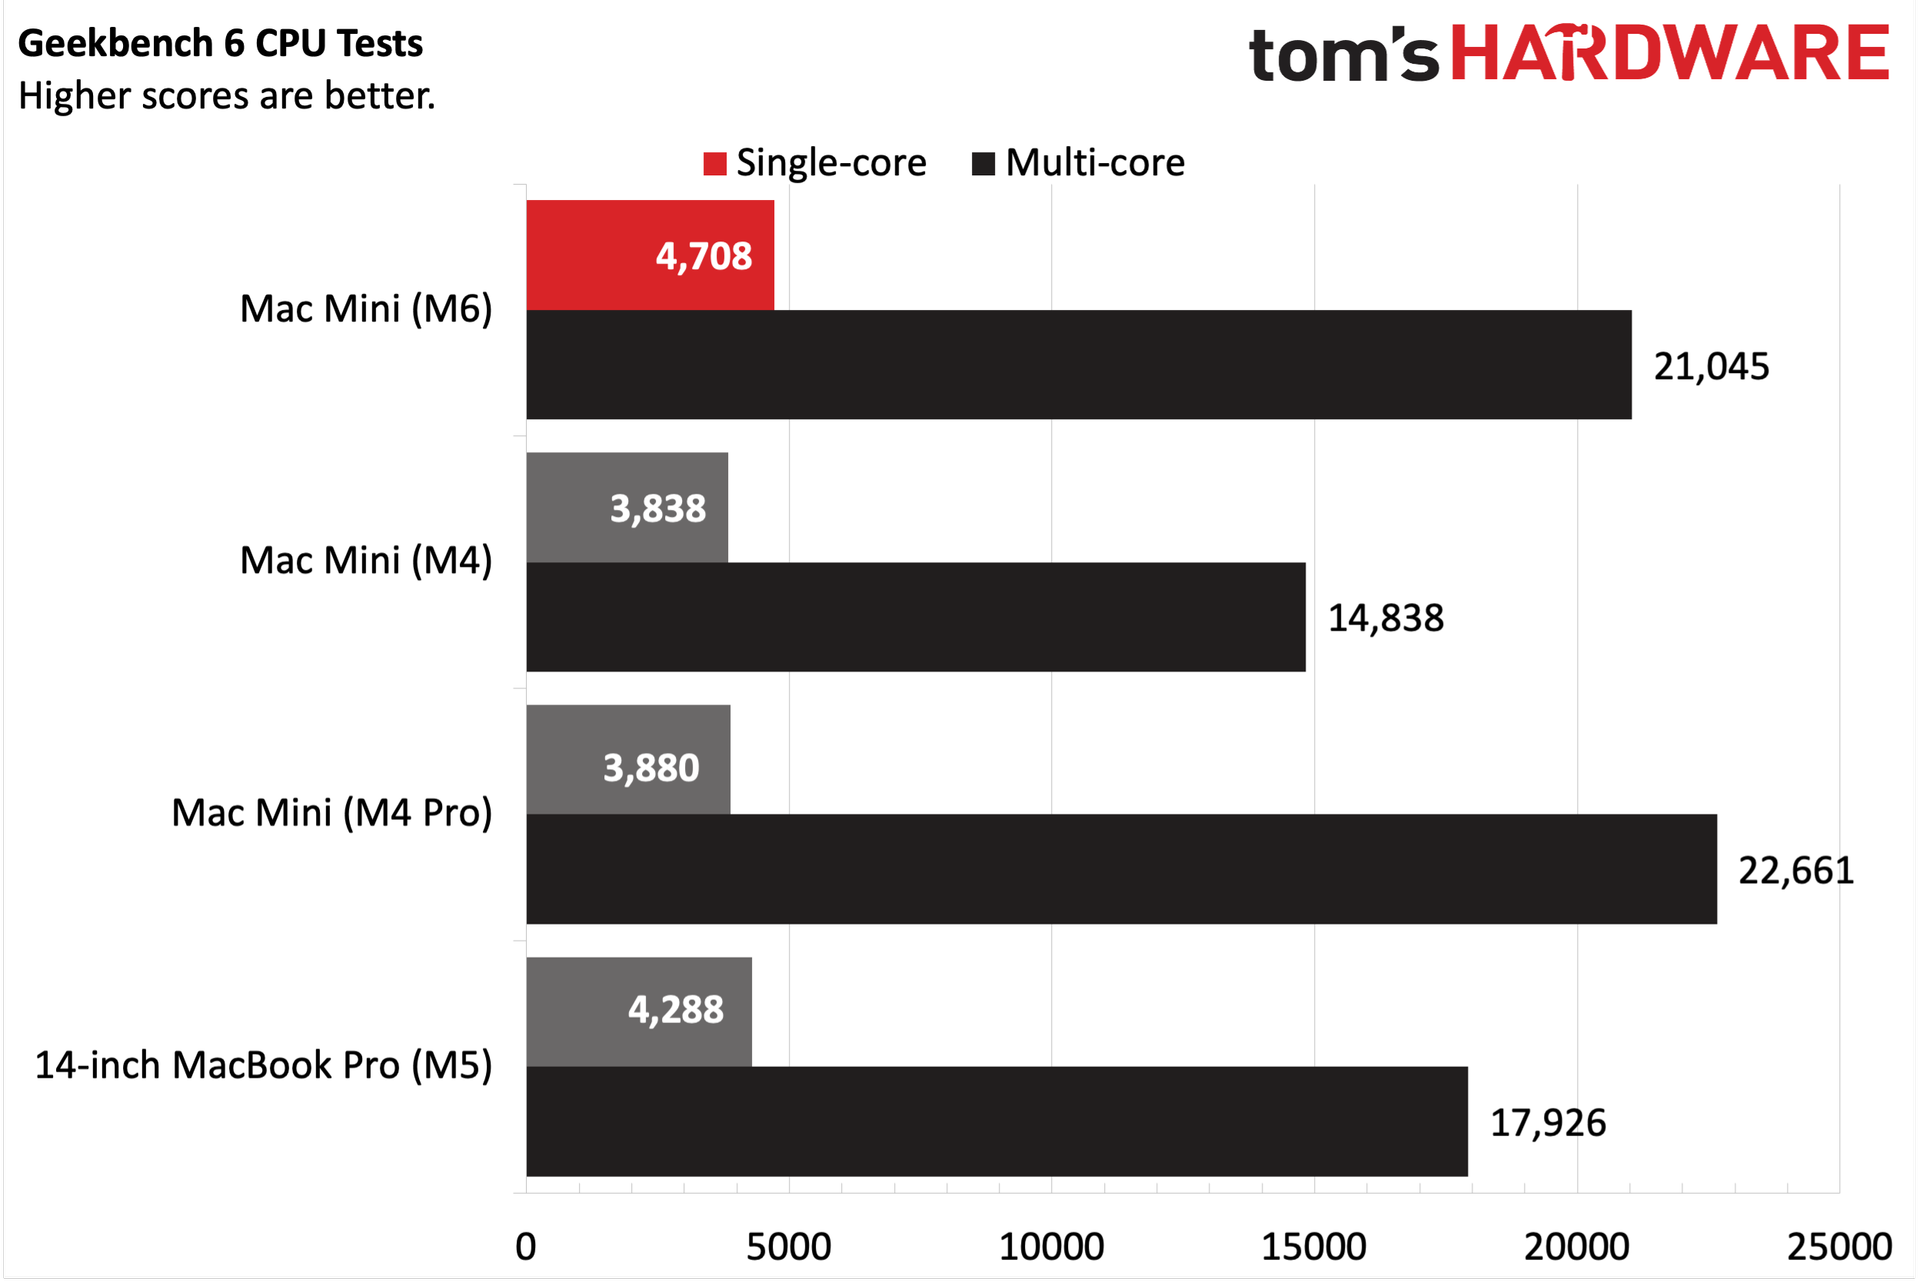
The M6 chip in the Mac mini had no trouble dispatching the M4, M4 Pro, and M5-equipped systems in the Geekbench synthetic CPU benchmark. In fact, it was 21 percent faster than the last M4 Pro Mac Mini in the single-core test. It also completely obliterated the M4 (10-core CPU, 10-core GPU) version of the Mac mini. The advantage versus the M5 system was lessened, but it was still a clear victory for the M6. The M6 actually slightly trailed the M4 Pro Mac mini (21,045 versus 22,661) in the multi-core test, which wasn’t too surprising given that the 12-core M6 was going up against a 16-core M4 Pro. But it was still a strong showing for the M6, given the architectural improvements that allowed it to get that close.
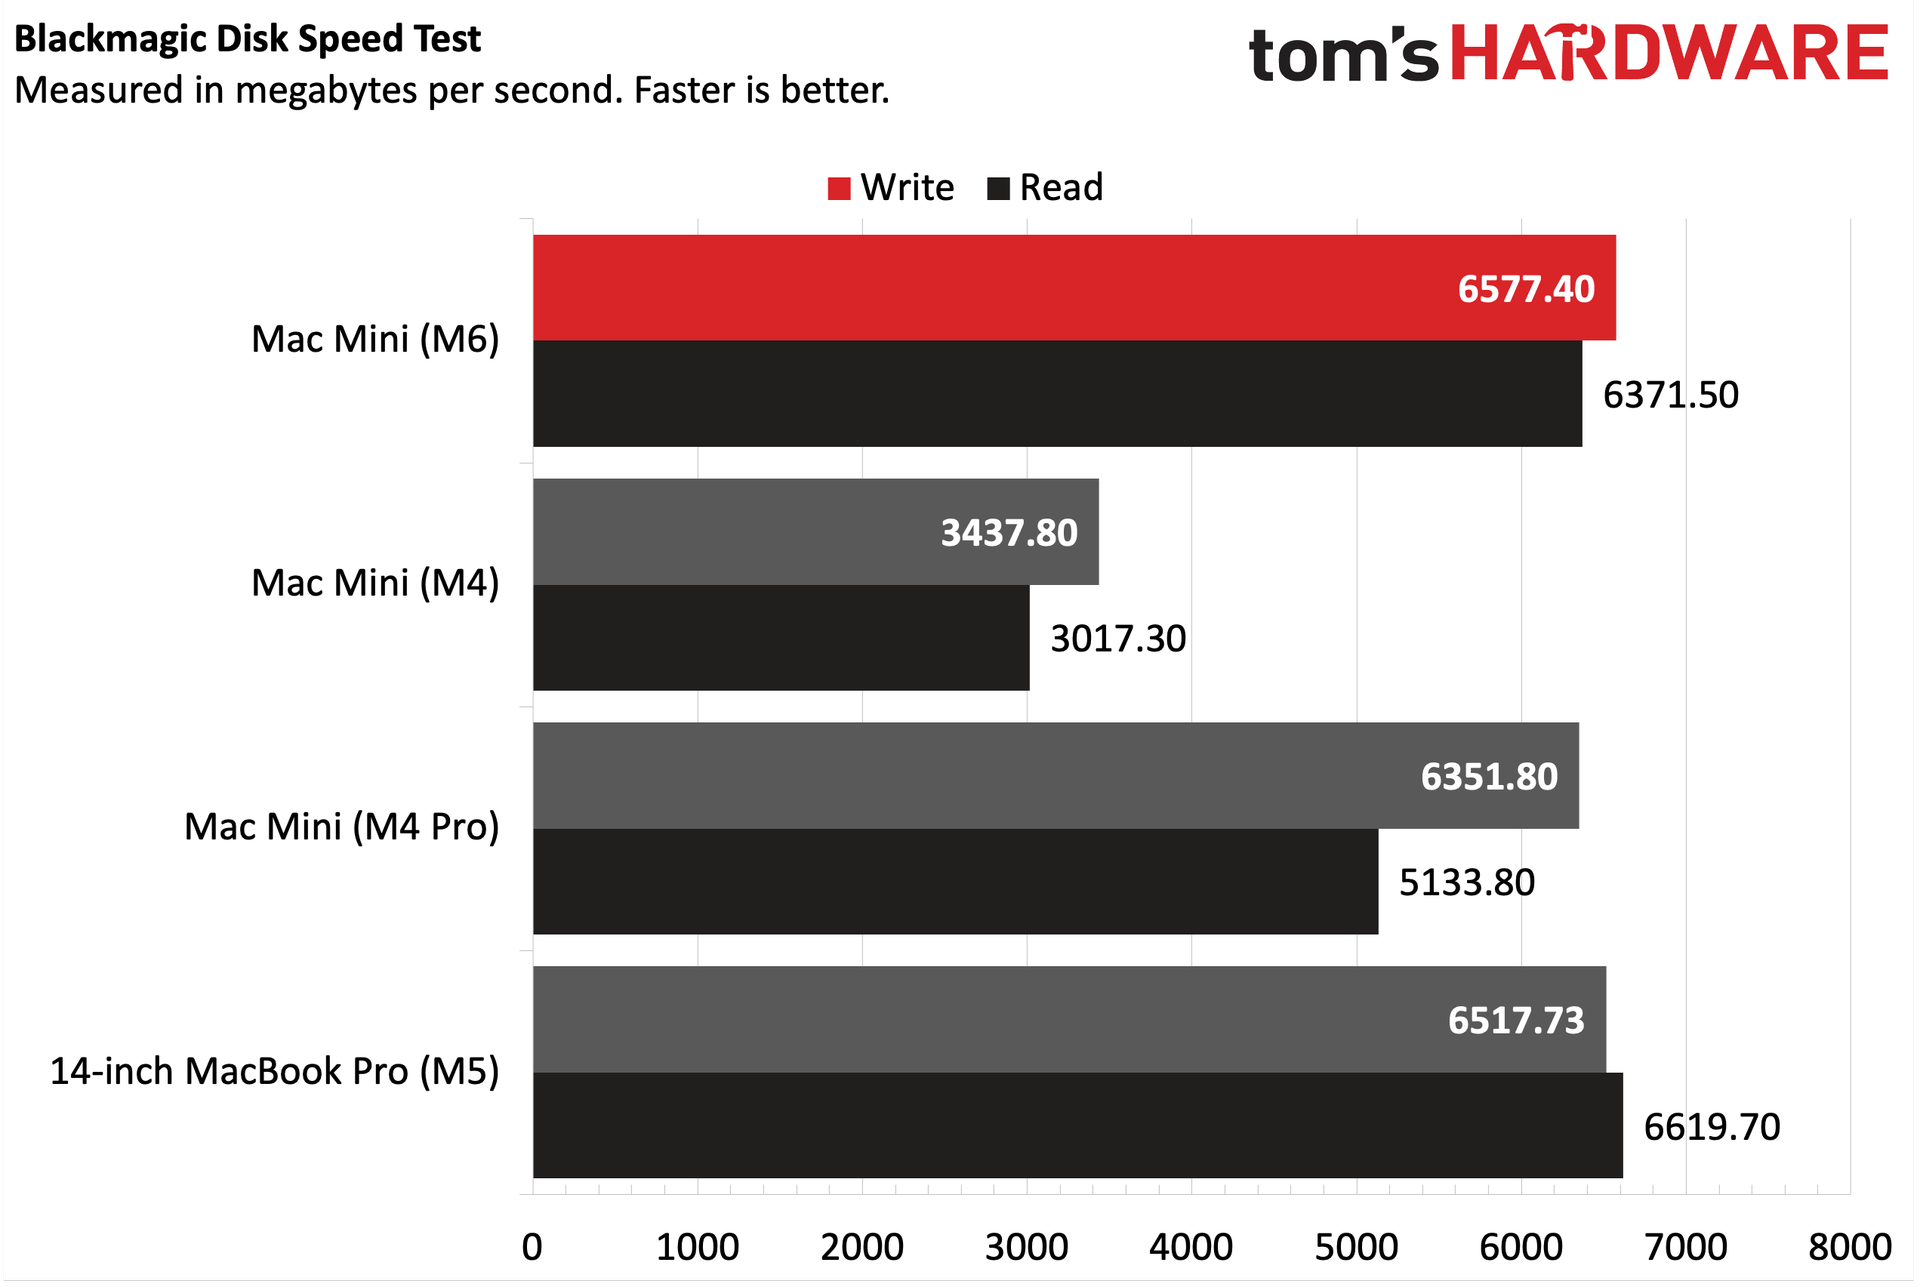
We had some trouble obtaining consistent performance from our usual 25GB file transfer test, so we fell back to the Blackmagic Disk Speed Test for benchmarking the 512GB SSD. Needless to say, it presented a marked improvement over the preceding M4 Mac mini.
Storage performance was comparable to the M5 MacBook Pro on sequential writes, but slightly behind for sequential reads. It also slightly outperformed the M4 Pro Mac mini in writes, but was over 1,000 MBps ahead in reads. However, the M6 Mac Mini nearly doubled the write performance and more than doubled the read performance of the M4 Mac mini.
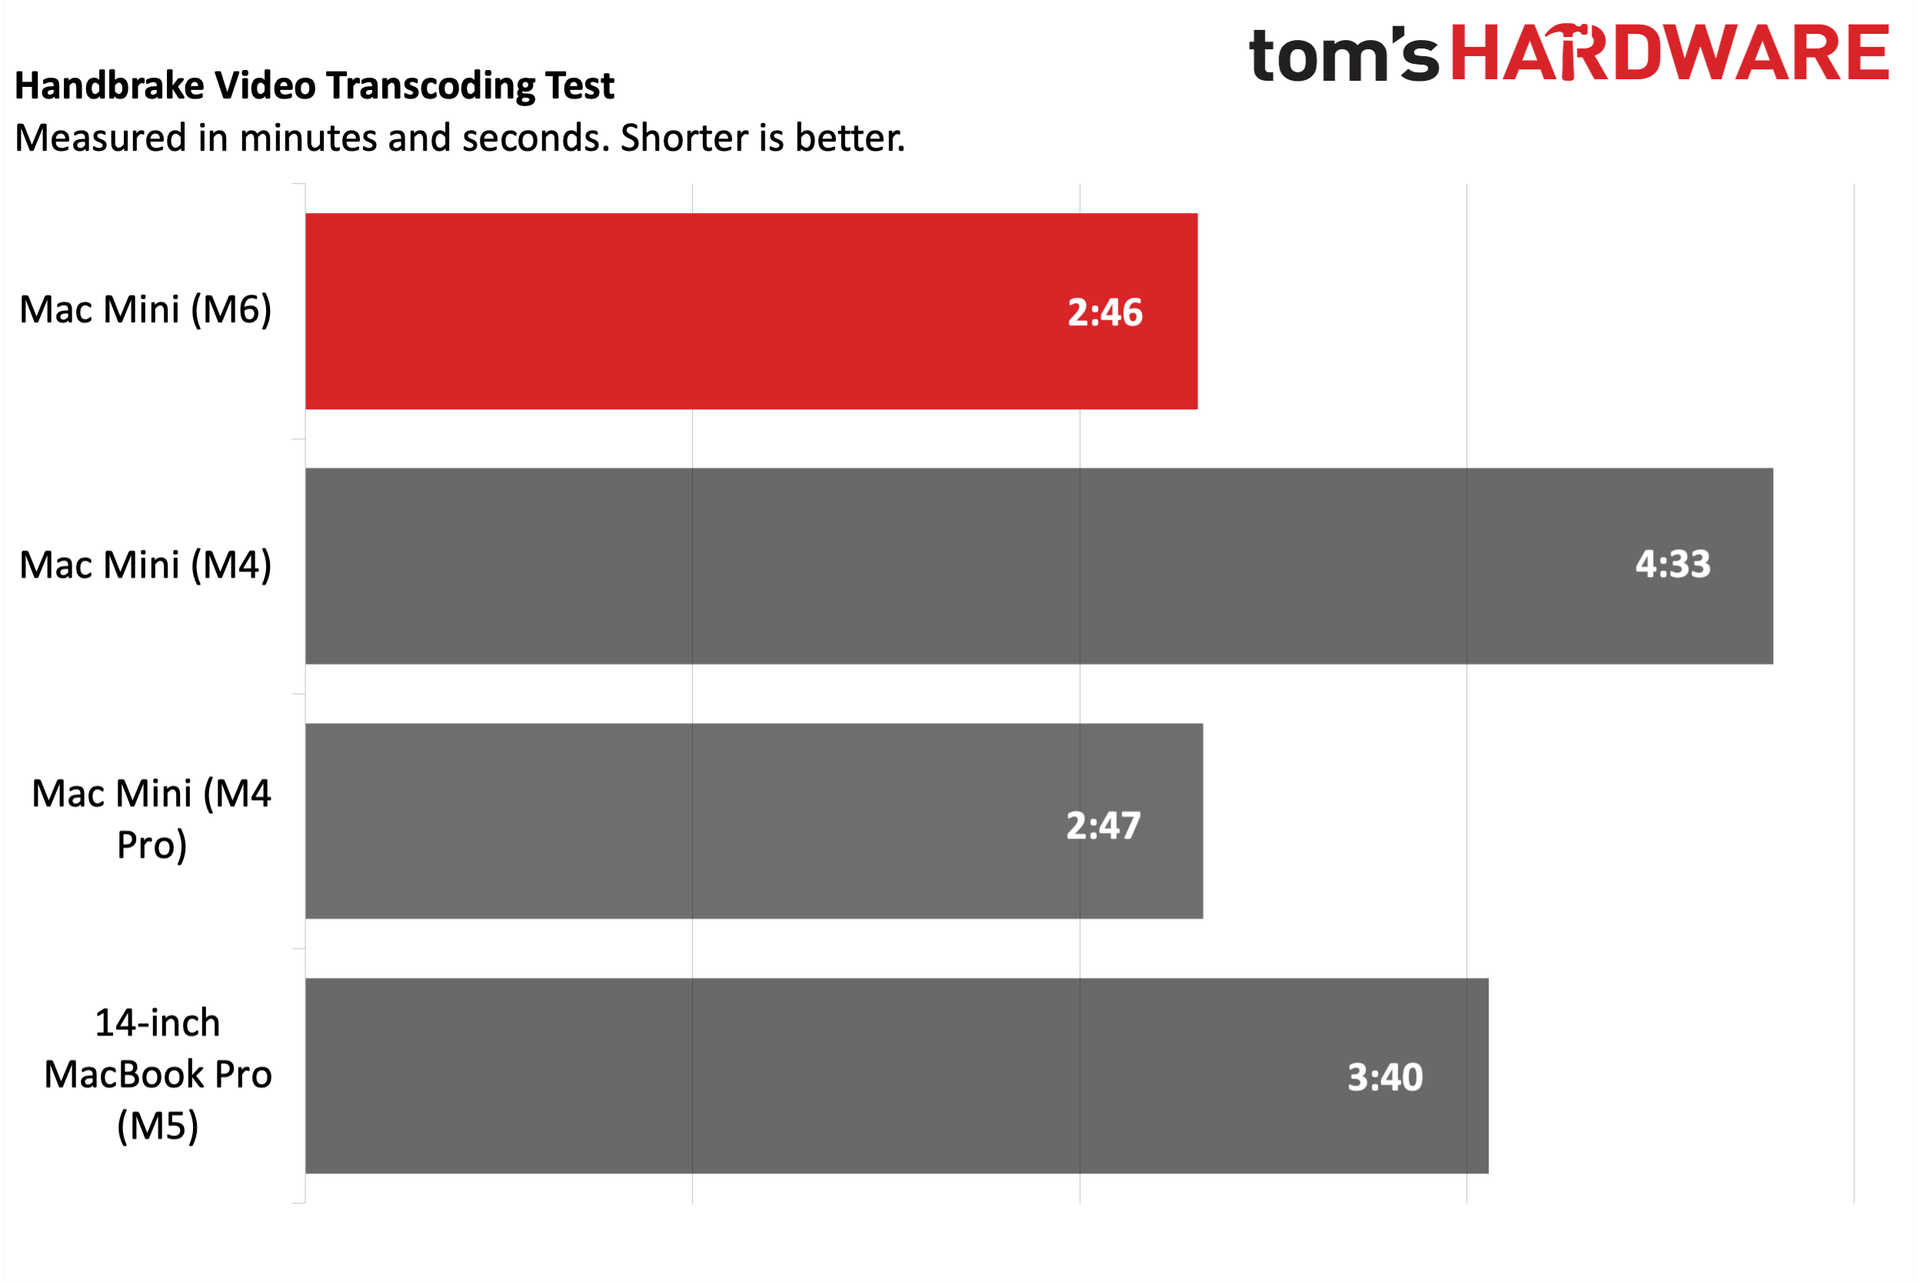
The similar multi-core performance in Geekbench was mirrored in our HandBrake test, during which we transcoded a 4K video file to 1080p. The M6 Mac mini completed the task in 2 minutes and 46 seconds, while the M4 Pro version was just one second behind. The M6 Mac mini was nearly 2 minutes faster than its M4 counterpart.
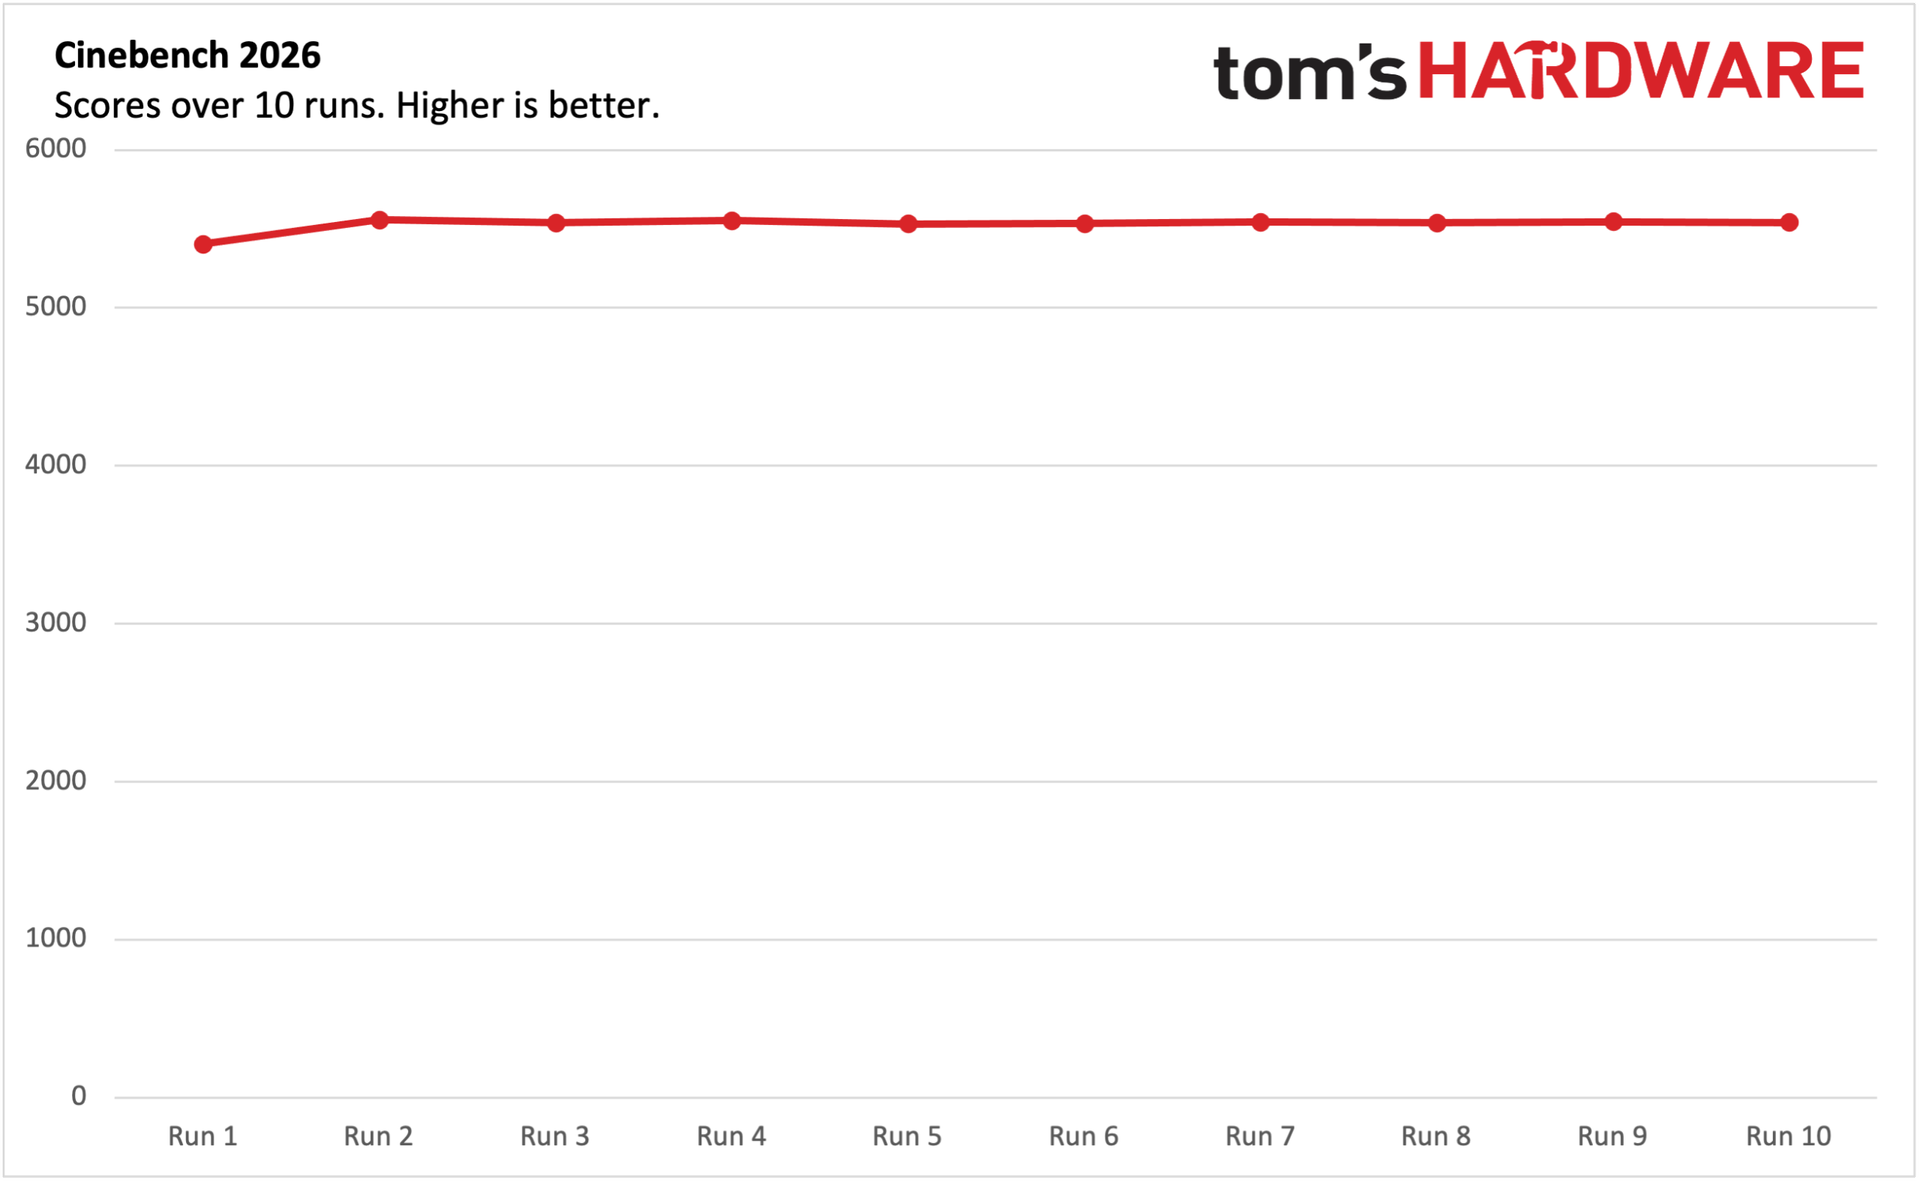
We ran Cinebench 2026 through 10 runs with the Mac mini, keeping track of its scores along the way. The Mac mini started off with a score of 5403, which rose to 5557 for the second run. For the remaining eight runs, the Mac mini was highly consistent, hovering between 5530 and 5554.
The M6 used in the Mac mini isn't yet fully supported by TG Pro, so we could only use the average of the available temperature sensors (power management sensors, power supply, and SSD). At idle, the fan spun at just around 1,000 revolutions per minute (RPM), with an average system temperature of 44 degrees Celsius. However, when running Cinebench 2026, the average system temperature rose to 64 degrees C, while the fan settled at around 2615 RPM.
Gaming and Graphics on the Apple Mac mini (M6)
Gaming shouldn’t be the primary goal with the Mac mini, but it can do some light lifting. I played Cyberpunk 2077 for a bit and benchmarked it. Although I was provided an Apple Studio Display (5K resolution) to test with the Mac mini, I ran benchmarks at 2560 x 1440 and 1920 x 1080, because the native 5K is a bridge too far for this game, given the hardware.
Using the "For this Mac" global setting, the Mac mini achieved 37.33 frames per second (fps) at 1440p and 58.11 fps at 1080p. With frame generation turned on, those numbers jumped to 62.61 fps and 96.24 fps, respectively.
If you don't mind turning the detail settings down a bit, you can achieve playable frame rates with the Mac mini. However, moving the detail slider to Ray Tracing (Medium) dropped frame rates into the 20 fps range even with frame generation turned on at 1440p.
macOS Golden Gate and Apple Intelligence
The Mac mini ships with macOS 27 Golden Gate, which was first made available to the public last week. macOS 27 is not a complete rethink of the desktop operating system formula for Apple, but it does provide a number of quality-of-life improvements for users.
One of the headlining features is new and improved Siri AI. While Siri was one of the first digital assistants to debut on a smartphone, it hasn't exactly been "smart," at least compared to its contemporaries. Siri AI now digs its fingers deeper into the operating system, allowing it to glean contextual data from your photos, mail, messages, and documents. You can access Siri AI from Spotlight (search) or using the dedicated Siri AI app. Siri AI is also vastly more useful, as it will more consistently answer general questions asked, rather than throw up its digital hands and say "Here's what I found on the web."
Apple's Shortcuts app is an incredibly powerful tool that has been available for years across the Mac, iPhone, and iPad product families. However, the granular control and seemingly limitless options can make creating a new shortcut daunting for newbies. So with macOS 27, you can now create a new Shortcut using natural language. For example, you could input, "Create a shortcut that sets the AC to 74 degrees when I leave work, and let my wife know what time I'll arrive at home," and it will take care of the rest.
Liquid Glass was one of the more controversial additions to macOS 26, with some people not liking the translucent makeover. MacOS 27 gives users more control over Liquid Glass, with sliders to adjust the intensity of the transparency effect.
Apple has also introduced plenty of system-level optimizations to improve performance across the board. For example, Apple says that AirDrop is up to 80 percent faster in macOS 27 than macOS 26, and a lot more reliable. Apps also open faster – any lagginess or stuttering that was perceptible in macOS 26 has been eliminated with this newest release. The best comparison I can make for the macOS 26 to macOS 27 upgrade is the fine-tuning that Apple did going from Mac OS X 10.5 Leopard to Mac OS X 10.6 Snow Leopard. There weren’t any major feature additions with that latter release, but there were a plethora of under-the-hood optimizations that made it much faster and more stable.
In addition, macOS 27 doesn’t install the Rosetta x86 translation software by default; you’ll need to download it when you first run a legacy x86 app. However, starting next year with macOS 28, you won’t be able to run apps that aren’t Apple Silicon-native, so Rosetta will be completely off the table.
Apple Mac mini (M6) Configurations and Warranty
The base Mac Mini comes with an M6 processor, 16GB of RAM, and a 256GB SSD for $899. Before Apple's June 2026 price increases, the base Mac mini with M4, 16GB of RAM, and a 256GB SSD cost $599. After the price increases, that $599 jumped to $799. Now, we're looking at another $100 increase for the base Mac Mini. There’s one standalone upgrade option: $100 extra gets you a 10 GbE port instead of the standard 2.5 GbE.
Apple also allows you to upgrade to 24GB or 32GB of RAM, along with 512GB, 1TB, and 2TB SSD options. A fully-loaded M6 Mac mini with 32GB of RAM, a 2TB SSD, and 10 GbE costs $2,399.
For people who require a bit more processing power, perhaps for AI tasks (as Apple seems so inclined to believe), the base M5 Pro Mac Mini (15-core CPU, 16-core GPU), with 24GB of RAM and a 512GB SSD, costs $1,699. However, you can go bonkers with the options, topping out with an M5 Pro (18-core CPU, 20-core GPU), 64GB of RAM, an 8TB SSD, and a 10 GbE adapter for a whopping $6,599. At that price, it’s probably worth looking at the Mac Studio.
All Mac minis come with a 1-year manufacturer warranty.
Bottom Line
The base M6 chip provides better single-core performance and nearly matches the multi-core performance of the optional M4 Pro in the previous-generation Mac mini. Compared ot the standard M4 Mac mini, the new M6 version blows it away in CPU and SSD performance.
These are the kinds of generational improvements we’ve come to expect with Apple Silicon, which seems to be firing on all cylinders these days. The new Mac mini also gets other, less-highlighted improvements, like faster standard wired networking (2.5 GbE versus 1 GbE) and Wi-Fi 7/Bluetooth 6.0 instead of Wi-Fi 6E/Bluetooth 5.4.
However, the elephant in the room is pricing for the Mac mini. Earlier this year, you could grab a base Mac mini for $599 – although availability was spotty after Q1, thanks to OpenClaw and anticipated price hikes. More importantly, over the years, going from one Mac mini generation to the next typically yielded performance benefits with no (or minimal) price increase. The AI revolution has rewritten the hardware rulebook, so we’re now faced with a new generation that is $300 more expensive than the previous model ($200 June price increase + another $100 increase for this new generation).
So in a matter of months, what was for years a screaming bargain for anyone looking for a cheap entry point into the Mac desktop ecosystem has gotten a lot more expensive. 16GB of memory and a 256GB hard drive are easier to justify at $599, but it’s a tougher pill to swallow at $899, and especially so with our review unit’s as-tested price of $1,399.
I spoke with Valve software developers Pierre-Loup Griffais and Jeff Leinbaugh about the Steam Frame launch, why the company is taking a two-pronged strategy with streaming and standalone support, and how the global memory/storage crunch affected development. You can read our review of the Steam Frame here, and the full transcript of our interview at Tom's Hardware Premium.
Nearly a year after first revealing the Steam Frame VR headset, Valve is now ready to deliver the finished product to paying customers. Reservations for the headset have opened today, three months after the launch of the Steam Machine.
Like the Steam Machine, the Steam Frame is launching amid absolute chaos in the tech industry. We're seeing higher prices across a wide range of PC hardware, especially memory and storage. Valve isn't operating in a vacuum, so those realities are reflected in the Steam Frame's pricing, which starts at $1,059.
I began by asking about the headset's genesis and the team's goals for creating a next-generation VR headset. "Work started on Steam Frame basically as soon as we shipped the Index," explained Leinbaugh. “And so we did a lot of exploration into technologies and features and use cases to try to answer that question. And the goals that we aligned on for what became the Steam Frame was to make [it] much easier to use, which to us meant a lighter, more comfortable, easier to get into and out of VR headset."
He added that with the previous Index headset, Valve was so laser-focused on making the best VR headset possible at the time that they made a lot of compromises to achieve those goals. And in many ways, those compromises were worth it to achieve their end goal. However, that strategy shifted with the Steam Frame.
"But this time around we thought we could achieve something that was a lot more comfortable, a lot more accessible. And so streaming technology was a big part of that. So the headset can be wireless so that there's not a lot of complicated setup to get to the game, whether that's playing on the headset or streamed," Leinbaugh continued. "So what we want to be possible is for somebody to put on the headset, browse their Steam library, and then just pick something that they want to play and not worry about too much else."
Standalone gaming on the Steam Frame
One of the biggest changes with the Steam Frame is that it can work with a robust wireless link to your PC, or as a standalone device using the onboard Qualcomm Snapdragon 8 Gen 3 SoC. I asked about the challenges in developing such a lightweight headset that can easily switch between operating modes.
"Yeah, a lot of the engineering challenges were around making sure that we had the right kind of compute and enough compute on the headset to both support a really good streaming experience, but also to be able to run games on the headset," said Leinbaugh. "So we picked the Qualcomm 8650 chip. It had a lot of capability, but in order to make use of that, we had to solve a lot of engineering challenges around thermal management and power delivery. So really treating this like making a really capable PC that just happens to run this particular mobile hardware was how a lot of the engineers approached that problem."
He added that Valve has taken a lot of the know-how from the Steam Deck and Steam Machine to give users the same SteamOS, but this time leveraging the Arm hardware along with Proton for emulation.
However, the Steam Frame has limits when playing games directly on-device, given its mobile-centric SoC. “Sure, games that are trying to push the boundaries on the AAA stuff that's very graphically intensive," explained Griffais. "Most of those recent ones won't run very well because it's a smaller compute envelope, right?"
"But there's a ton of stuff that is coming out that is a great experience on the Steam Frame. For example, I think last week the Metal Gear Solid Collection Part 2 released. And, you know, MGS4 is a game that I haven't played in, I don't know, 20 years at this point, but it's great from there."
He added that many indie games will run just fine on the Steam Frame, along with older back-catalog AAA games (which are still enjoyable) that don't require the compute of more modern titles.
"So I think the point is that you're able to engage with your whole library, right?" said Griffais. "And then have kind of a similar thing as the Deck where you're going to try and figure out if some games are maybe a little bit below the bar in terms of what you would like for performance."
Half-Life Alyx has been the poster child for VR gaming in recent years, and Valve has taken steps to ensure that Steam Frame users can have a proper native gaming experience. “And we're doing the same for Half-Life Alyx, where we're doing a lot of work to support the Frame more natively and trying to remove performance barriers that are induced by some of the translation, the emulation there that you get on normal and modified PC games.,” said Griffais.
Streaming on the Steam Frame
While standalone gaming on the Steam Frame is possible, Valve designed the headset first and foremost as a streaming device. To that end, Valve has taken steps to optimize the networking stack and improve performance. One of those steps is implementing foveated streaming to reduce strain on network resources.
“So the Steam Frame has eye-tracking cameras on the inside of the headset that know where your eyes are looking. And when you have that, there's a lot of potential use cases, but the one that we're using most consistently is foveated streaming, which really means when you're streaming, especially VR content, there's a lot of video data that you have to send," Leinbaugh explained.
"But because we know with eye-tracking cameras what part of the image you're looking at at any time, we can refocus some of those resources to make sure that the important parts of the image are treated as like first-class bits. And then the rest gets kind of the last part of the resource pool, which is the part of the image that you can't see and you won't notice the image degradation."
By not treating every bit delivered to the headset the same, Valve can reap performance and image quality gains. "So it's the best analogy really is it's almost as if the part that you're looking at is using about 10 times as much bandwidth and encoding bit rate as it actually is for the entire image, because we just squished it all into that part that follows where you're looking."
(Image credit: Tom's Hardware)
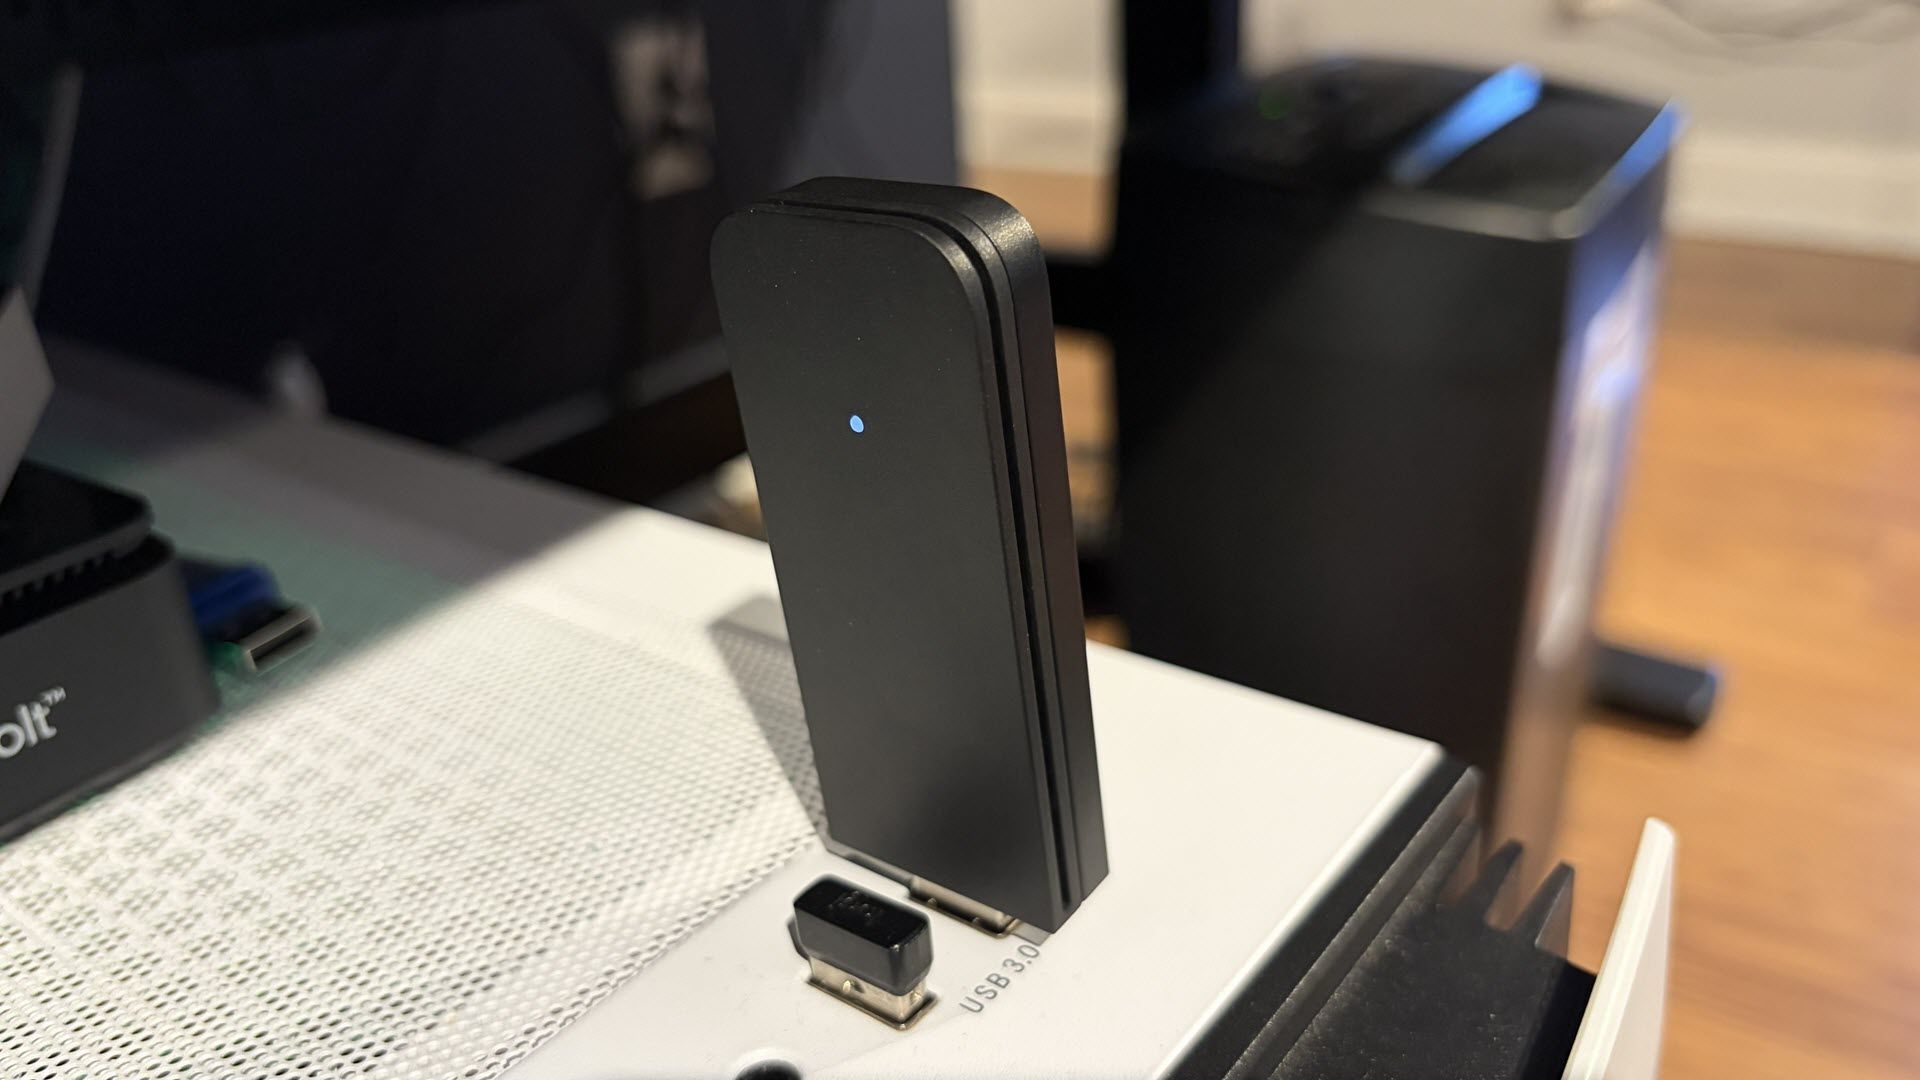
The Steam Frame communicates with your PC wirelessly using a dedicated Wi-Fi 6E USB dongle. Data transfers between the two happen over the 6 GHz channel for optimal performance. I inquired about how any disruptions/interference with that wireless link would affect gameplay.
“So there's a fallback mechanism built into that, which, if you have two links active and one of them drops out because of interference, or you walked out of range, or all the many reasons that wireless interference can happen," said Leinbaugh. "If something happens to one of those links, the other one will immediately pick up and cover the gap. And it's just very unlikely that a lot of those sources of interference will hit both links at the exact same time."
Other strategies can also step in; for example, if you have a latency spike, a previous frame can be "reprojected and replayed" to cover small gaps. For extended dropouts, there's no recovery method; the stream will fail, and you'll be booted to the default environment.
There are also other strategies that can step in; for example, if you have a latency spike, a previous frame can be "reprojected and replayed" to cover small gaps. For extended dropouts, there's no recovery method; the stream will fail, and you'll be booted to the default environment.
Pricing and availability
Pricing, of course, will be a big sticking point with the Steam Frame. Consumers got a bit of sticker shock with the Steam Machine given its hardware specs, and the Steam Frame will likely be no different. The Steam Frame starts at $1,069 for the 256GB SKU and costs $1,299 for the 1TB SKU.
"I think as far as memory prices and those kinds of conditions, we're really in it like everyone else," Griffais explained. "We've been working hard on trying to get the parts that we can get at the best price possible."
While all of us would love for memory and storage prices to fall to sane levels again, it will be a while before we see any relief. "It's an unfortunate situation all around. We wish that gaming hardware was cheaper, but we're definitely trying to be on the cheapest side that we can get despite all those conditions," Griffais explained.
But price increases aren't just limited to the likes of memory, as Griffais added, “Even just things like motherboards, copper, anything, even shipping anything worldwide right now is way more expensive than it was last year and two years ago. So every part of the sticker price is affected there."
The Steam Frame will be available starting September 14, and it will use a reservation system similar to that of the Steam Machine to cut down on scalpers.
Prior to the official launch of the Steam Frame, Tom's Hardware Premium had a chance to talk with Valve software developers Jeff Leinbaugh and Pierre-Loup Griffais. We discussed the development process behind the Steam Frame, the standalone and streaming modes, networking strategy, and pricing, which you can read in its entirely here. You can read our review of the Steam Frame here.
Like previous Valve launches, you can also read transcripts of our interviews with the company on the Steam Machine and Steam Controller.
The transcript below has been lightly edited for clarity.
Brandon Hill, Tom's Hardware: What were your goals in creating the Steam Frame and providing the framework necessary to support it, compared to legacy hardware like the Index?
Jeff Leinbaugh, Software Developer, Valve: Yeah, so the work started on Steam Frame basically as soon as we shipped the Index. And so we did a lot of exploration into technologies and features and use cases to try to answer that question. And the goals that we aligned on for what became the Steam Frame was to make [it] much easier to use, which to us meant a lighter, more comfortable, easier to get into and out of VR headset.
That was a better way to interact with your whole Steam library than the goals we had for the Index. Where the Index was just: we wanted to make the best possible VR headset that we could make. And that came with a lot of compromises, which were worth it because they allowed us to have this really great VR headset and see what that was capable of.
But this time around we thought we could achieve something that was a lot more comfortable, a lot more accessible. And so streaming technology was a big part of that. So the headset can be wireless so that there's not a lot of complicated setup to get to the game, whether that's playing on the headset or streamed.
And then the other big part of that accomplishing that goal was making it possible to interact with Steam just like you would on a Steam Deck and to be able to play games that don't even support VR in a virtual display. So what we want to be possible is for somebody to put on the headset, browse their Steam library, and then just pick something that they want to play and not worry about too much else.
And that's kind of where all the user experience goals, at least, came from around this. And then there's a lot of other technical goals that support that we can get into if you're interested in any of those.
Hill: So, that leads into my next question: what were the engineering challenges in making the Steam Frame a standalone device and one that can also stream? And I know you've got the wireless dongle to help with the networking offload.
Leinbaugh: Yeah, a lot of the engineering challenges were around making sure that we had the right kind of compute, and enough compute on the headset to both support a really good streaming experience, but also to be able to run games on the headset.
So we picked the Qualcomm 8650 chip. It had a lot of capability, but in order to make use of that, we had to solve a lot of engineering challenges around thermal management and power delivery.
So really treating this like making a really capable PC that just happens to run this particular [...] mobile hardware was how a lot of the engineers approached that problem.
And then from there, we kind of tied that into a lot of the work that we did for Steam Deck and Steam Machine running Steam OS now on ARM, but it's the same Steam OS.
So at some point we got to kind of meet in the middle and leverage Proton and Steam OS and a lot of things there to start getting games running.
(Image credit: Tom's Hardware)
Standalone mode & software support
Hill: And what kind of performance levels are you targeting for games using the Steam Frame when it's in the standalone mode?
Pierre-Loup Griffais, Software Developer, Valve: I guess it's hard to pinpoint a specific segment there because there are so many games on Steam that keep coming out that are running great on there, right? Sure, games that are trying to push the boundaries on the AAA stuff that's very graphically intensive. Most of those recent ones won't run very well because it's a smaller compute envelope, right?
But there's a ton of stuff that is coming out that is a great experience on the Frame. For example, I think last week the Metal Gear Solid Collection Part 2 released. And, you know, MGS4 is a game that I haven't played in, I don't know, 20 years at this point, but it's great from there.
And even at the higher resolution, 60 FPS is locked. So it's really cool to see games that are coming out right now that are great experiences on there. I think there's a ton of indie games and things that run really well too. And if you go down the back catalog, there's a ton of stuff from a little bit ago, even AAA stuff that runs great as well.
So I think the point is that you're able to engage with your whole library, right? And then have kind of a similar thing as the deck where you're going to try and figure out if some games are maybe a little bit below the bar in terms of what you would like for performance. And then off to stream those from another PC instead, or the Steam machine.
Hill: And building on that, how's the reception been to the Steam Frame Verify program from developers for the standalone games?
Griffais: I mean, I think we have a lot of developers that are pretty eager to get their games working well. And so we've seen it approached from different ways. Some folks do tweaks to their existing PC version and then get to a very good point with that.
But just the same kind of tweaks as you would expect from Steam Deck, where some surface-level tweaks for the user experience, like changing controller bindings a little bit or changing default settings in a way that really makes the game better for everyone and not just for Steam Frame.
And we're doing the same for Half-Life Alyx, where we're doing a lot of work to support the Frame more natively and trying to remove performance barriers that are induced by some of the translation, the emulation there that you get on normal and modified PC games.
And that's yielding great results to get to the next level of performance there. And so we expect that some developers will be doing some of that work or maybe adapting some of that existing work that they've already done on an Android version of their game and then adapting that through Lepton as well. So I think everyone's kind of engaging with it at a different pace there. But overall, I think like we're talking to a bunch of VR devs that are excited to get their games to be labeled as verified or playable.
Foveated streaming and technical hurdles
Hill: Could you go into a little more detail on foveated streaming and how it enhances the gaming experience with Steam Frame?
Leinbaugh: Yeah, so the Steam Frame has eye-tracking cameras on the inside of the headset that know where your eyes are looking. And when you have that, there's a lot of potential use cases, but the one that we're using most consistently is foveated streaming, which really means when you're streaming, especially VR content, there's a lot of video data that you have to send.
And so you're therefore very sensitive to how much available bandwidth that you have available for not just transmitting it over a wireless link, or whatever kind of link, but also just encoding and decoding that data. All of that takes from a pool of finite resources and your network stack or your graphics card.
But because we know, with eye-tracking cameras, what part of the image you're looking at at any time, we can refocus some of those resources to make sure that the important parts of the image are treated as first-class bits. And then the rest gets the last part of the resource pool, which is the part of the image that you can't see, and you won't notice the image degradation.
So instead of kind of evenly focusing all of the encoding and network resources around this entire immersive, all-encompassing VR image where you're not seeing most of it, we make sure that the part that you're looking at is encoded differently in a way that's a much, much higher equivalent bit rate.
So the best analogy really is [that] it's almost as if the part that you're looking at is using about 10 times as much bandwidth and encoding bit rate as it actually is for the entire image, because we just squished it all into that part that follows where you're looking.
(Image credit: Tom's Hardware)
Hill: Switching gears slightly, how are you compensating for temporary losses in connection or signal strength when gaming wirelessly? Is there a fallback mechanism?
Leinbaugh: Yeah, there are a few different levels of what we'll do, and we've made sure to do something in response to all these things happening. So the first thing is if you're using the wireless adapter, if you also are connected to your home WiFi, for example, which a lot of people just naturally will be, then the streaming, VR streaming will take advantage of both of those connections.
And so you'll have the adapter and your WiFi both active at the same time; we call it multi-link streaming. And what that means is that those two connections are competing against each other constantly, every single packet.
So there's a fallback mechanism built into that, which, if you have two links active and one of them drops out because of interference, or you walked out of range, or all the many reasons that wireless interference can happen. If something happens to one of those links, the other one will immediately pick up and cover the gap. And it's just very unlikely that a lot of those sources of interference will hit both links at the exact same time. So that's kind of the first line of defense that we have.
If you still don't, if you still have an interruption or maybe you only have one link active, then the headset has strategies to fill in those gaps. So if you have a short interruption, just like a latency spike or something, then a previous frame will get reprojected and replayed. And that works pretty convincingly for covering small gaps like that.
A lot of people won't even notice that it's happened. If you have an extended dropout where the video is just not arriving at all for whatever reason, then at that point, the video stream is not going to recover.
If it's a very extended dropout, but the headset will fade you back into the construct environment so that you're at least not getting stuck with a really unexpected experience or something that might confuse you or disorient you.
So the worst-case scenario is you'll just kind of fall back to the default environment and have a chance to either wait for it to recover or do something. Maybe you unplugged your Wi-Fi router or something that you need to go do.
Pricing and market conditions
Hill: When the Steam Machine arrived, there was a little bit of sticker shock with the price when it launched. And the Steam Frame is also around $1,000, close to $1,300 bucks in top trim. Surely Valve is sensitive to the realities of the marketplace with RAM and storage prices. How do you appease the gamers out there that are begging for some relief in hardware pricing?
Griffais: Oh, yeah, I think as far as memory prices and those kinds of conditions, we're really in it like everyone else. Like, there's not really anything special that we can do.
We've been working hard on trying to get the parts that we can get at the best price possible. But I think everyone's affected. [...] The fact that our price was affected by that compared to what we were hoping for is definitely true. But I'd say that it's trending along the reality of the market. And there's not really any sort of the kind of distortion compared to just the price of the parts in there.
And it's an unfortunate situation all around. We wish that gaming hardware was cheaper, but we're definitely trying to be on the cheapest side that we can get despite all those conditions.
It's not just memory and all that too, right? Even just things like motherboards, copper, anything; even shipping anything worldwide right now is way more expensive than it was last year and two years ago. So every part of the sticker price is affected there.
Hill: Final question: Are you planning to implement the same reservation system that you used for the Steam Machine with Steam Frame?
Valve has been ramping up its hardware releases during 2026, with the Steam Controller launching this past spring, followed by the Steam Machine earlier this summer. The 2026 hardware onslaught is now culminating in the Steam Frame, the company’s latest headset aimed at VR and non-VR gaming.
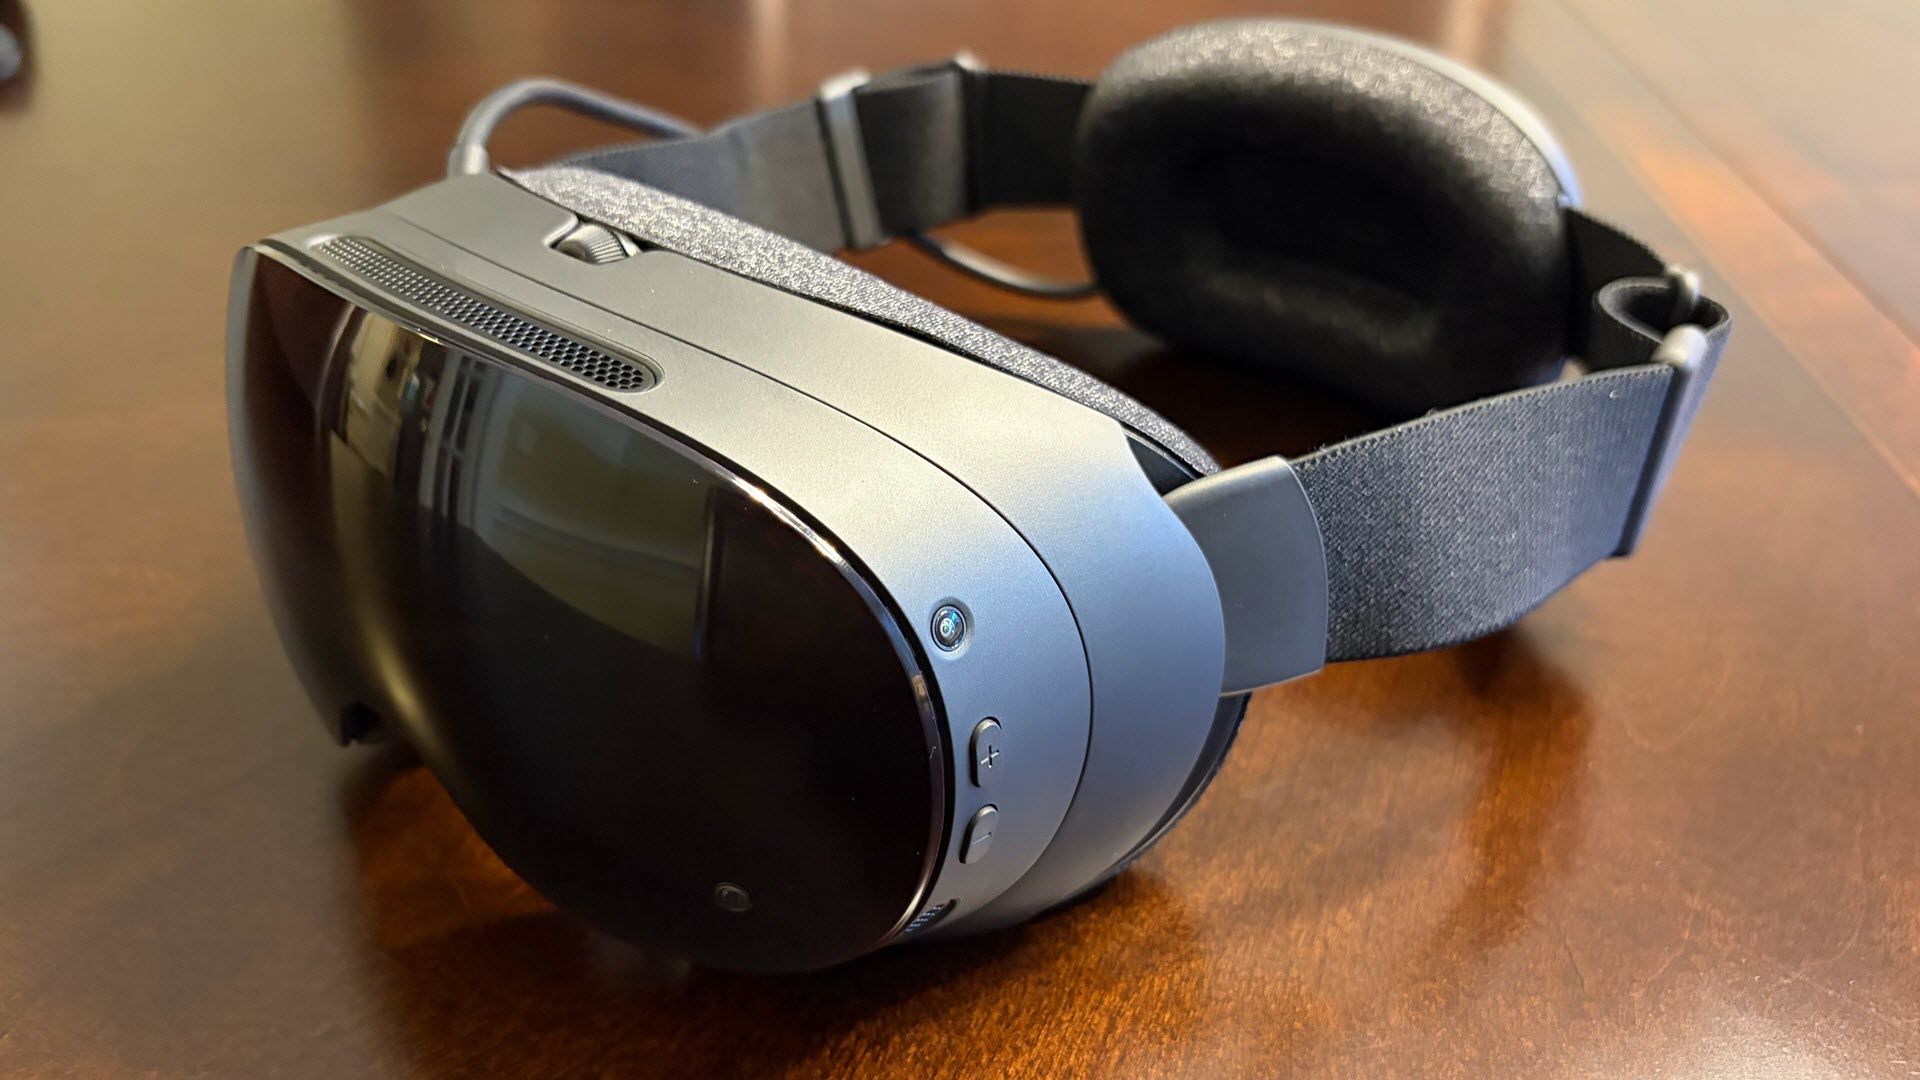
Rather than being a streaming-only platform, like the preceding Valve Index, the Steam Frame has a powerful onboard Qualcomm Snapdragon 8 Gen 3 and up to 1TB of internal storage to play standalone games without the need for a PC. It’s an ambitious headset, which comes with an equally ambitious $1,000+ price tag.
Design and Comfort of the Valve Steam Frame
At first glance, the Steam Frame reminds me of oversized ski goggles, compared to the Daft Punk style of the preceding Valve Index headset. The overall design feels very organic, with soft curves and thin plastic to keep weight down. The thinner plastic drastically reduces weight compared to the Index (440 grams with the headstrap versus 809 grams for the Index).
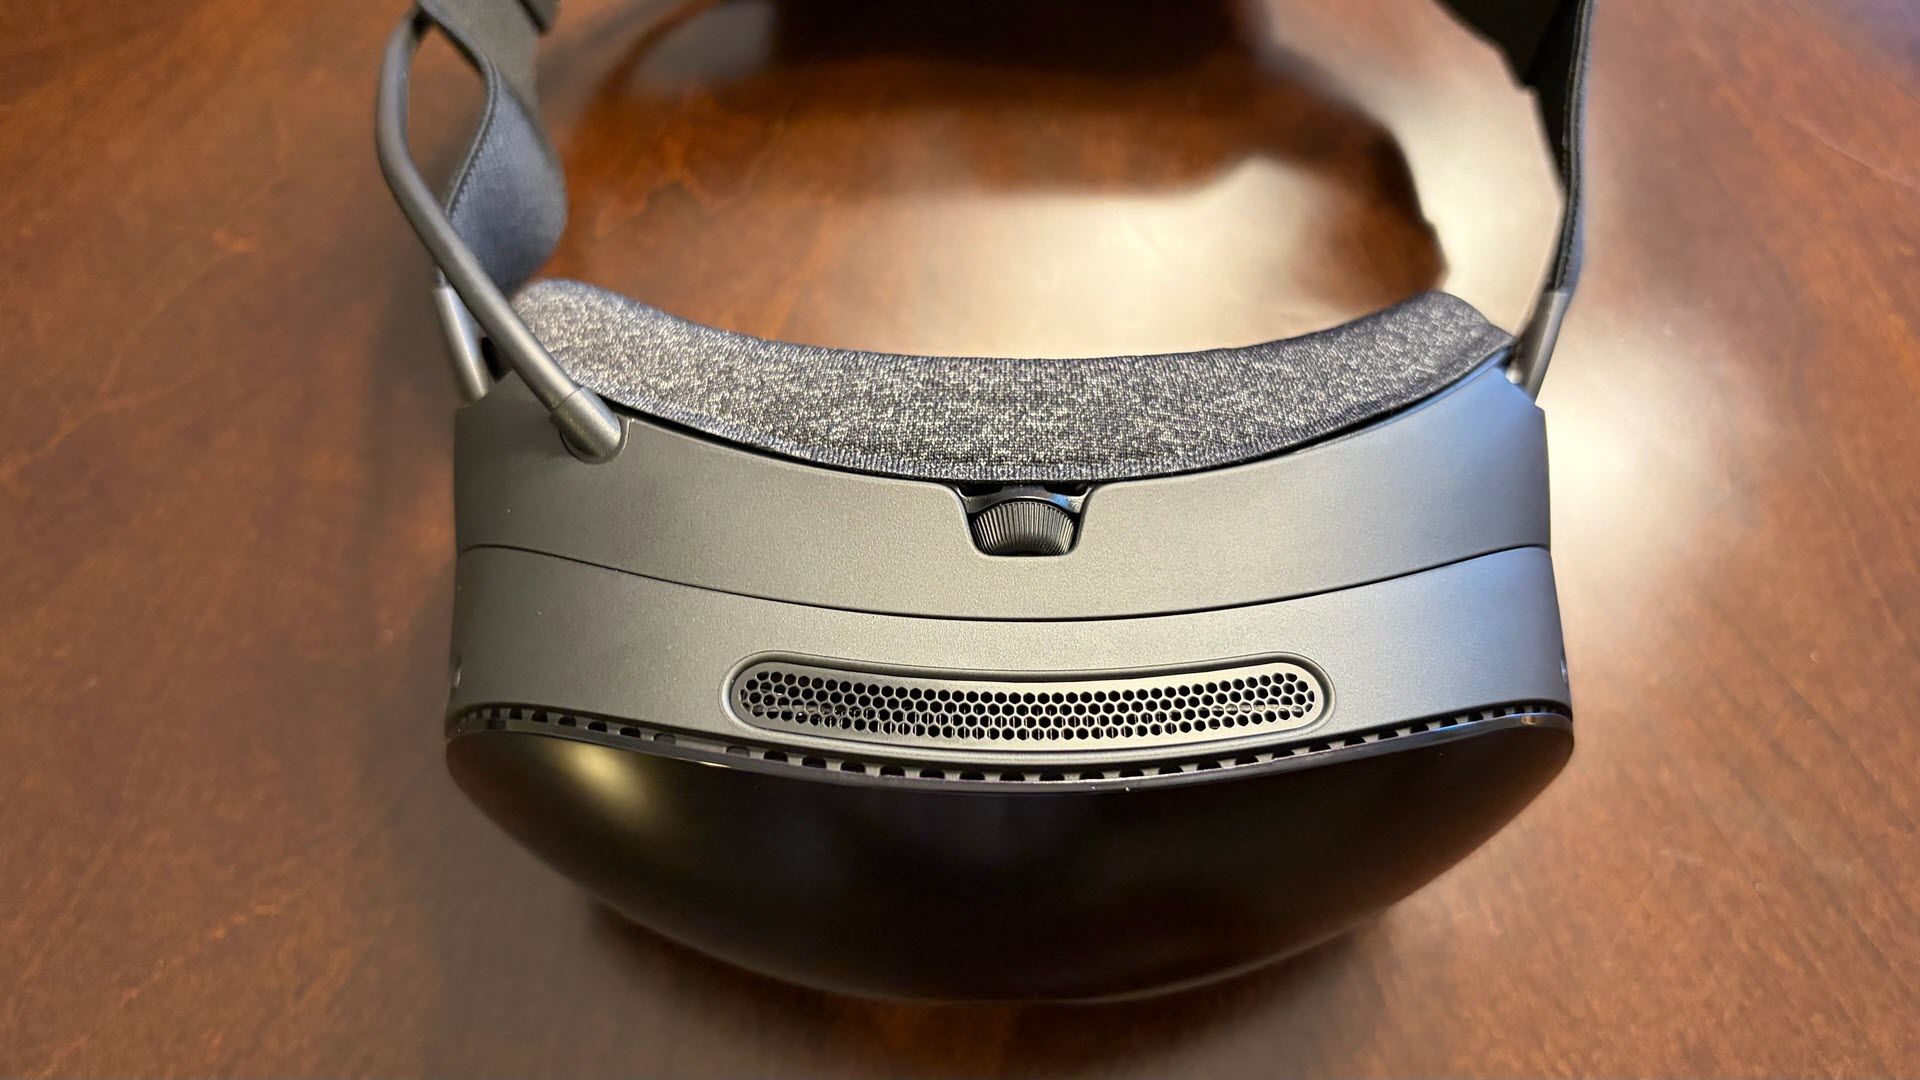
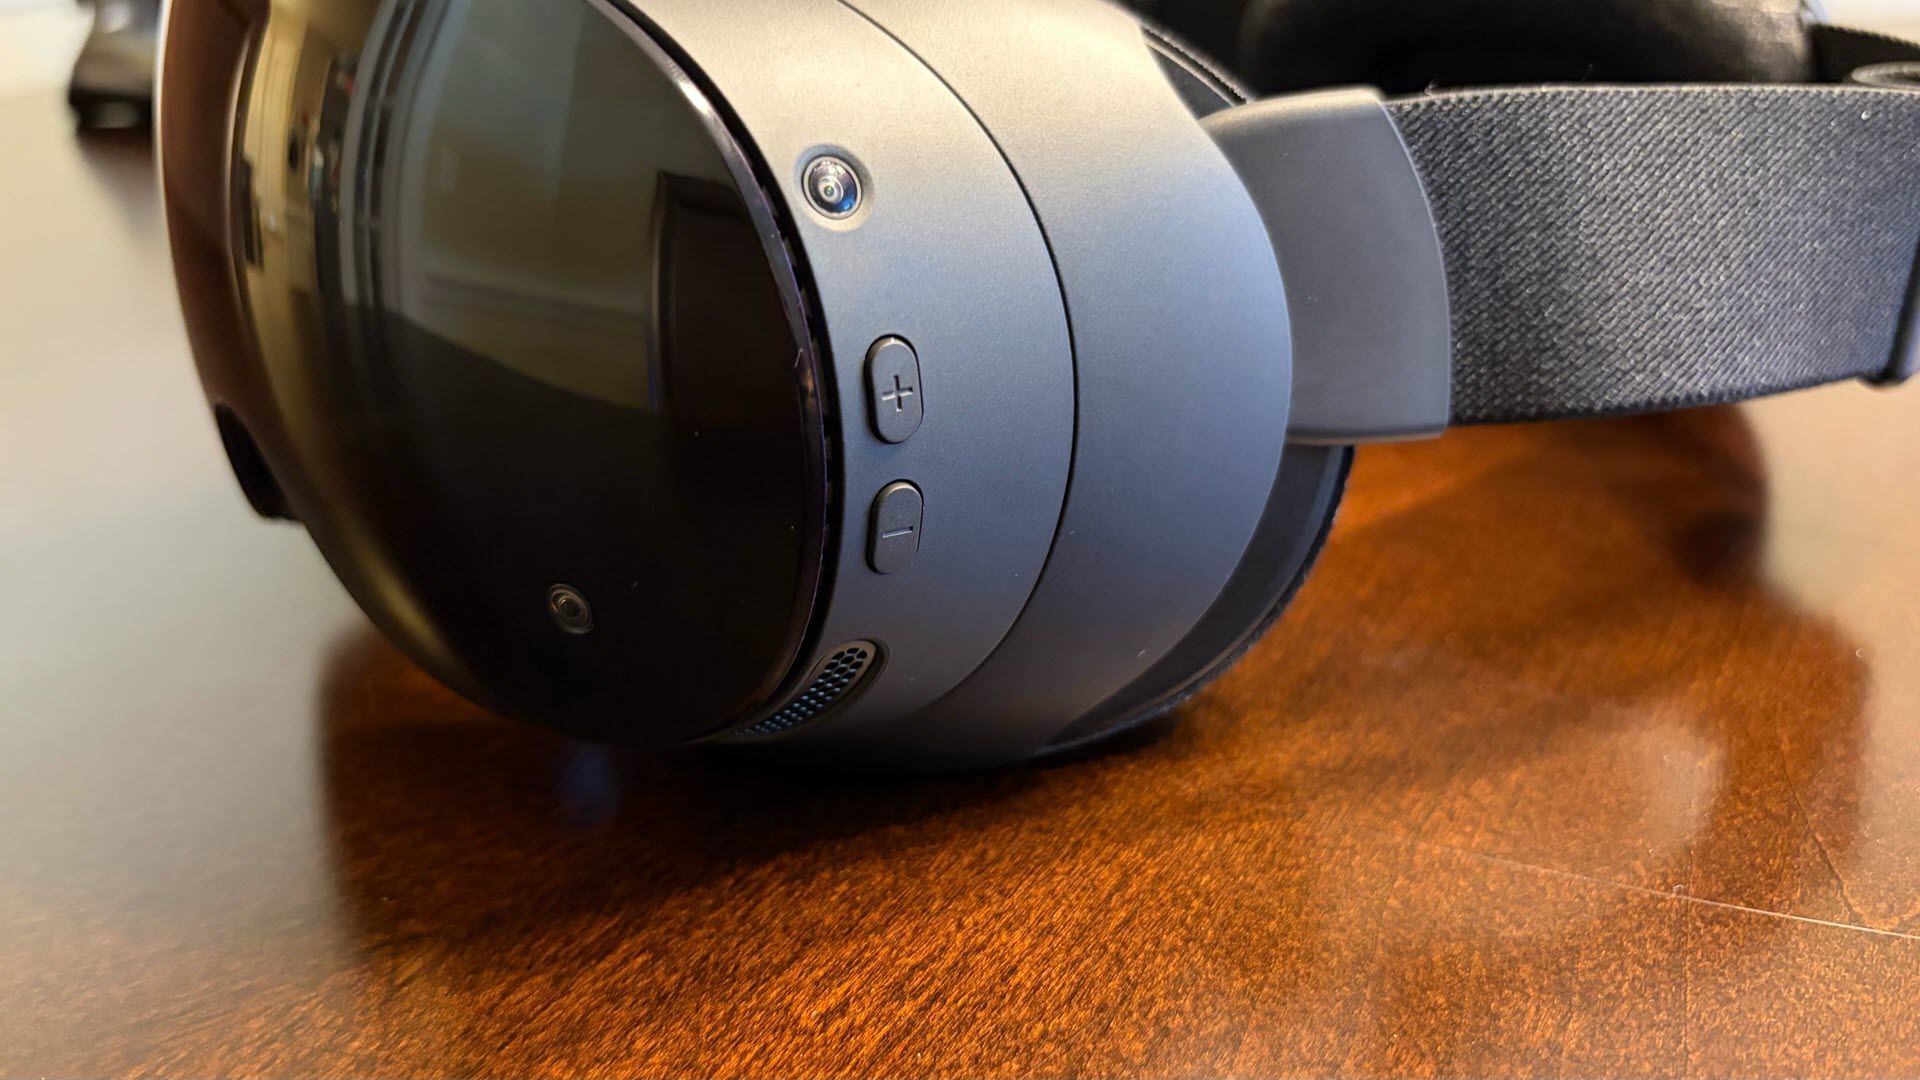
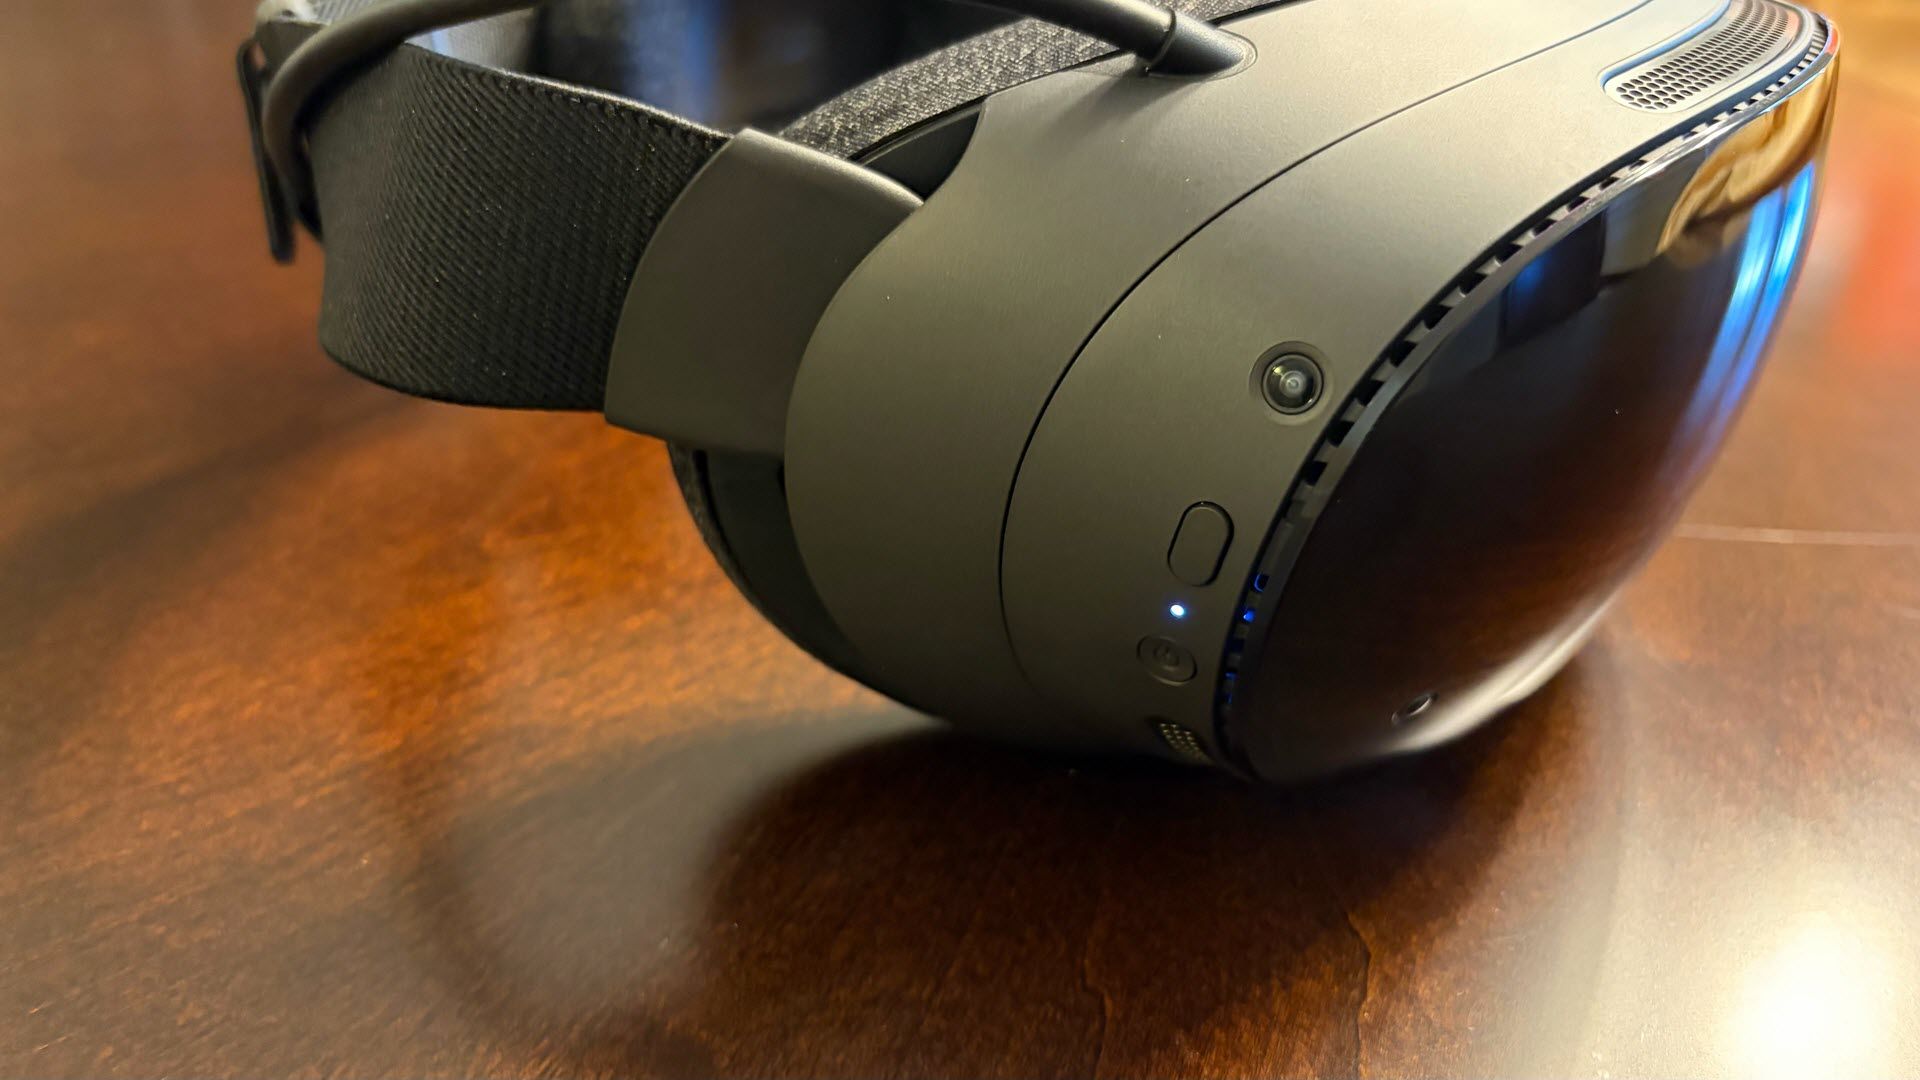
Two forward-facing cameras (which provide a monochrome passthrough of your environment) sit near the bottom of the front cover, while two additional cameras sit on the side of the Steam Frame, facing sideways and slightly upward. Together, the four cameras provide headset and controller tracking. The final two cameras are internal for eye-tracking purposes. The main unit also houses a cooling fan that helps remove warm air from the Snapdragon SoC and keeps your head from sweating during extended gaming sessions.
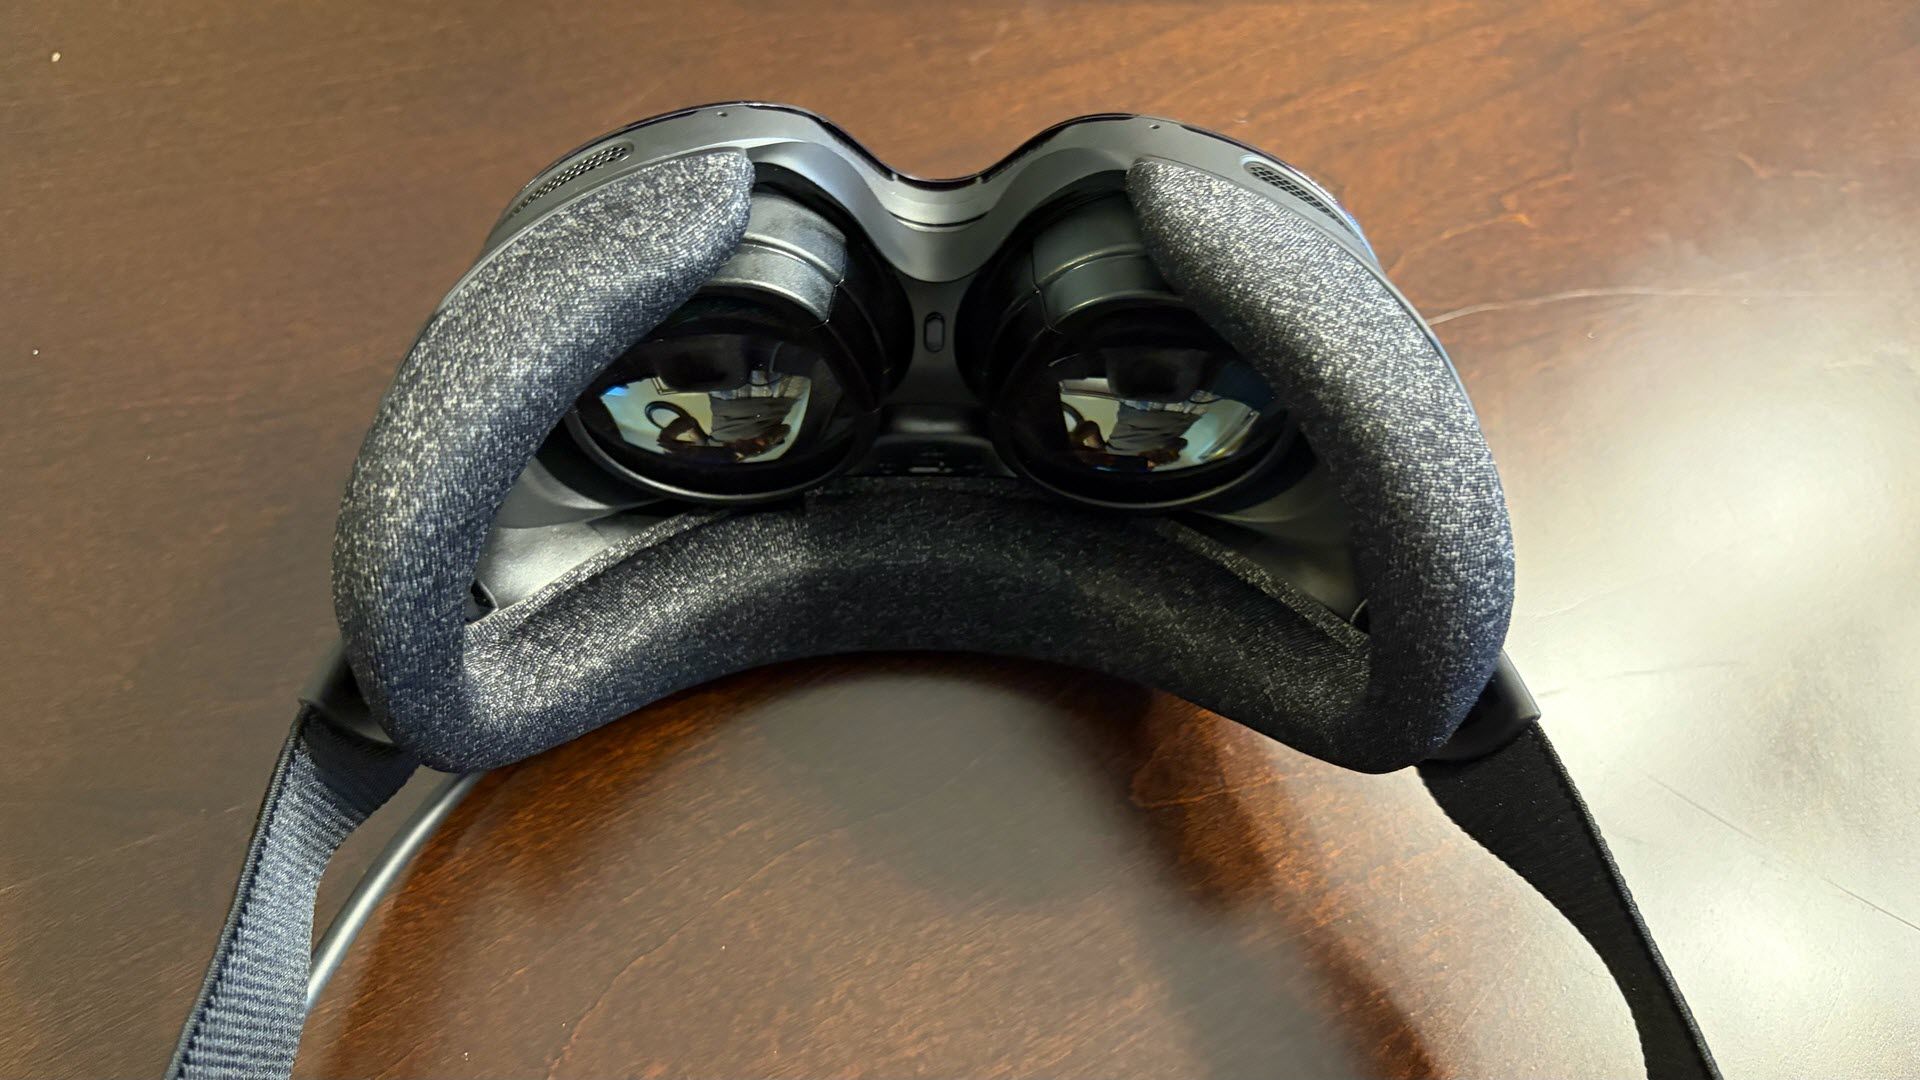
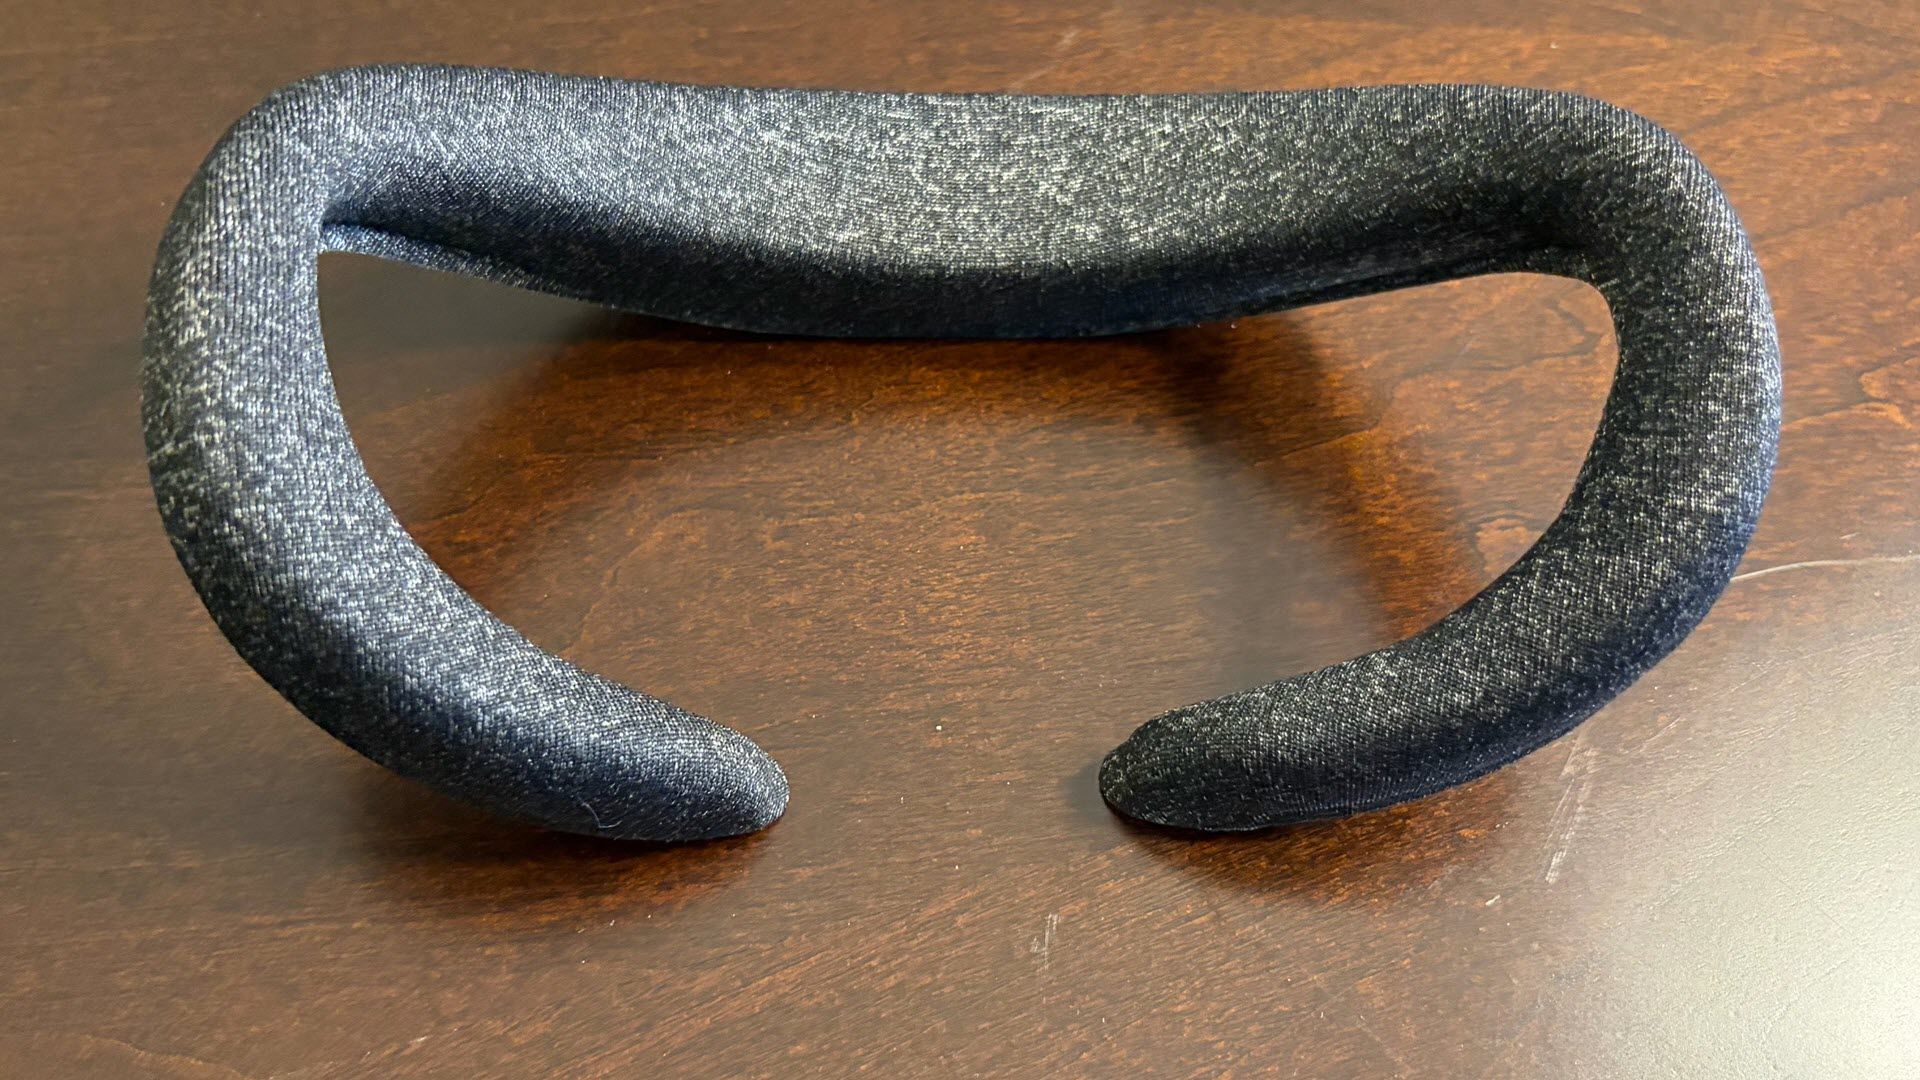
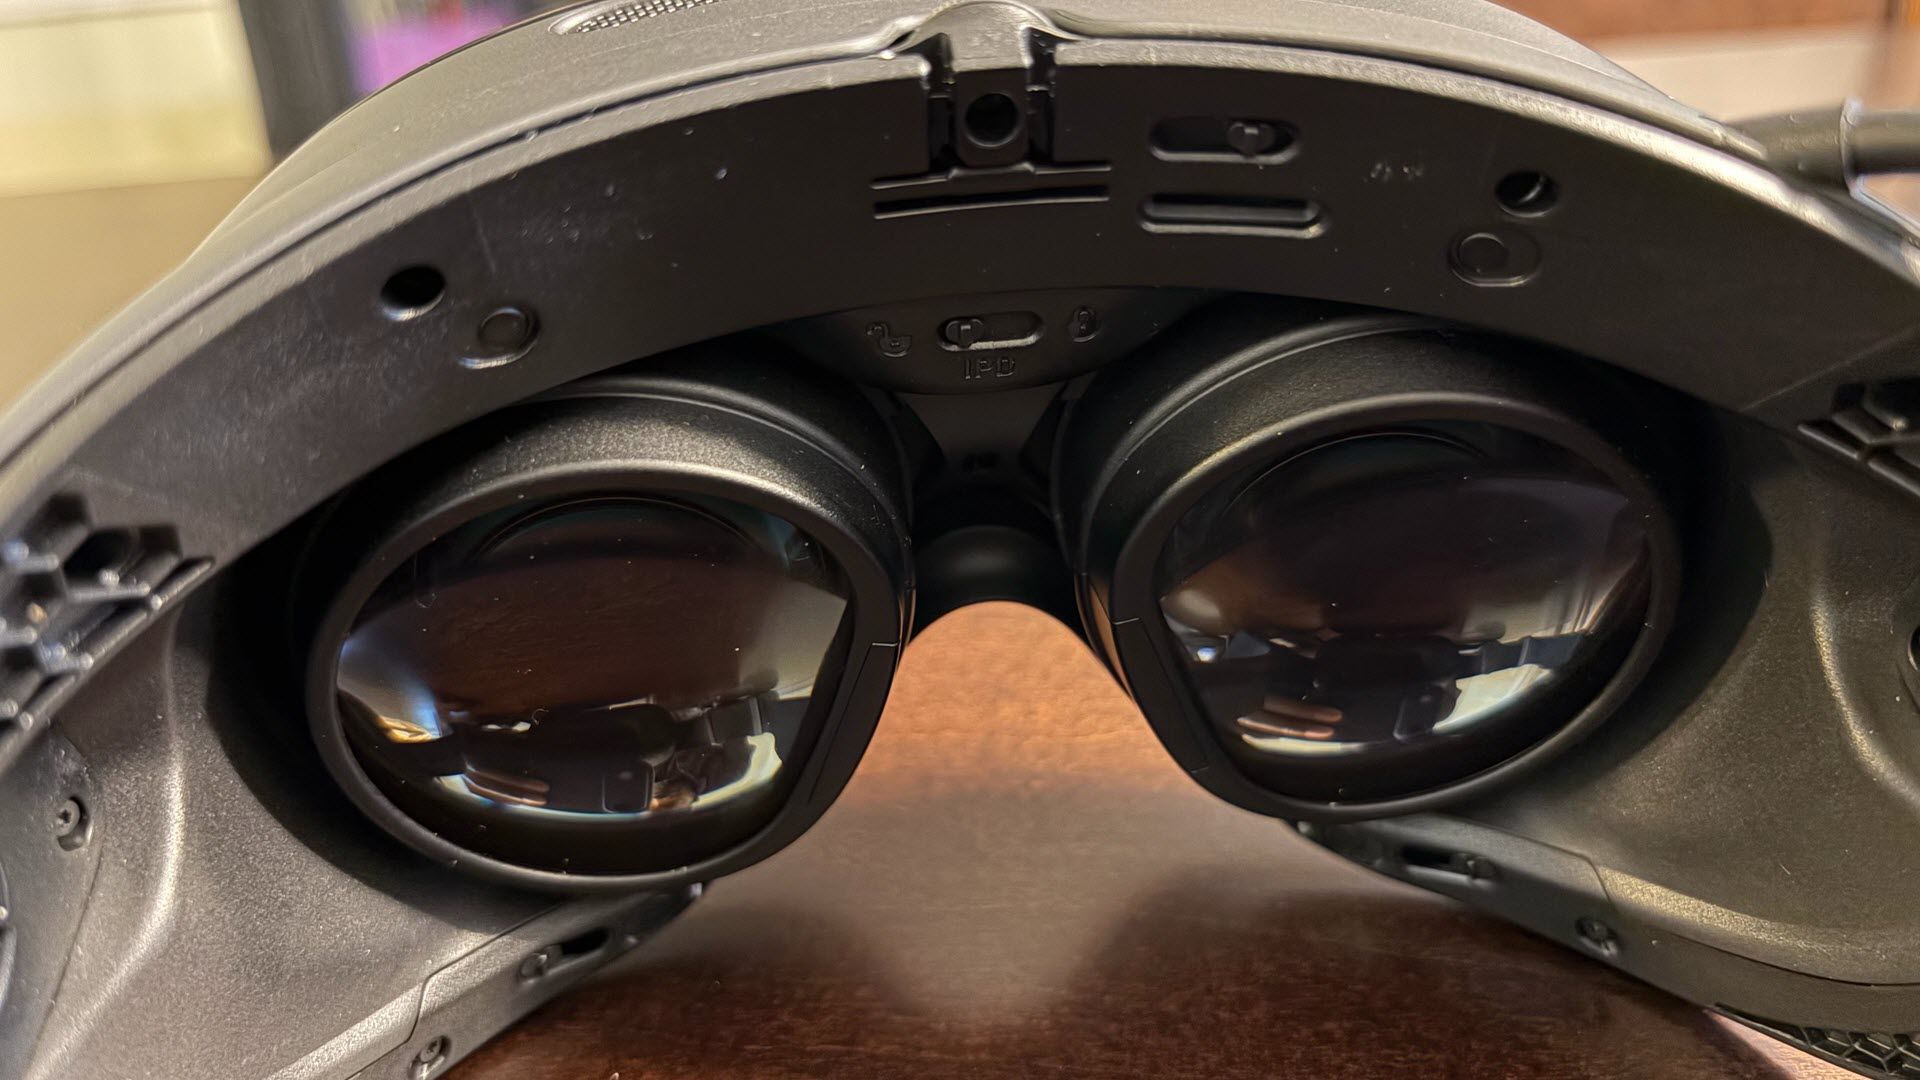
An expansion port for future features sits at the bottom front of the Steam Frame, just ahead of where the headset rests on your nose. An interpupillary distance (IPD) adjustment knob sits at the top of the headset (ranging from 57.6 to 69.6 mm), while an IPD lock switch (to prevent accidentally hitting the dial when putting on or taking off the headset) is located inside the Steam Frame, directly above the proximity sensor. Although our review unit came with 1TB of internal storage, a microSD slot is available for further expansion behind the fabric-covered foam gasket that attaches magnetically.
On the right side of the Steam Frame, there are two buttons: Aux and Power. On the left side are volume up and volume down. The Steam Frame has four speakers, two on each side of the headset, positioned low just below the arm pivots for the adjustable strap. You can also use Bluetooth headphones/ear buds if you prefer.
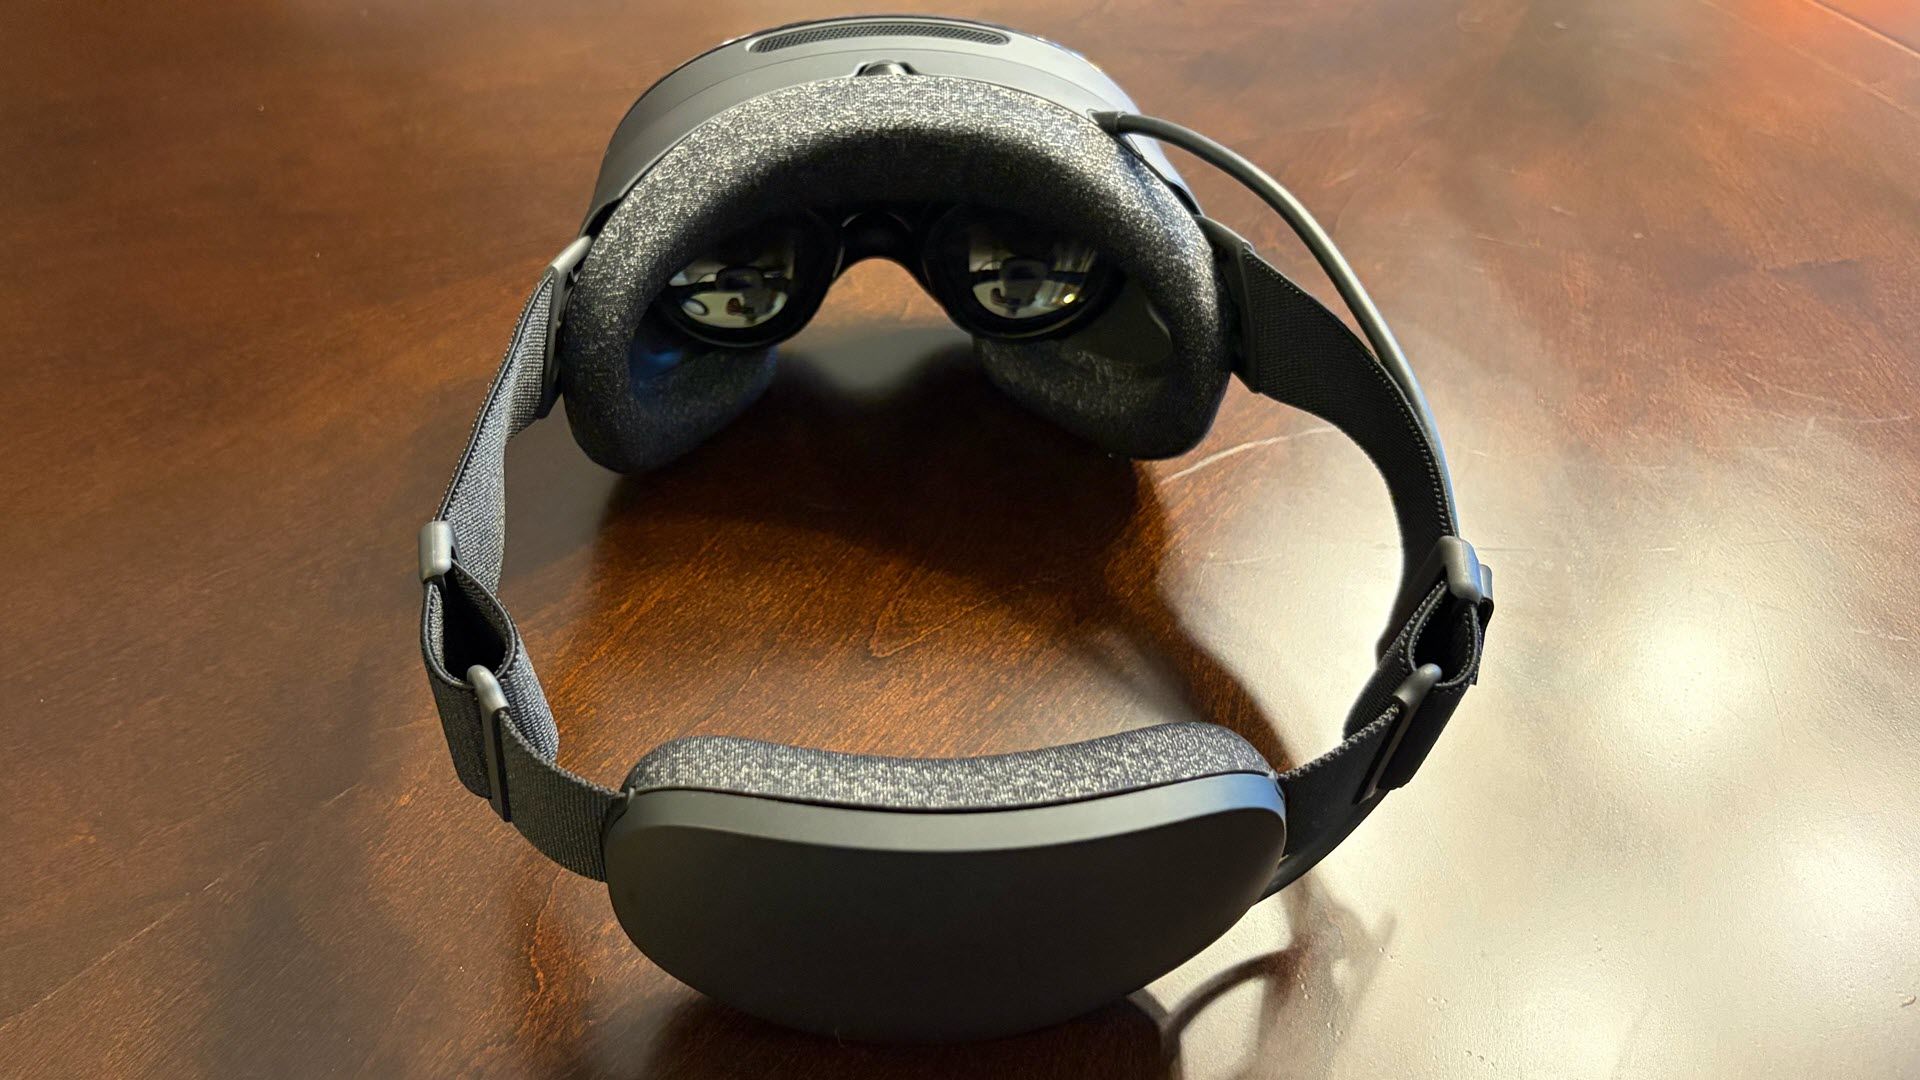
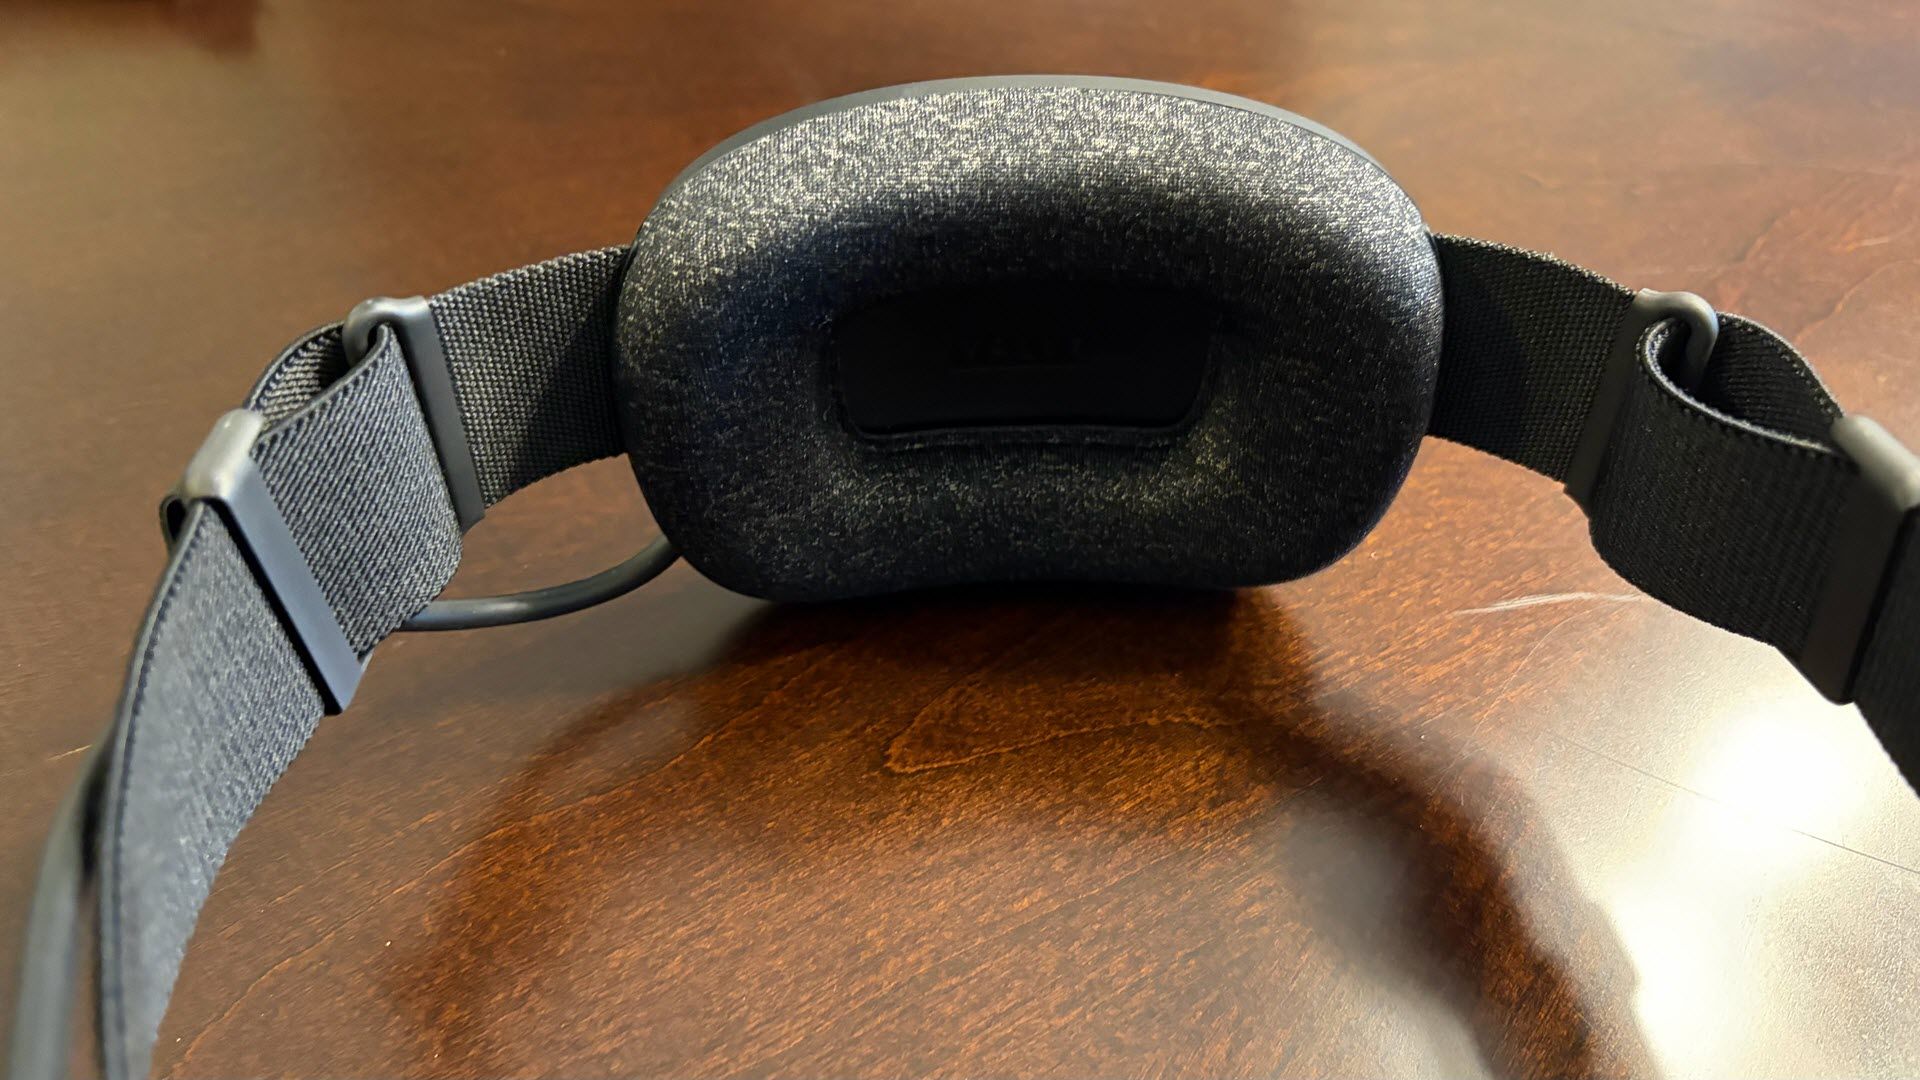
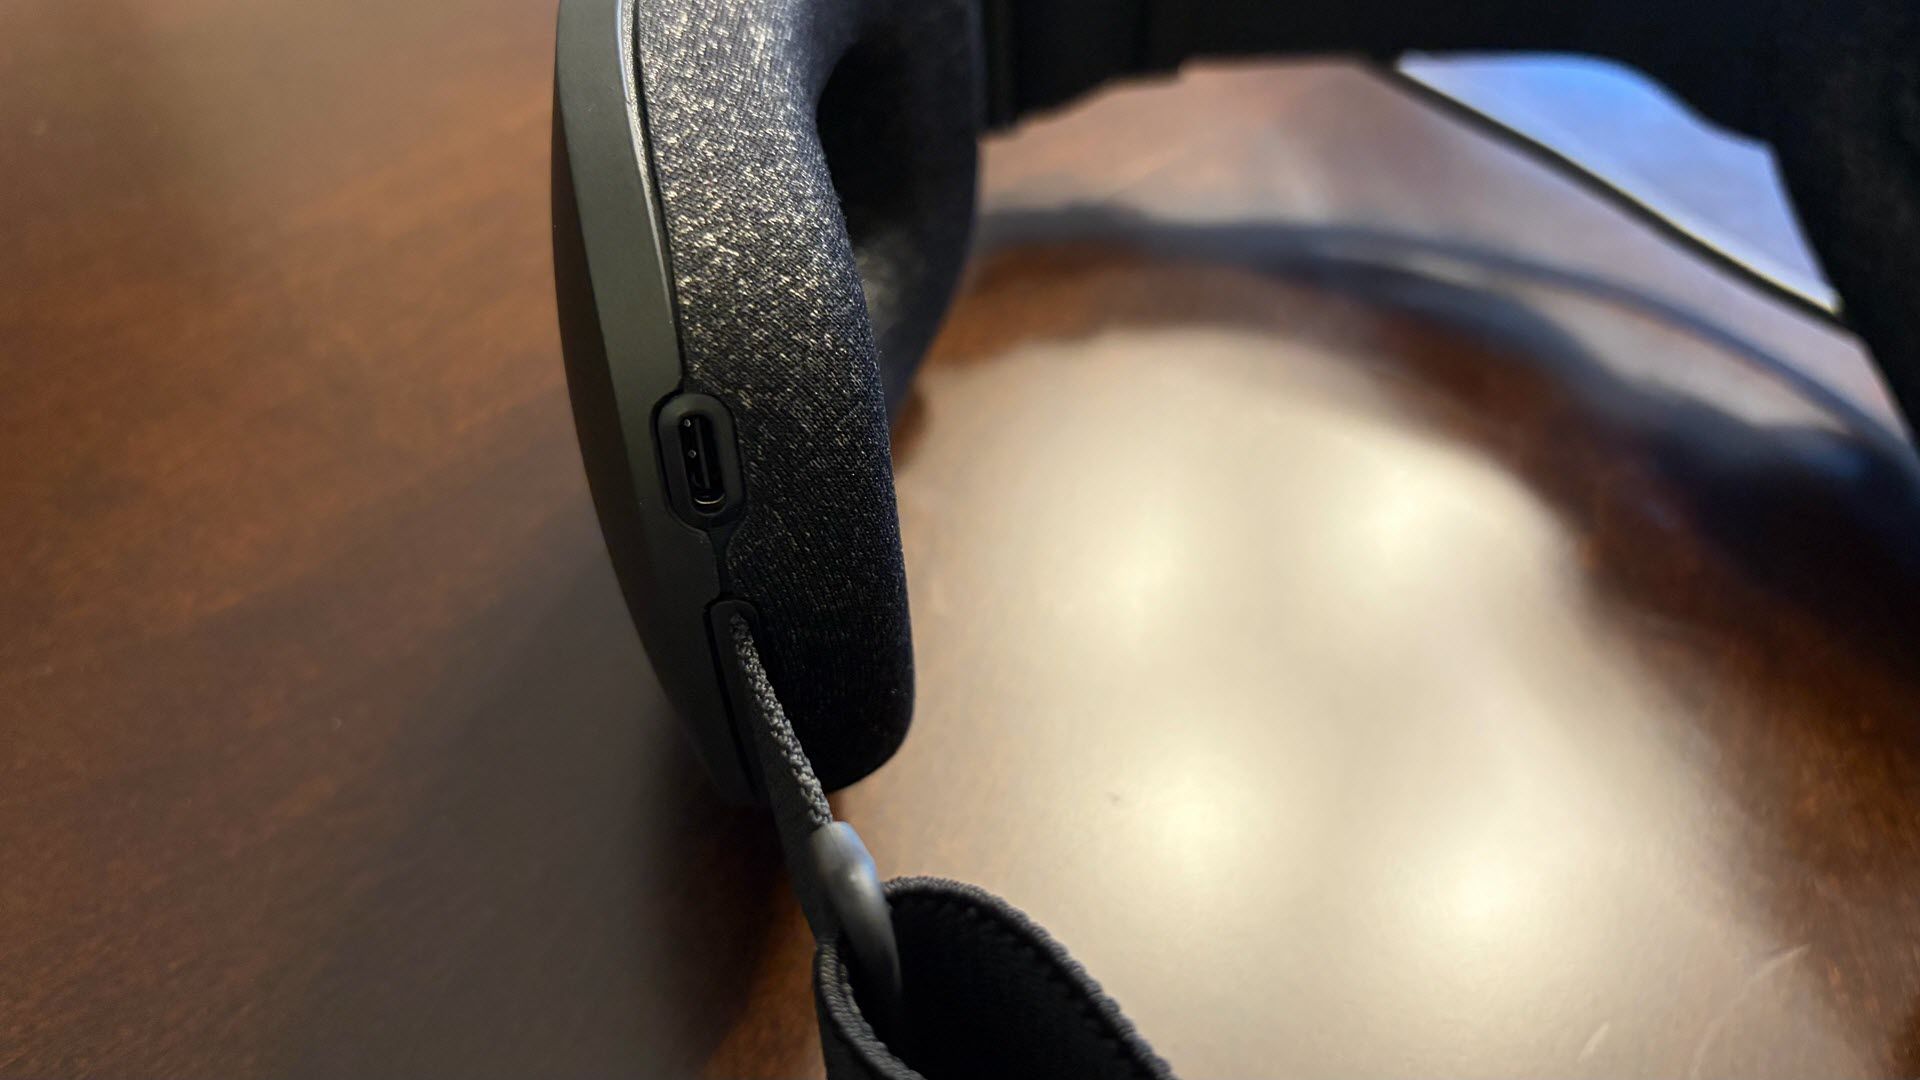
Speaking of the strap, I found it to be comfortable and highly adjustable. The straps attach to a padded restraint (which houses the 21.6 Whr battery) that cradles the back of your head. The Stream Frame's lightweight design, combined with the pressure-relieving front gasket and rear cradle, helped reduce fatigue after extended sessions (particularly with Half-Life: Alyx). Speaking of the rear cradle, I appreciate that the USB-C port for charging the Steam Frame is located here instead of on the front of the headset. This leaves the dangling cord behind, out of the way (if you want to charge the device while wearing it).
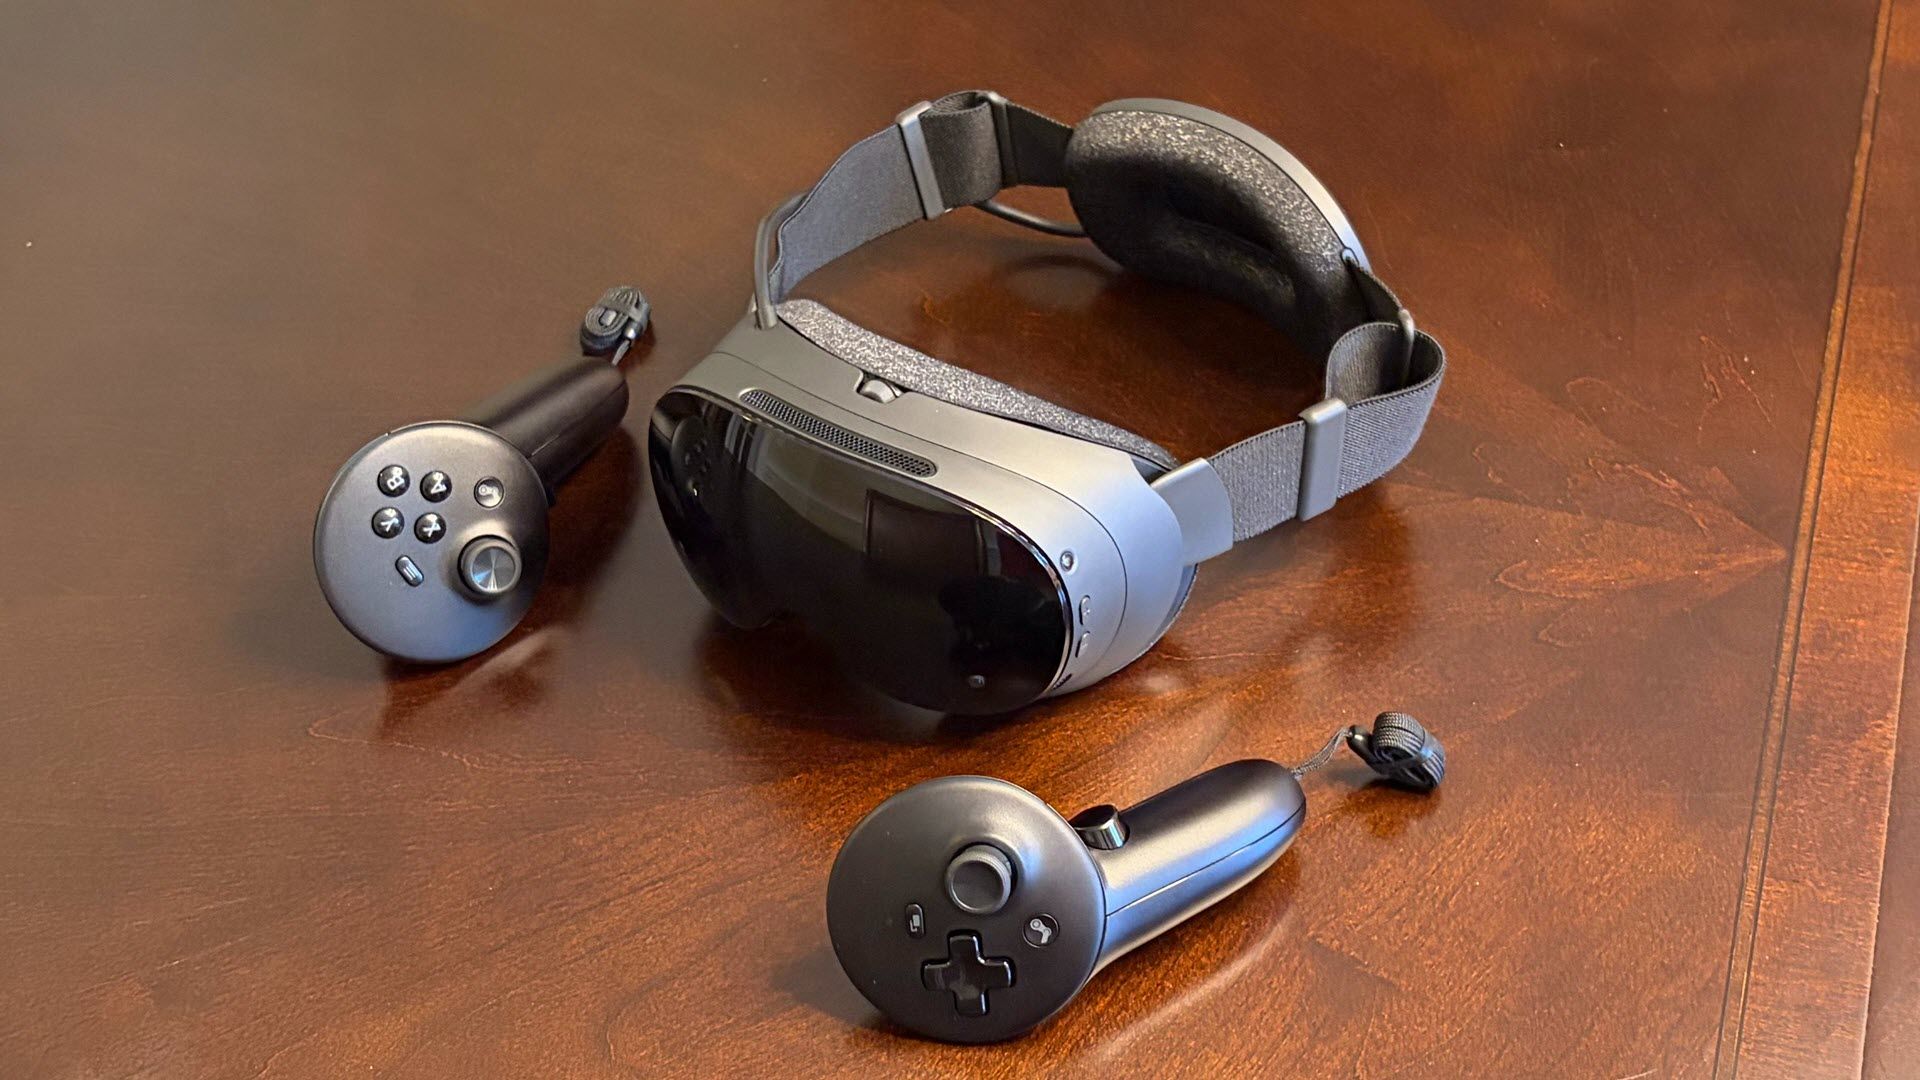
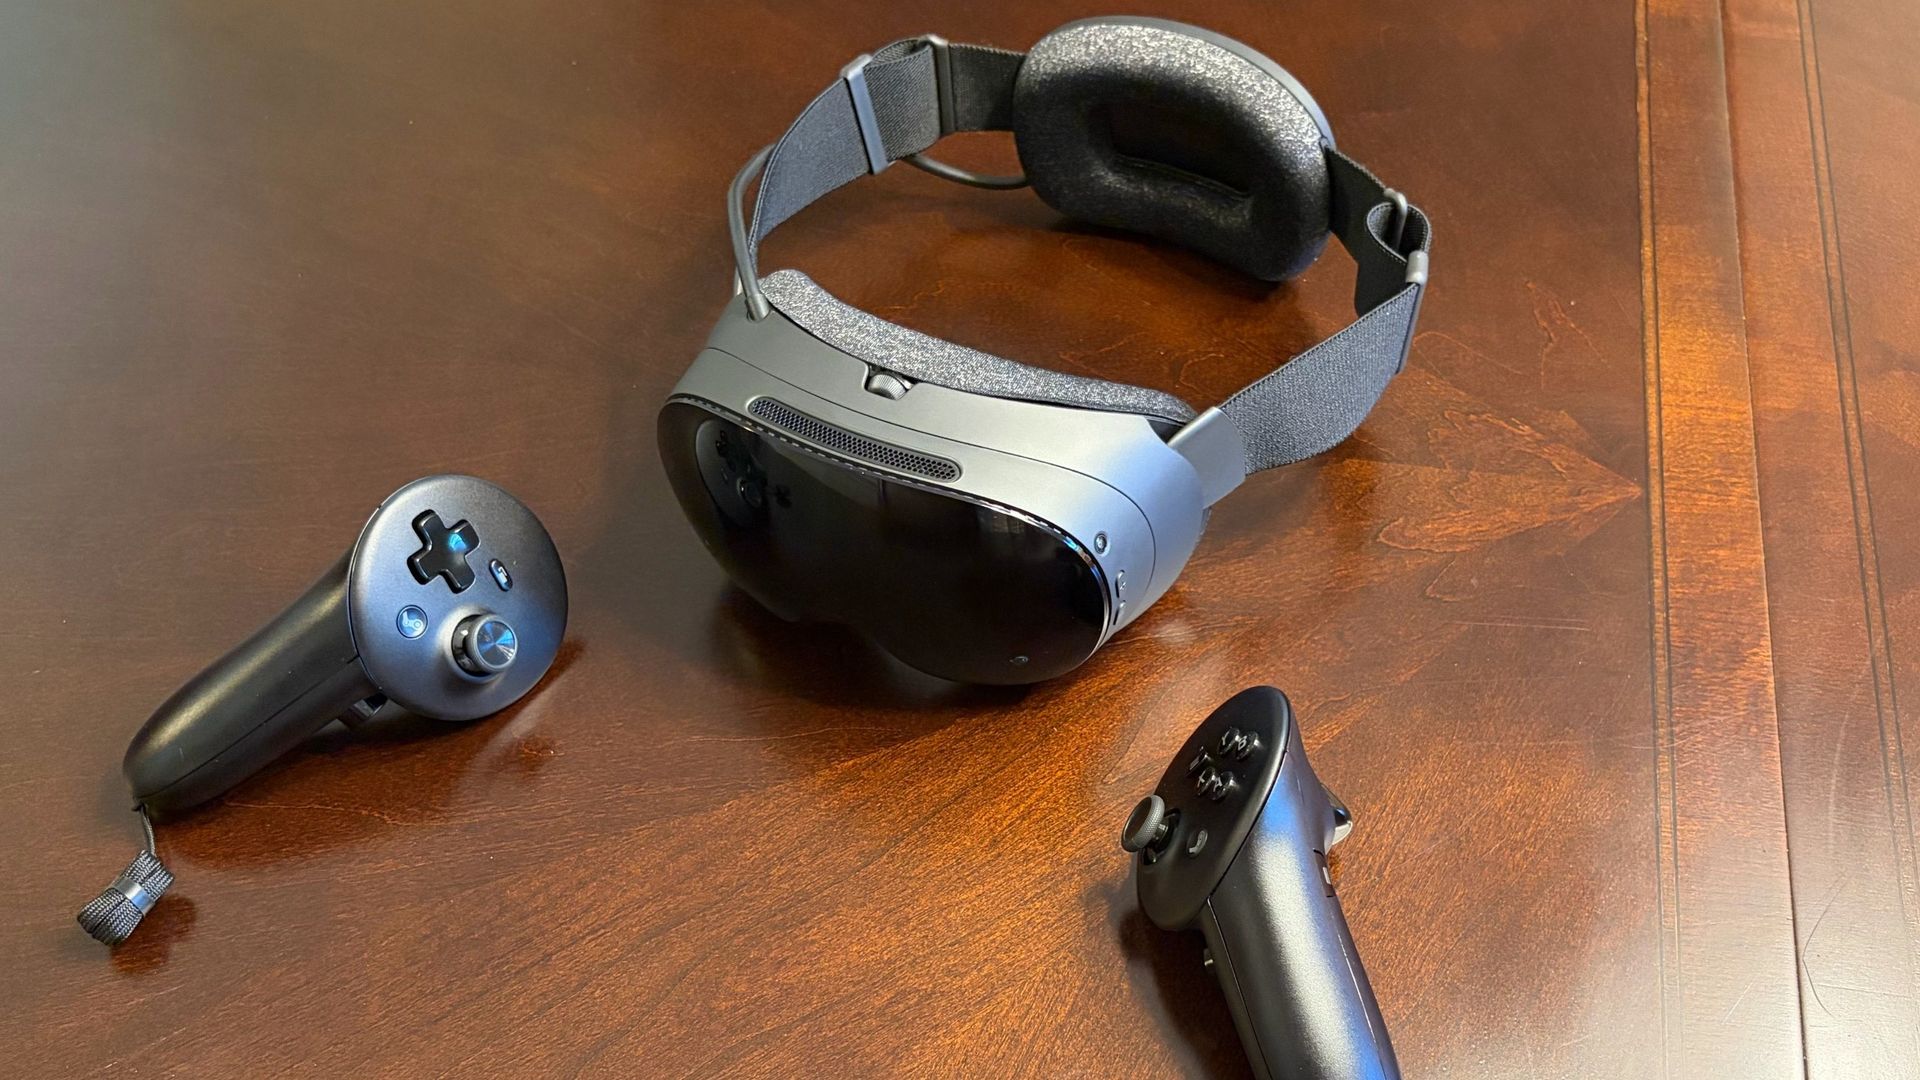
Our review unit came with the Steam Frame, two wireless hand controllers, a USB-C to USB-C cable, and the headstrap. Our kit also included a USB-C power adapter ($29). We also received the Ergonomic Accessories Kit ($59), which contains a headstrap for the Steam Frame, two hand straps for the controllers, and an extended light blocker gasket that fits on the underside of the headset to further reject ambient light. I personally didn’t feel that any of the additional items in the Ergonomic Accessories Kit were necessary to enhance my experience with the Steam Frame.
Valve Steam Frame Specifications
Display
2160 x 2160 per eye
Display Type
LCD
Refresh Rate
72 Hz to 120 Hz, 144 Hz (experimental)
Processor
Qualcomm Snapdragon 8 Gen 3
RAM
16 GB LPDDR5X
Storage
256GB or 1TB, microSD slot
Operating System
SteamOS 3 (Arch-based), KDE Plasma
Field of View
110 degrees horizontal
IPS Range
57.6 to 69.6 mm
Degrees of Freedom
6 DoF
Audio
Dual drivers per ear
Wireless Connectivity
Wi-Fi 7, Bluetooth 5.4 (Steam Frame), Wi-Fi 6E (Dongle)
Battery Life
1 to 4 hours
Weight (Headset + Strap)
15.52 ounces (440 grams)
Price
$1,299 as tested ($1,059 base)
Valve Steam Frame Controllers
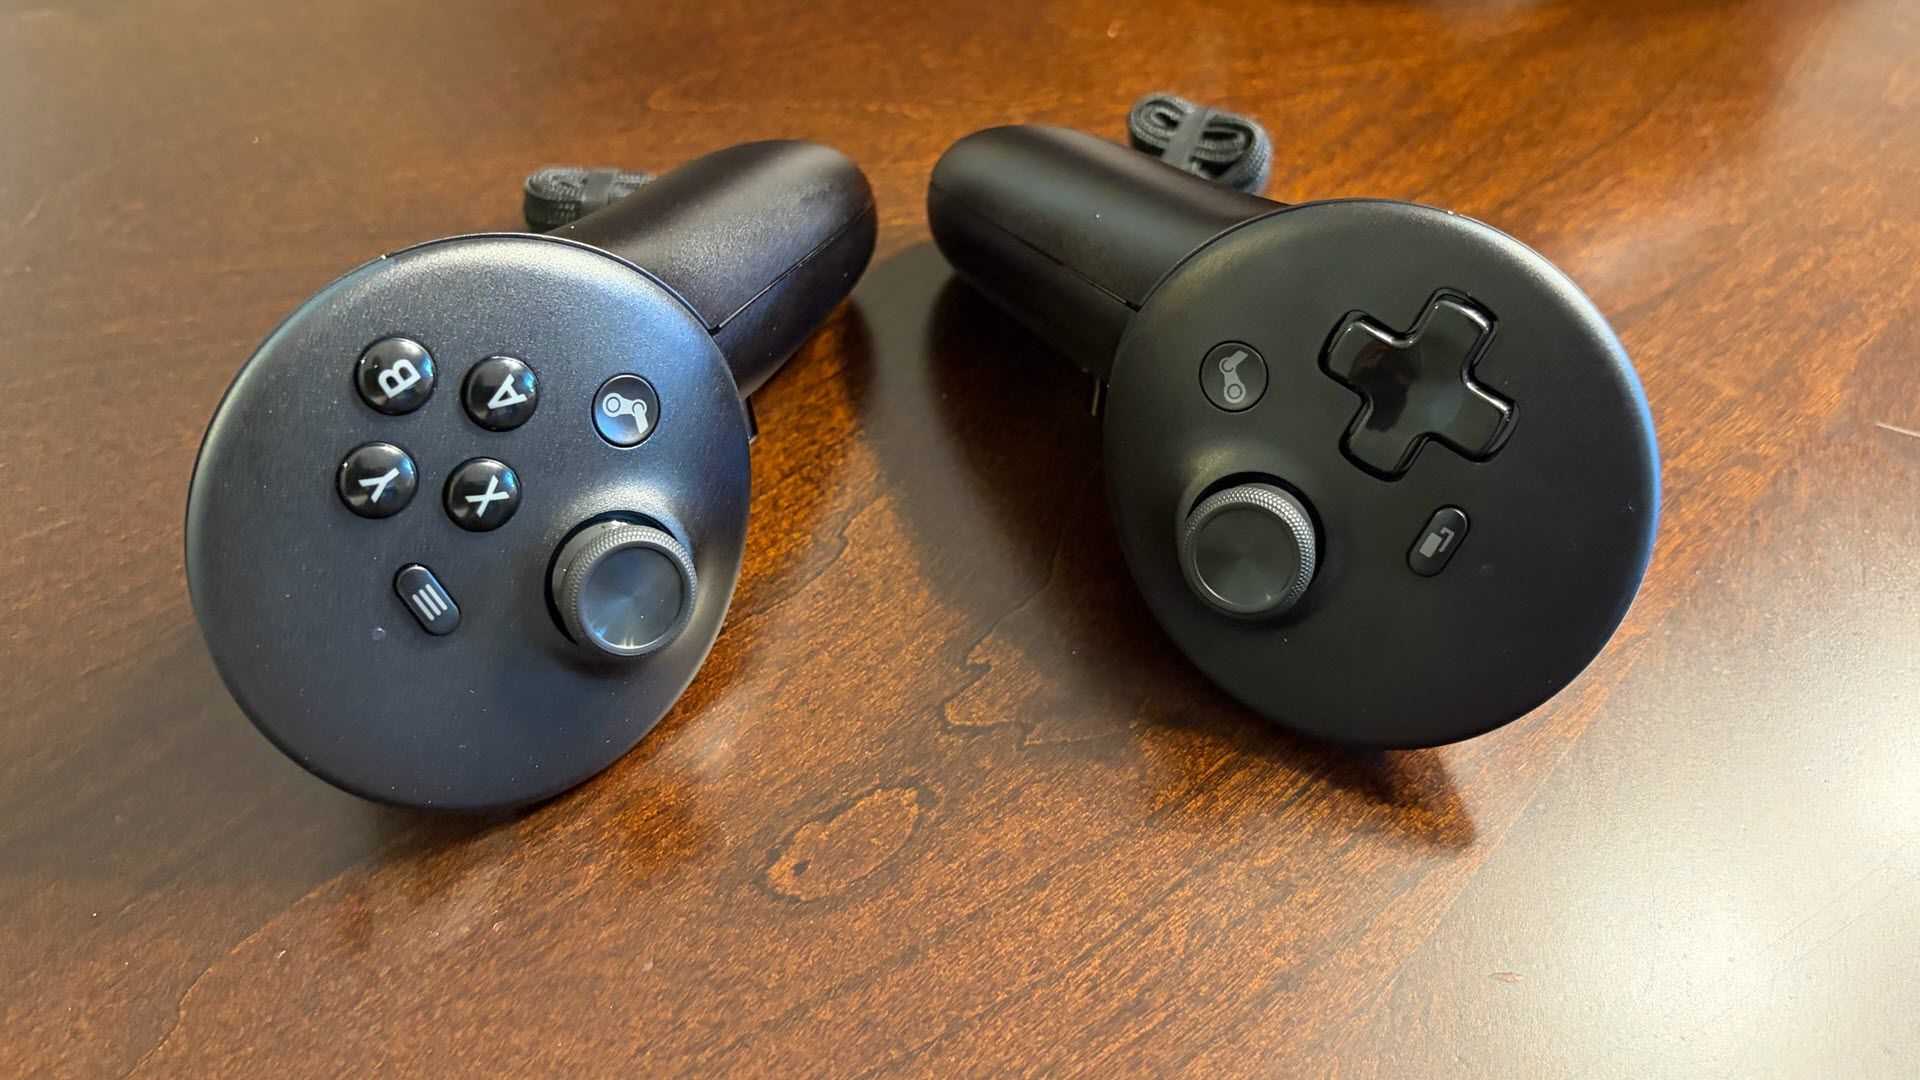
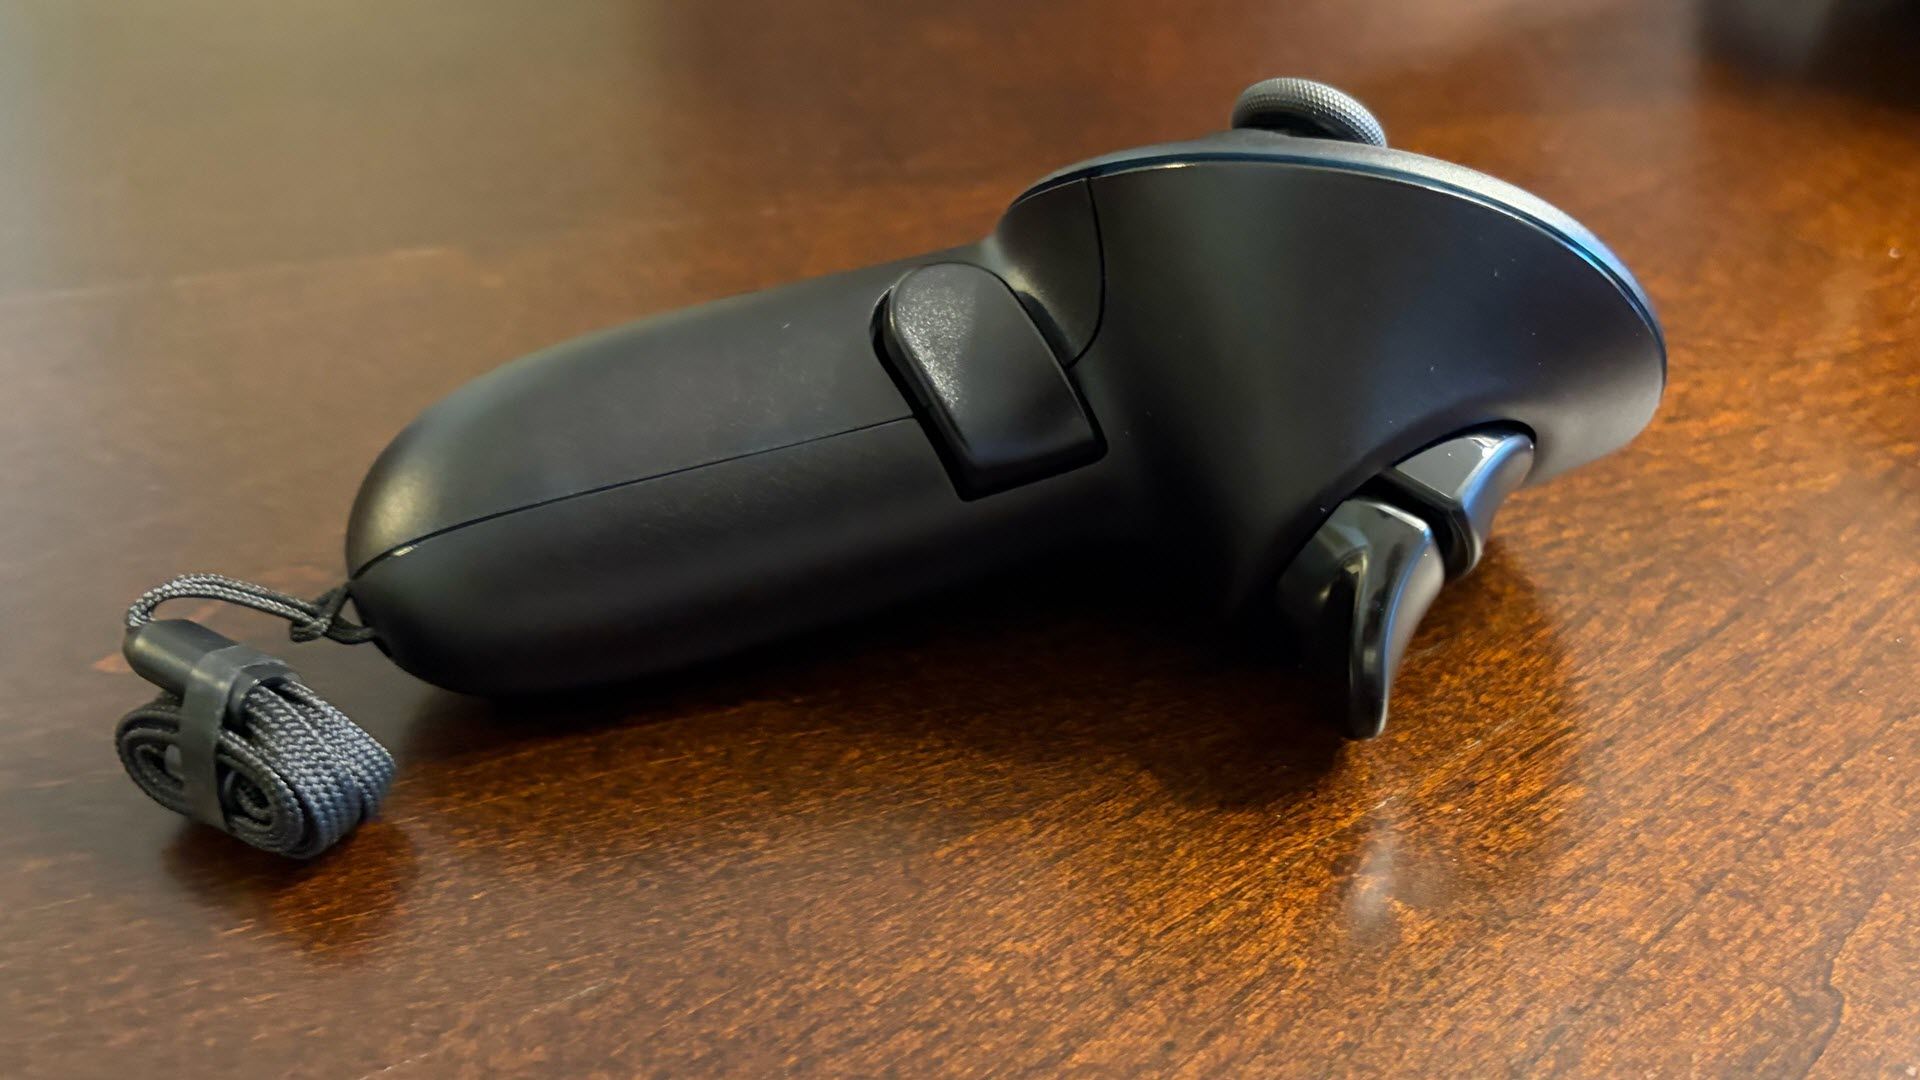
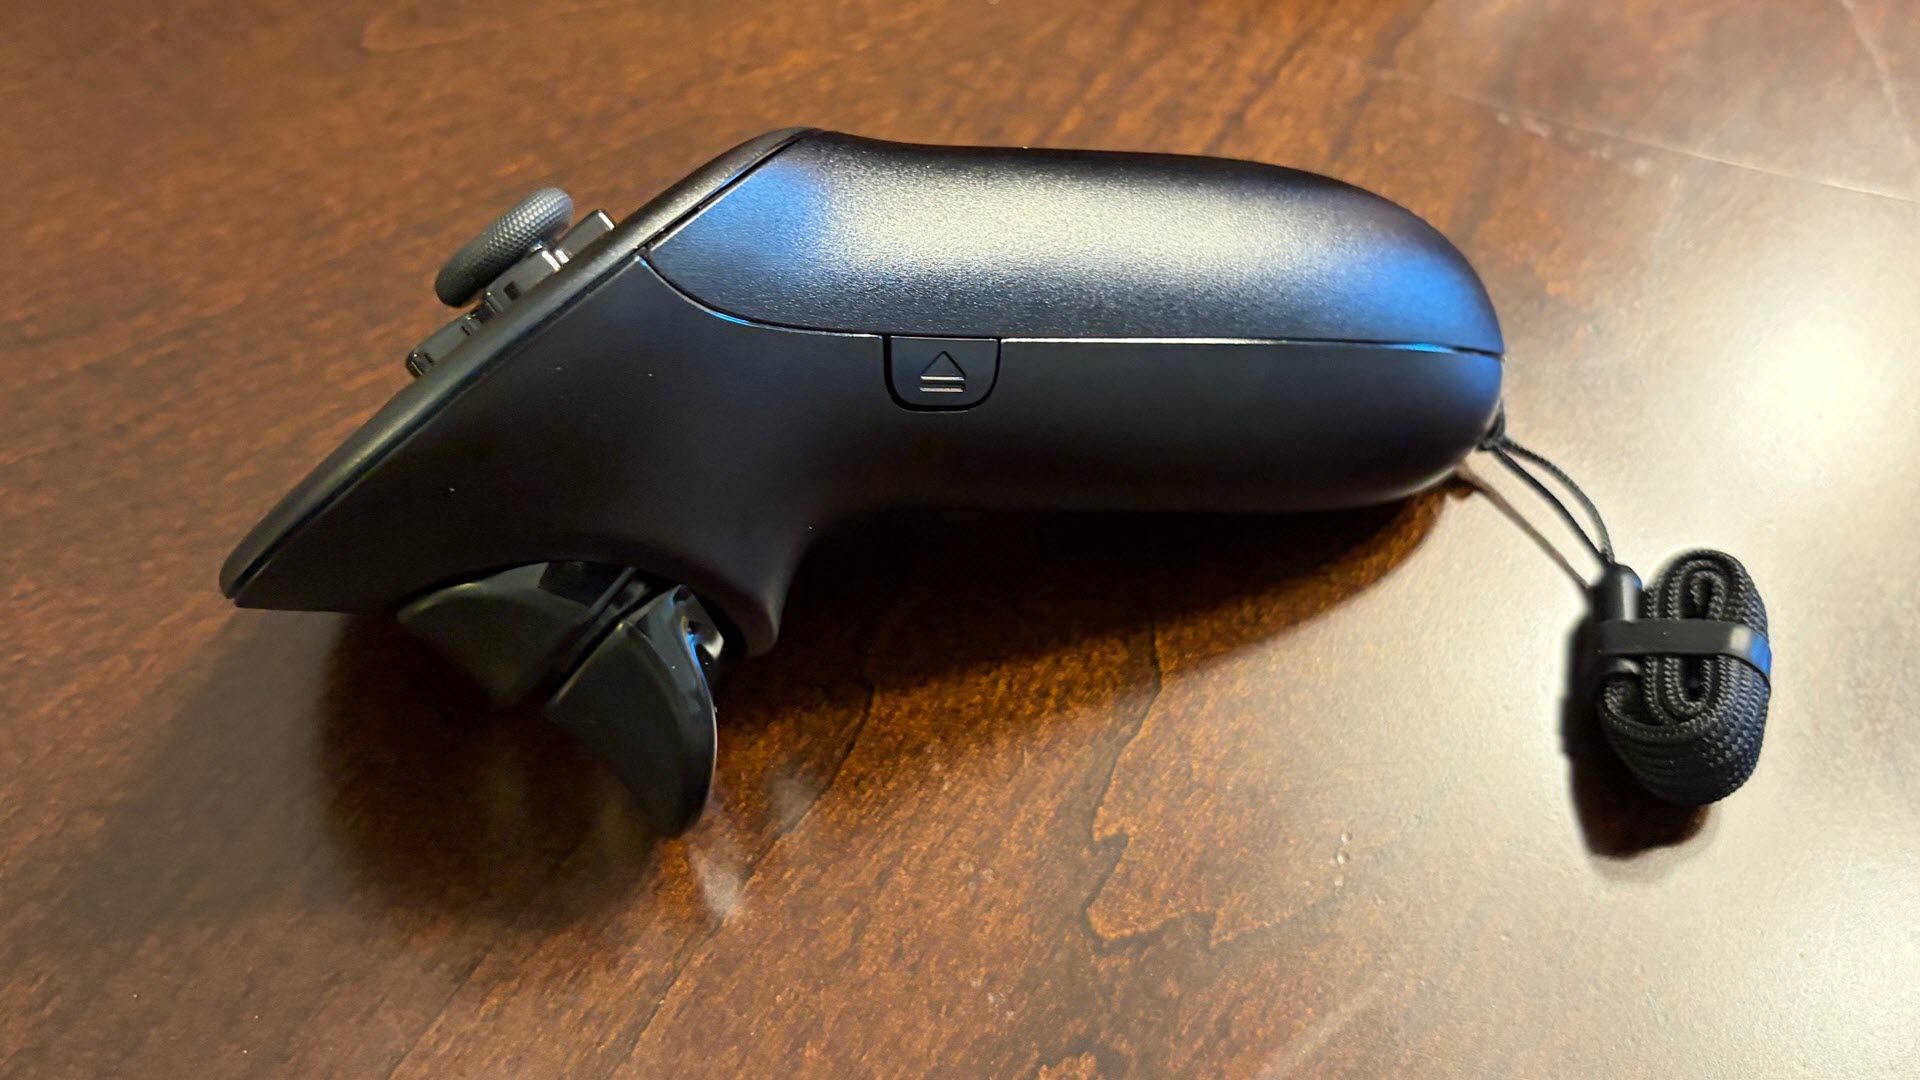
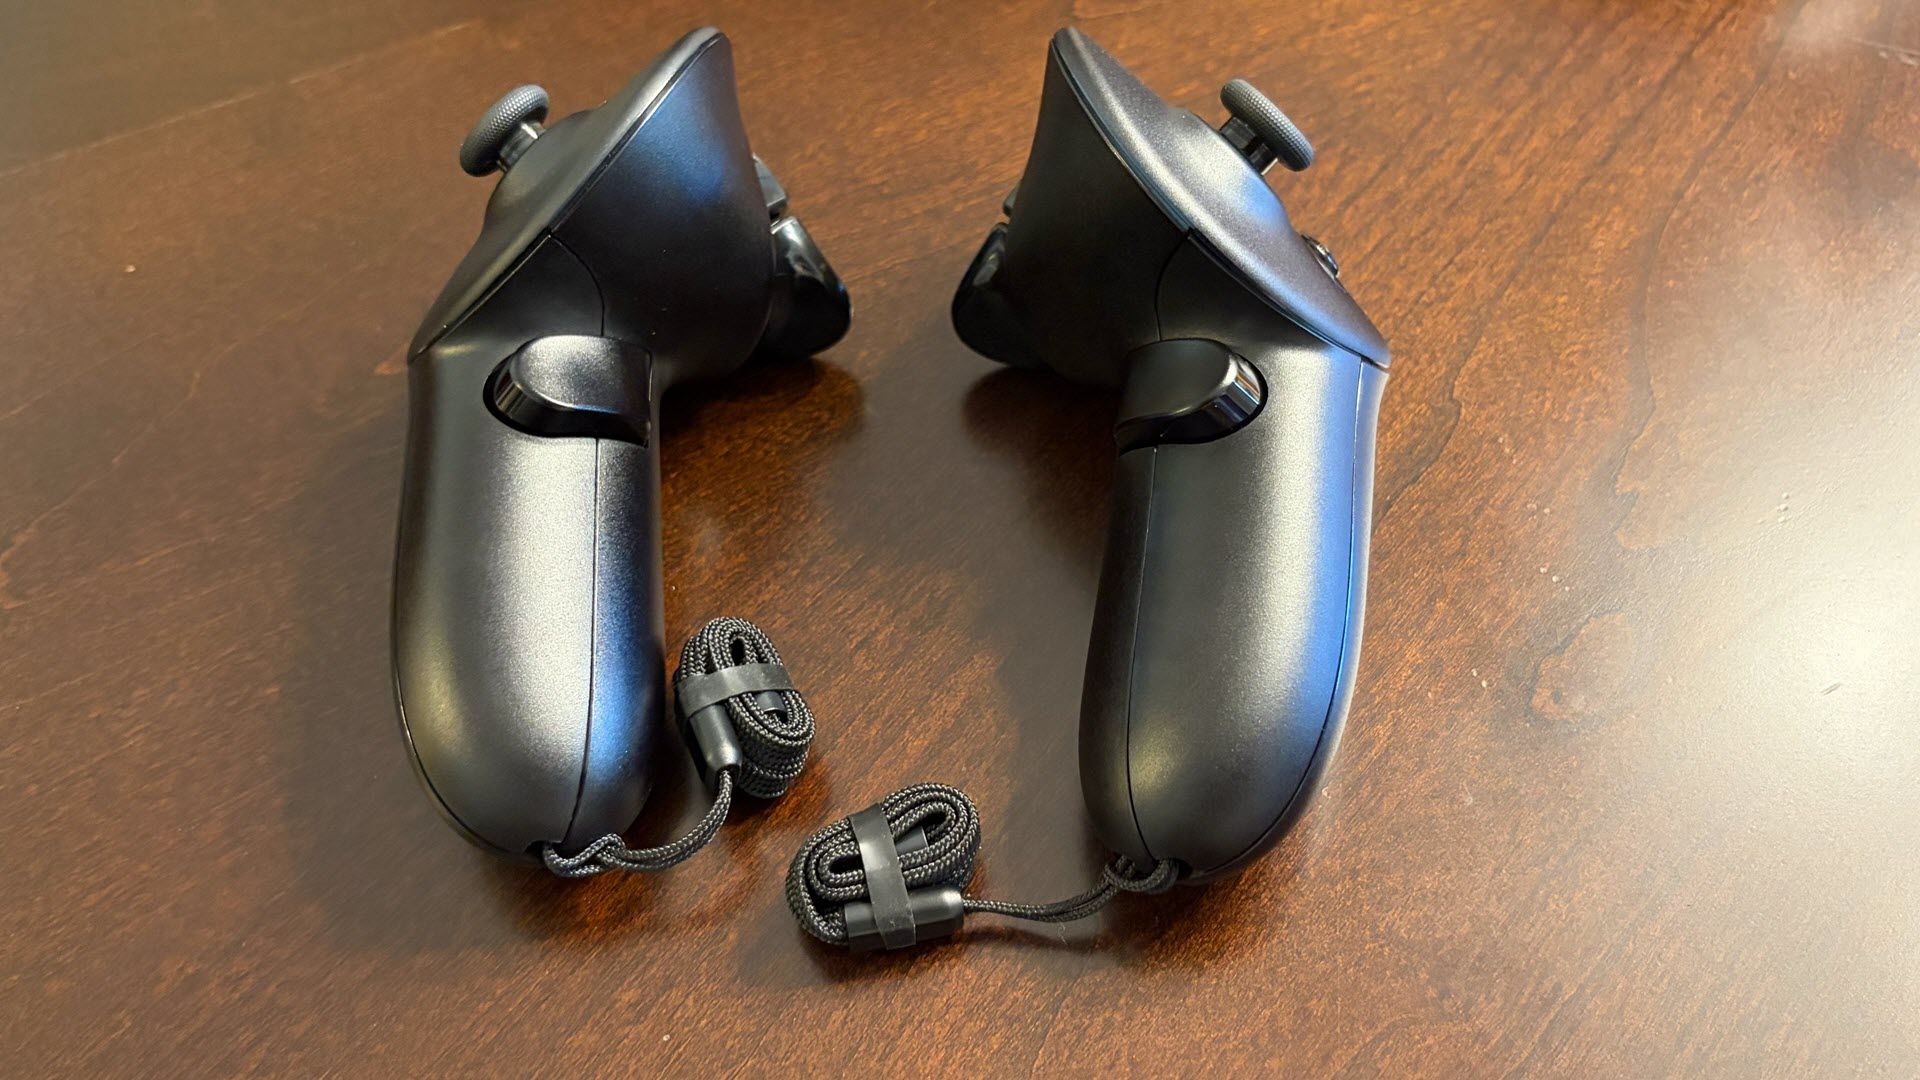
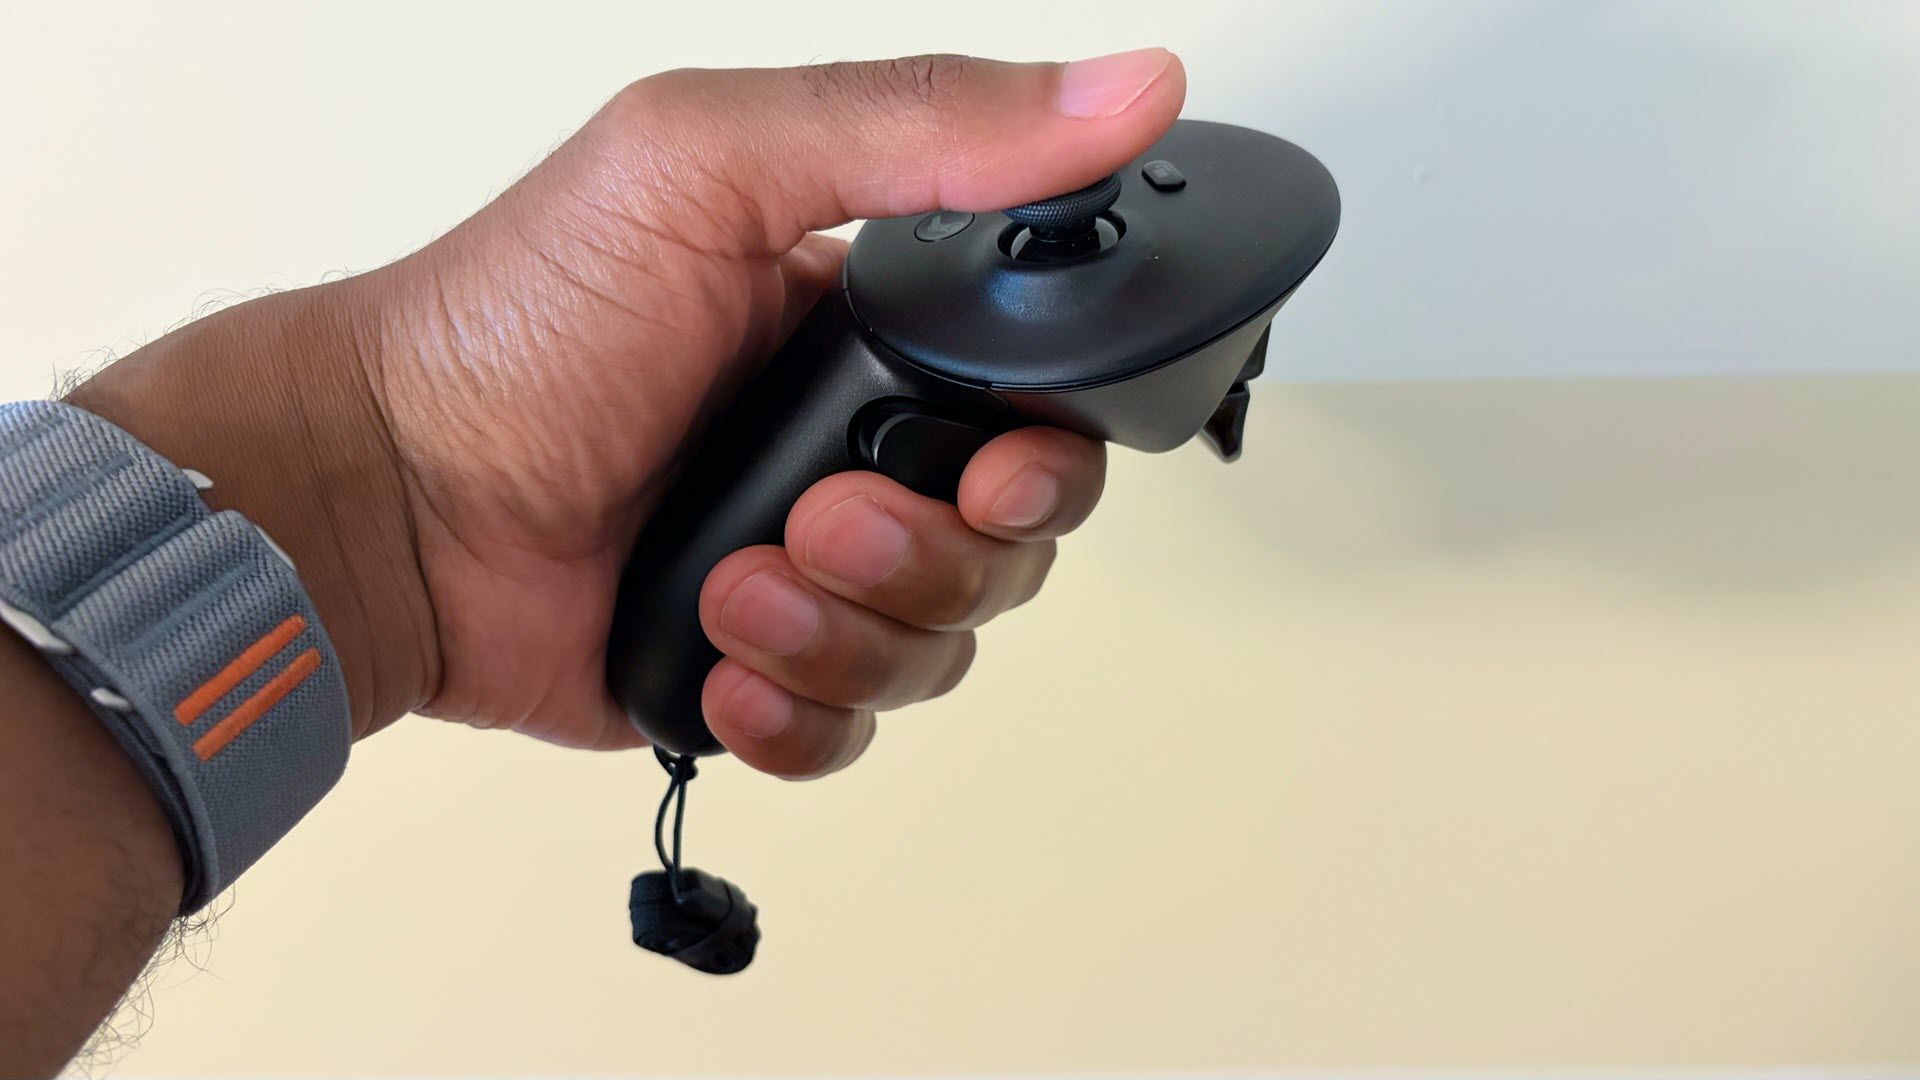
The Steam Frame comes with two wireless controllers that fit nicely in my hands. While the main body of the Steam Frame has a matte grey plastic finish, the controllers are made of shiny, textured black plastic. Each controller (which supports six degrees of freedom) features a dual-stage grip button, an analog trigger, a bumper, a Steam button, and a magnetic thumbstick with capacitive finger sensing. This is the same thumbstick that you’ll find on the Steam Controller used with the Steam Machine.
The right controller also has AXBY and Menu buttons. The left controller adds a View button and a D-pad. Both controllers feature a haptic motor and capacitive finger tracking. The controllers communicate directly with the Steam Frame using a dedicated Bluetooth wireless link.
Each controller is powered by a single AA battery, which Valve says lasts roughly 40 hours (a pair of AA alkaline batteries are preinstalled).
Valve Steam Frame Hardware
Valve designed the Steam Frame as a dual-purpose VR headset. It can stream games directly from your high-powered gaming PC, or it can work as a standalone headset (think Meta Quest series), thanks to its Qualcomm Snapdragon 8 Gen 3 Arm SoC and 16GB of unified LPDDR5X RAM. Although our review unit came equipped with 1TB of UFS onboard storage (further augmented by a microSD slot), a cheaper SKU with just 256GB of internal storage is available.
In standalone mode, the Stream Frame uses FEX emulation along with Proton to run x86 Windows games on ARM64 hardware.
However, for the best performance, you’re going to want to leverage your desktop PC and wireless connectivity for streaming games from Steam. The Steam Frame includes an integrated 2x2 Wi-Fi 7 radio, plus a standalone Wi-Fi 6E dongle that plugs into a free USB 3.0 port on your desktop or laptop. The dongle provides a low-latency link between your PC and the Steam Frame. Instead of clogging your wireless router’s bandwidth or adding unwanted lag, the direct wireless connection improves performance and reduces latency.
So, in essence, the Steam Frame takes a multi-pronged approach. The 5 GHz band primarily connects to your home network for internet, firmware updates, and software updates. The 6 GHz link, however, connects only to the wireless dongle. With that link, Valve can implement technologies like foveated streaming, which is an interesting (and much-needed) way to optimize data streaming across the network.
In short, foveated streaming uses the internal eye-tracking cameras to determine what part of a scene you’re viewing at any given time. Whatever is in your direct field of view gets full-resolution, full-priority data to improve image quality. Whatever is in your periphery, or not seen at all, gets lower priority and therefore comes through at a lower resolution. This saves bandwidth and helps to preserve as much performance as possible when streaming.
Just as important as the processing and networking hardware underlying the Steam Frame is its optics system. In this case, the headset uses dual LCDs, offering 2160 x 2160 resolution per eye. Valve opted for LCDs over micro-OLEDs to meet its design, performance, and cost targets. From what I've seen after spending over two weeks with the Steam Frame, it was a wise decision. Micro-OLEDs would have no doubt pushed the starting price of the Steam Frame even higher, as we’re certain that many folks will likely already be wary of the $1,059 base price ($1,299 as tested).
The displays can run as low as 72 Hz and as high as 144 Hz, though the latter mode is experimental right now. All of the games that I played on the Steam Frame defaulted to 72 Hz. The headset uses pancake lenses designed specifically for this use case, and offers a horizontal field of view (FoV) of up ot 110 degrees (a slight improvement over the 108 degrees on the Index).
Setting up the Valve Steam Frame
Setting up the Steam Frame was honestly about as low-impact as you can get with a VR headset. I first plugged the headset into the included wall charger and let it charge for about an hour. Once that was done, I ran through the initial setup, which involved logging into the Steam app on my smartphone to identify the Steam Frame. With that step complete, the setup process commenced, culminating in me installing the latest SteamOS update on the headset from the Stable channel.
(Image credit: Tom's Hardware)
On the desktop side, I plugged the Wi-Fi 6E dongle into a free USB port on my Windows 11 desktop, and it was automatically recognized and ready to use.
Valve Steam Frame Streaming Mode
I tried several games, streaming them to the Steam Frame. The perennial favorite, Half-Life: Alyx, was my go-to game to experience the full power of VR immersion from the headset. The PC rig that I used features a Core Ultra 7 265K processor, 32GB of DDR5-5600 memory, and a GeForce RTX 4060 Ti GPU. I had no trouble maintaining consistently high frame rates without dropping frames, which would be a serious hindrance in VR gaming.
Gunman Contracts “Stand Alone” was another game I tried; it offers quick, furious gunplay and sharp graphics. The game's concept reminded me of old-school arcade shooters from the 80s and 90s, where you used physical gun models to shoot at a display. However, Gunman Contracts “Stand Alone” advances that genre with total immersion and true hand/finger manipulation of objects. My only issue with the game is that the default smooth controls to move your character in the virtual environment physically made me feel sick. My body had a hard time adjusting to the movement because my physical body wasn’t moving forward or backward to match.
I also streamed non-VR games like Batman: Legacy of the Dark Knight, which played fine in Theater Mode. The game played on what vaguely resembled a movie theater screen, with a calming background filling the rest of the dead space around it. However, I couldn’t use the included Steam Frame controllers with a non-VR game, so I grabbed my trusty Xbox Series X wireless controller.
Other non-VR games I tried included BeamNG and Forza Horizon 6. Both games played without issue. The experience wasn’t nearly as all-encompassing as being dropped into a full VR environment, but it was preferable to sitting in front of a smaller physical monitor on my desk.
Valve Steam Frame Standalone Mode
Since the Steam Frame offers a standalone mode without needing a wireless “tether” to a PC, I tried three games promoted to work with the handset. The first game was a repeat of one I tried in streaming mode: Half-Life: Alyx. The game runs great on-device using ARM64 emulation, though I did notice some stutters and slight performance lags compared to streaming. Valve admits that there is a performance hit with x86-to-Arm translation, but it will vary depending on the game.
Two other standalone games tested were Stellar Café and Dungeons of Eternity. The former is a cartoonish game set in a cafe, where you can use your voice to interact with the in-game robots/characters who serve you beverages. The back-and-forth conversational flow is fun and engaging. In fact, the conversations almost seemed a little too real, with human-like responses and realistic commentary.
Valve Steam Frame Battery Life
The Steam Frame's battery life varies greatly depending on whether you’re streaming from your PC or playing games natively on the headset. For example, when I played Half-Life: Alyx directly on the Steam Frame at 72 Hz, I got about an hour of runtime before it died. However, when streaming, I could easily get more than double that amount at the same refresh rate, since the Arm processor isn’t taxed nearly as heavily.
I also saw a little over an hour of runtime with Gunman Contracts “Stand Alone” when running natively. Non-3D games like Forza Horizon 6 lasted for well over two hours when streaming from a PC.
However, even with the shorter runtimes with standalone play, battery life wasn’t an issue for me. I like to take a break from VR games at least every hour or so to have a reality “reset” and to give my brain a rest.
Bottom Line
I found the Steam Frame to be a versatile, enjoyable headset during my time with it. Weighing in at less than a pound, the headset is low-impact and comfortable to wear for hours on end. The foam padding around the headset provides a good seal against your forehead, and the weight is well balanced, partly because the battery sits at the back of your head.
Performance while streaming from a PC was excellent, while standalone gaming takes a hit due to the emulation required for the Snapdragon 8 Gen 3 Arm SoC. However, Valve is billing the Steam Frame as a streaming-first platform, so that shouldn't surprise you. Consider standalone gaming an added bonus if you want to have a quick VR gaming session when you’re away from your PC.
Valve also made some smart design choices, including wireless links between the Steam Frame and your PC via the Wi-Fi 6E dongle, monochrome passthrough to help you orient yourself when wearing the headset, and adjustable IPD to accommodate a wide range of faces.
However, what will make or break the Steam Frame is its price, which starts at $1,059. That’s a tall order in this economic climate, when gamers are already being assaulted from multiple fronts with rising memory, storage, and GPU prices. The $1,059 price gets you only 256GB of internal storage, and opting for 1TB costs $1,299. You could always get the cheaper model and add your own microSD card, but you also have to contend with the inflated costs of portable storage.
But if you’re willing to ignore the price and have your mind set on a lightweight VR gaming experience, and you have the PC hardware to fuel it, you can’t go wrong with the Steam Frame.
2026 has been a trying year for router manufacturers, as the Federal Communications Commission (FCC) has subjected leading companies to strict oversight and outright bans. As an olive branch of sorts, the FCC has handed out "conditional approvals" to be included on the Covered List to companies that have jumped through all the necessary hoops to satisfy the commission's concerns. Asus is the latest company to secure that approval, which was confirmed in an FCC notice issued this week.
According to the FCC, the following Asus networking products have been granted conditional approval:
RT Series
ROG GT Series
OG Strix GS Series
TUF Gaming Series
ExpertWiFi Series
ZenWiFi Mesh Series
5G MiFi Series
Wireless repeaters
Wireless access points
In other words, Asus' entire wireless networking portfolio is cleared for sale in the U.S., with the conditional approval granted until March 6, 2028 (18 months from the date of issuance). The FCC explains, "We find that each of the Conditional Approvals constitutes 'a specific determination' by [Department of War] that such devices do not pose risks to U.S. national security."
This latest move by the FCC is a welcome sigh of relief for Asus, a Taiwanese company with an extensive networking portfolio and some of the best Wi-Fi routers. More importantly, Asus is ready to unleash a whole new generation of Wi-Fi 8 products over the next year. Wi-Fi 8 promises significant reliability and quality-of-life improvements across a wide range of wireless devices, so having a front-row seat to the transition from Wi-Fi 7 to Wi-Fi 8 is pivotal for Asus.
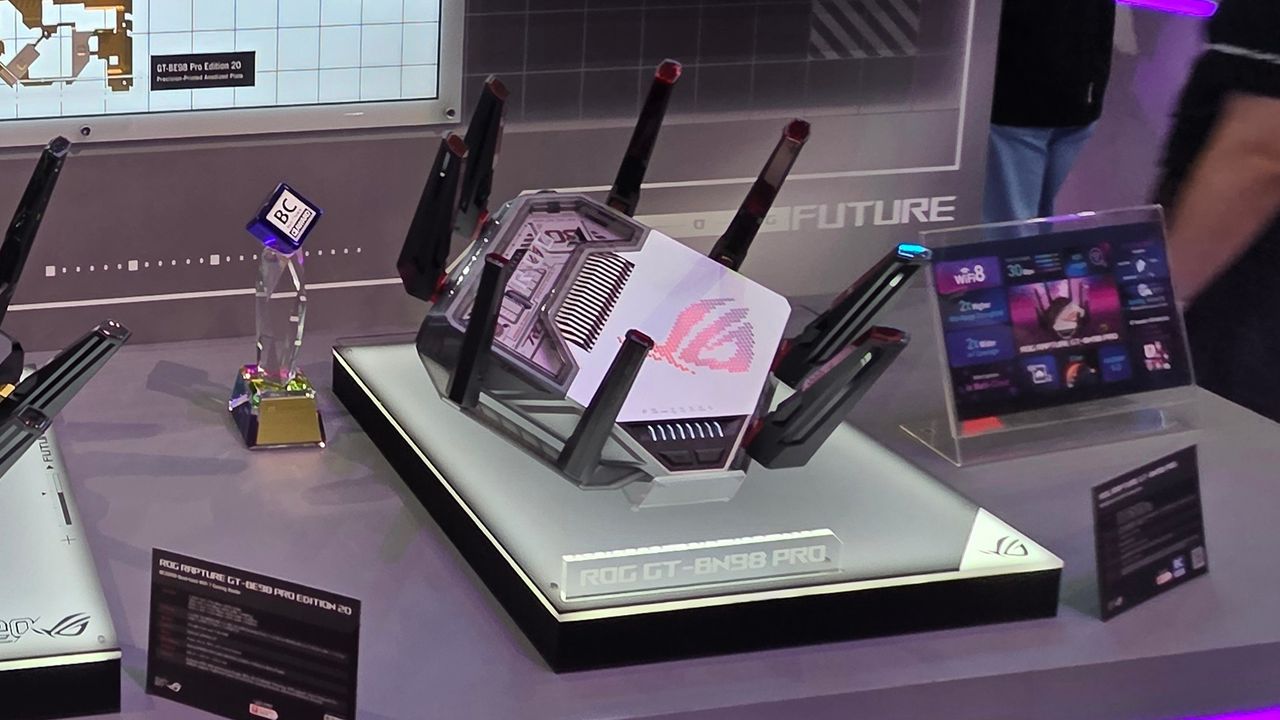
We've already seen a concept ROG NeoCore Wi-Fi 8 router from Asus at CES this year, and the company announced its first consumer Wi-Fi 8 router, the ROG Rapture GT-BN98 Pro, in June. The ROG Rapture GT-BN98 Pro is promising a 2x uplift in real-world throughput compared to its current-generation Wi-Fi 7 products.
Asus joins Netgear and Amazon Eero/Leo on the conditional approval list. The largest player in the U.S. wireless router market is TP-Link, and it still hasn't gained FCC approval. The U.S. government has been reluctant to give its blessing, and a war of words has been brewing over alleged Chinese ties despite TP-Link Systems Inc. being headquartered in California. As a result, the company has not confirmed a release date for its newly announced Wi-Fi 8 "Ultra" routers in the U.S.
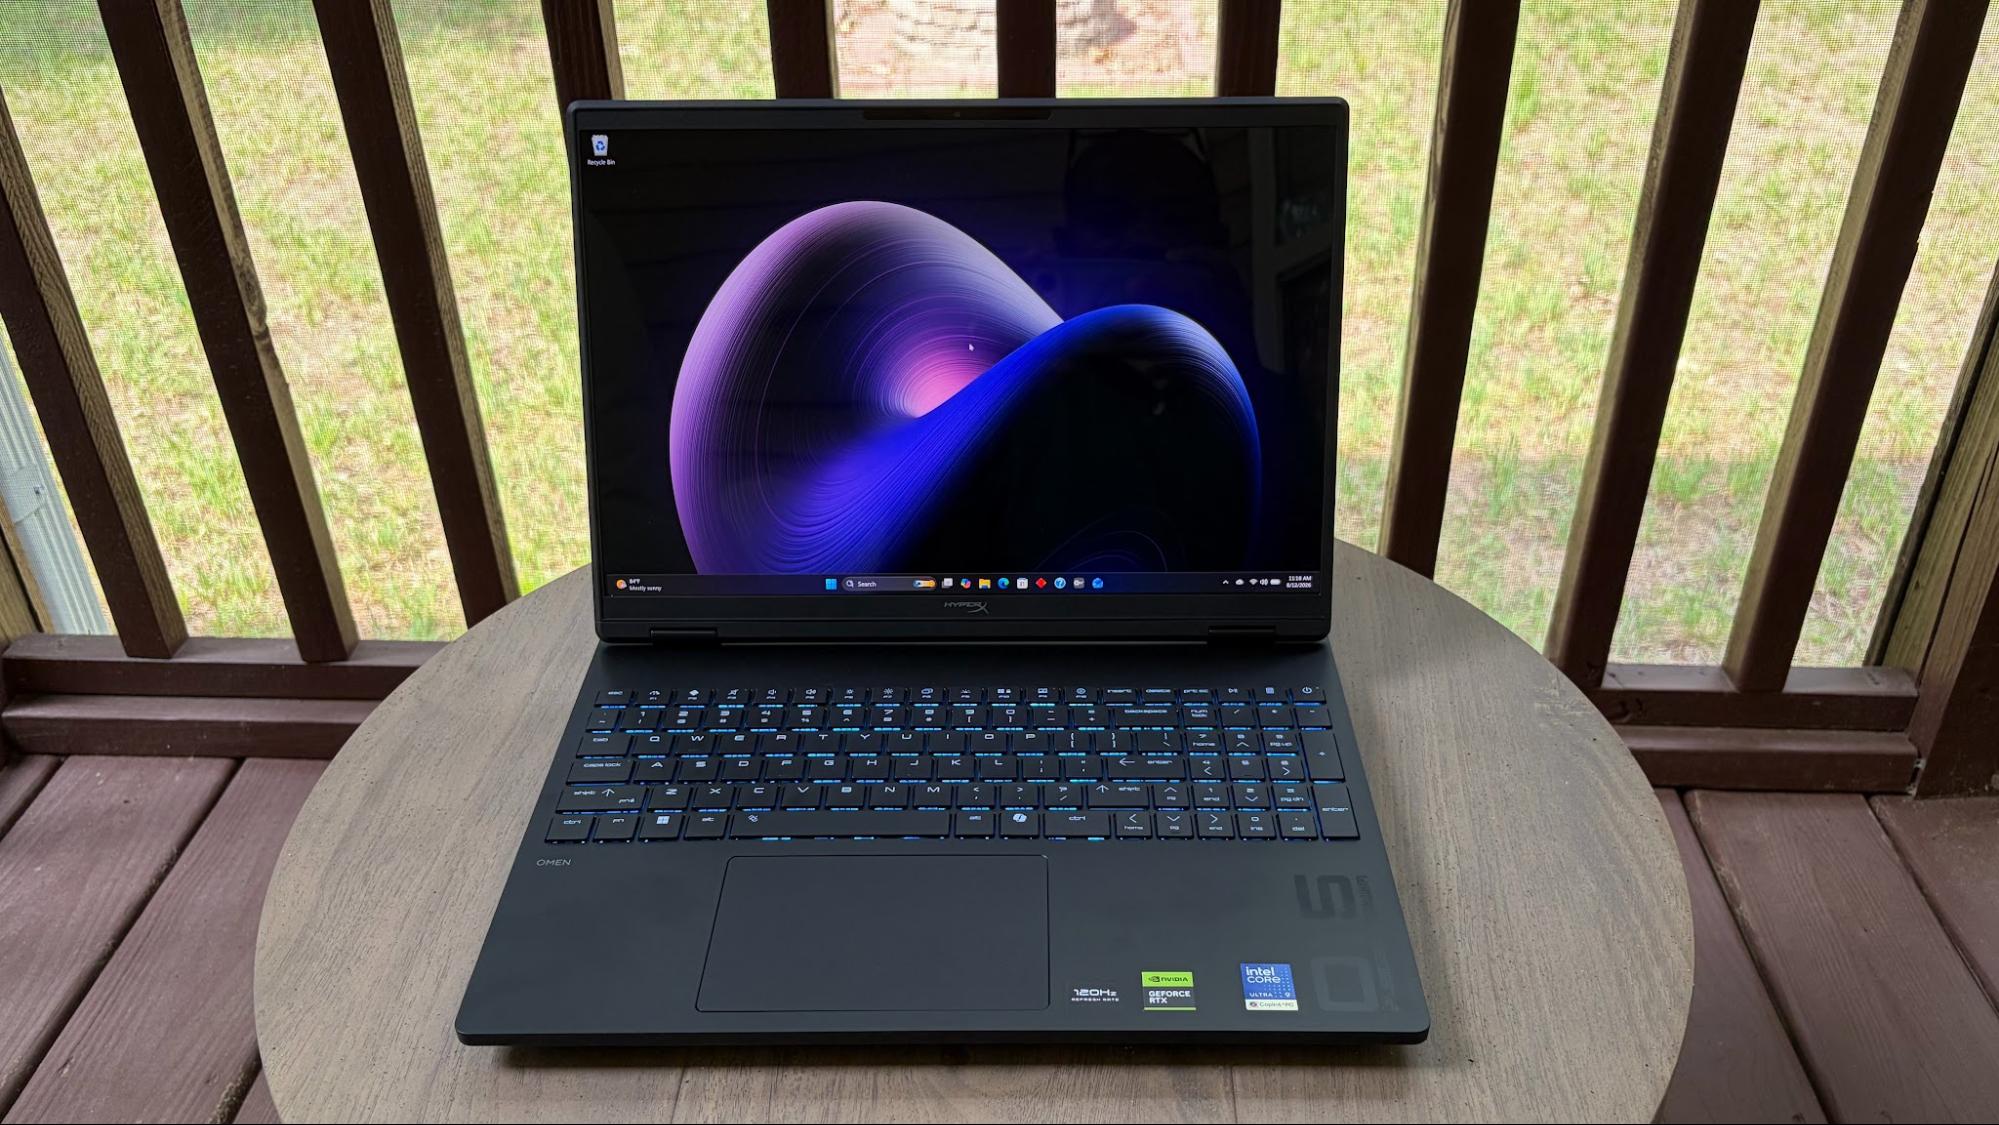
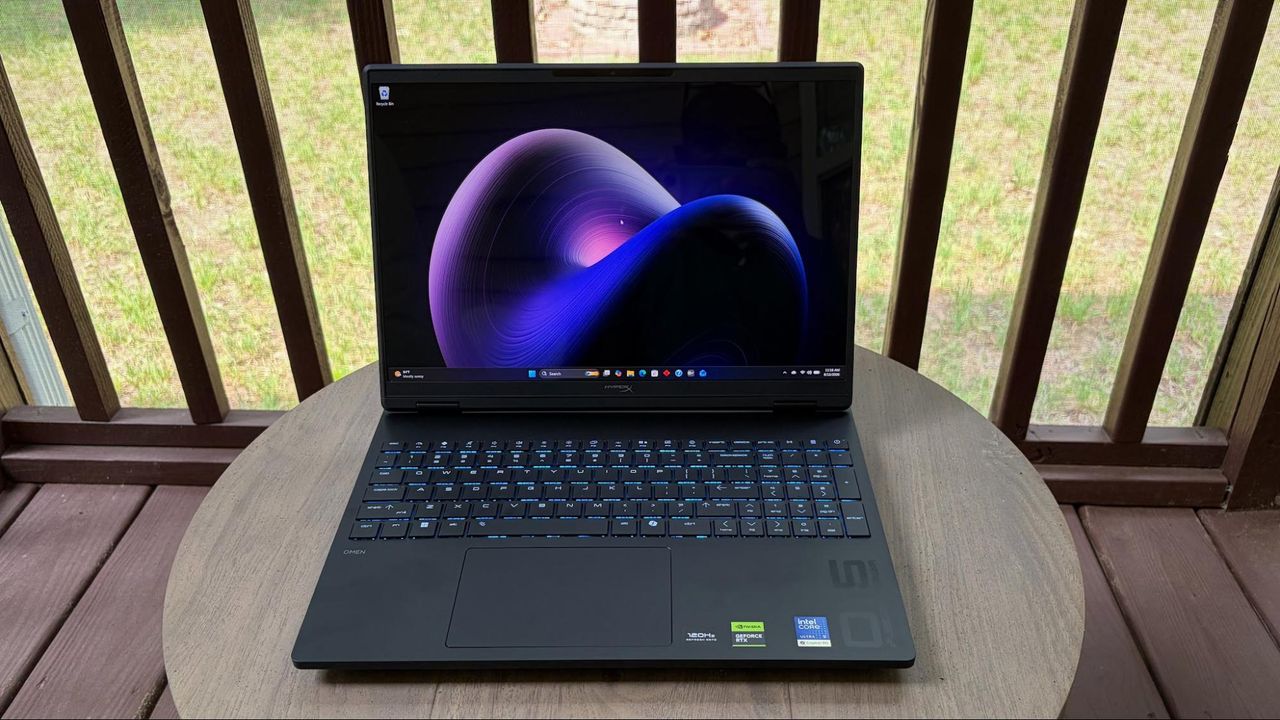
In today’s AI-dominated tech space, gamers have been bombarded with rising prices for storage, memory, and even GPUs. So gamers are increasingly looking for value when purchasing a new system. To that end, HP is attempting to deliver solid gaming performance at an accessible price with the HyperX Omen 15. It’s worth noting that the Omen now takes the place of the Victus 15 in HP’s mainstream gaming laptop range, with the Omen Max occupying the top spot.
The Omen 15 has a strong foundation with a Core Ultra 9 processor, 32GB of RAM, a 15.3-inch 1800p OLED display, and a sleek design. HP delivers all this for just over $2,000, and it has strong gaming performance, but there are compromises in chassis construction and features you’d expect at this price point.
Design of the HyperX Omen 15
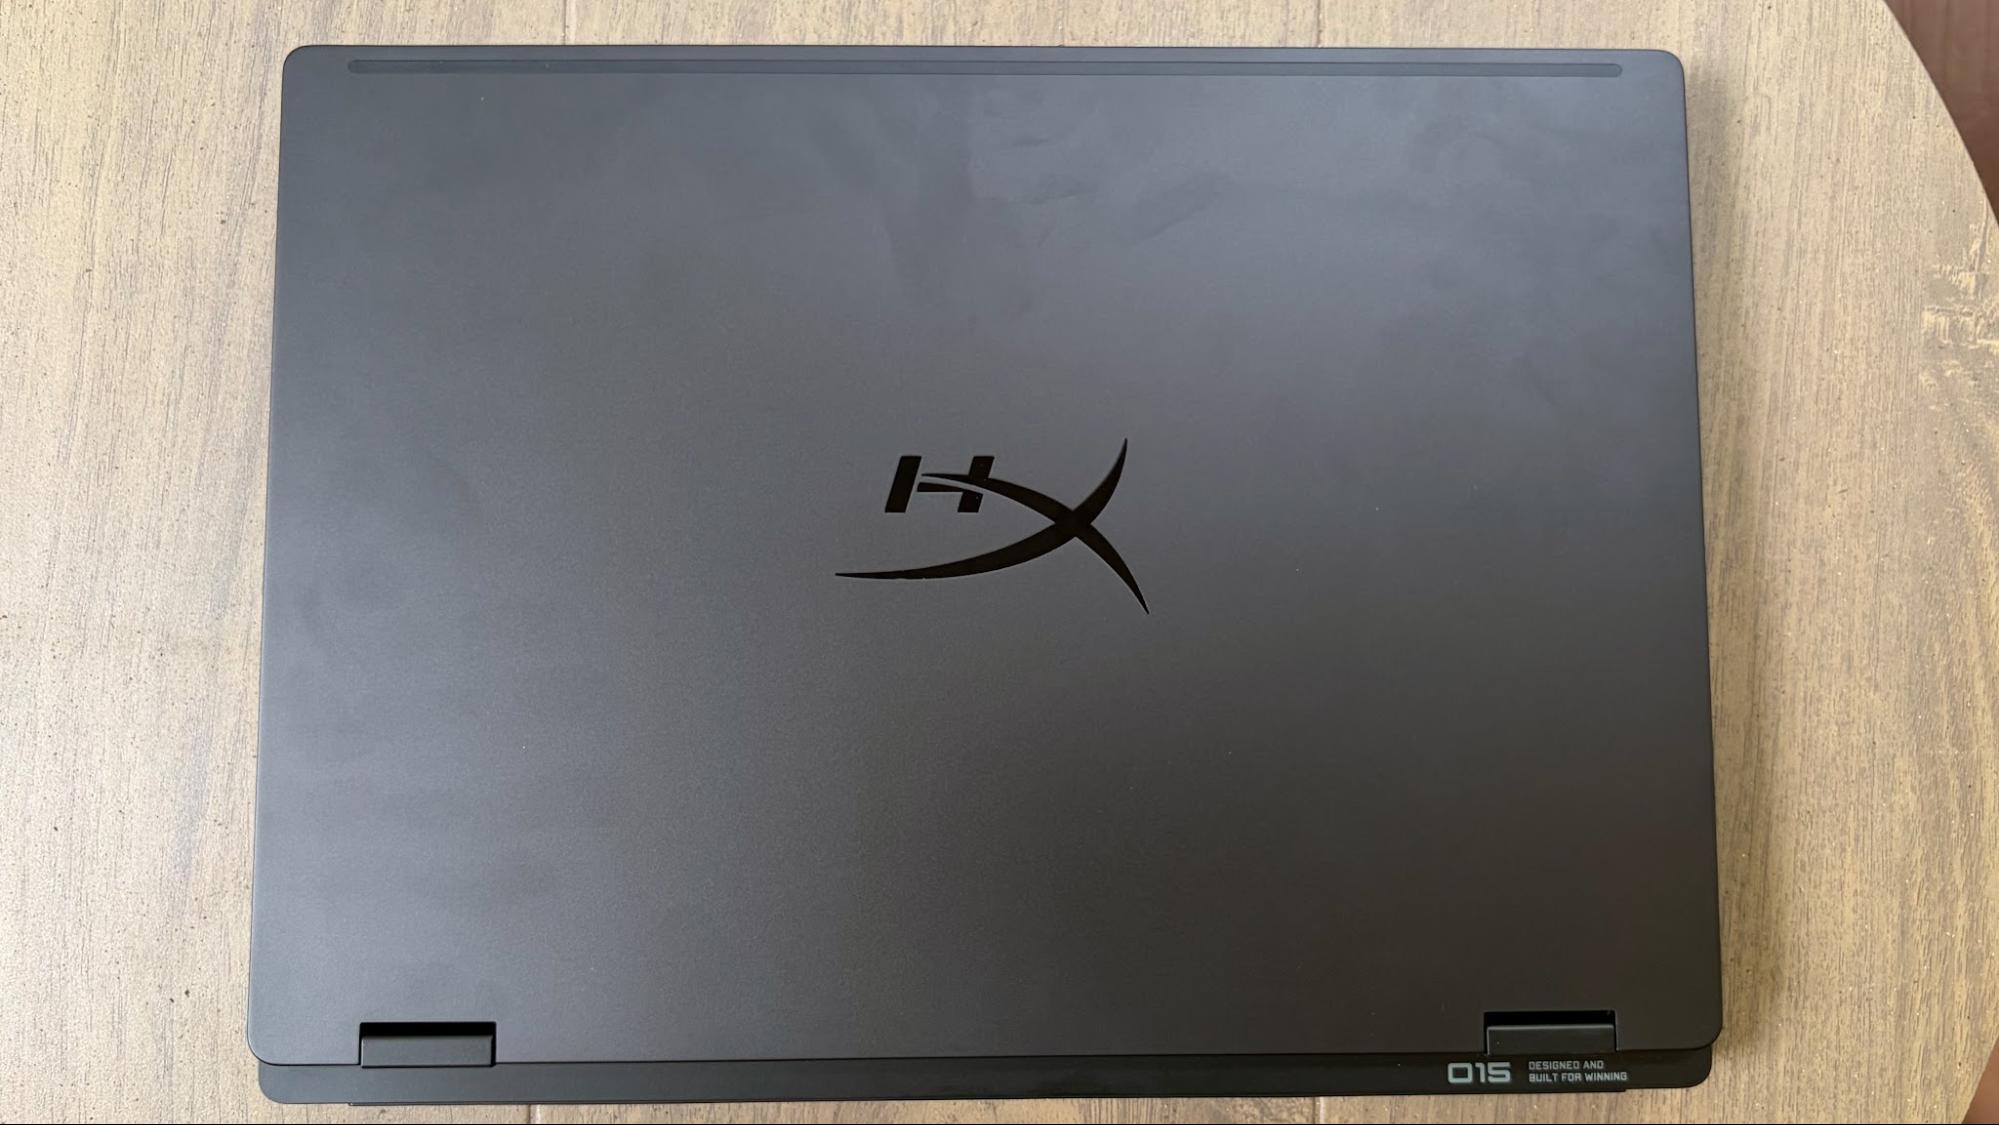
The Omen 15 shares its design language with the slightly larger Omen Max 16 that I previously reviewed. It’s an unassuming design, finished in Shadow Black, with just a hint of shimmering flakes if you look closely under light. There aren’t any garish design flourishes or additional RGB effects (other than the keyboard).
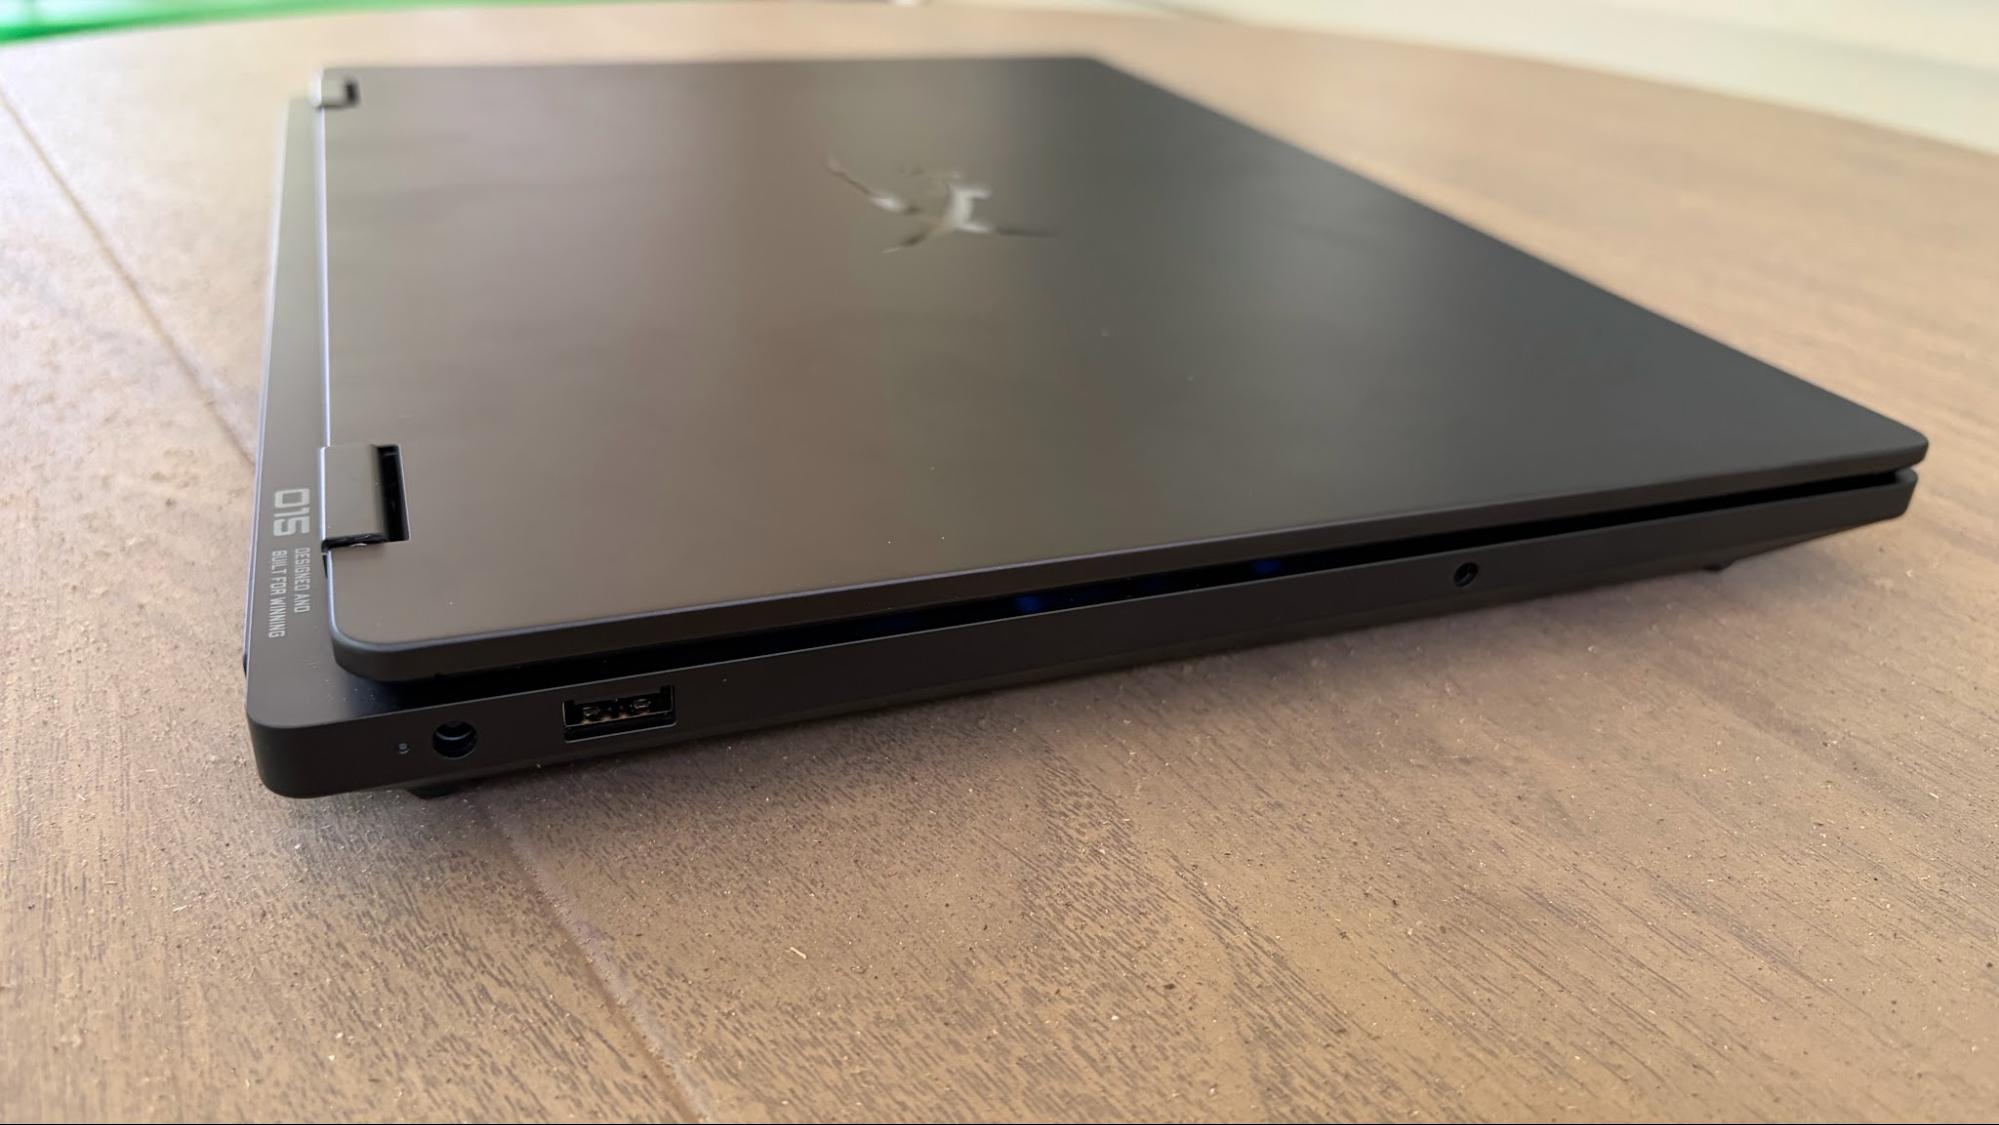
Like the Omen Max 16, the Omen 15 identifies itself with an “O15” script on the right side of the deck. Given that the Omen 15 is less than half the price of its larger sibling, you only get an aluminum lid. Everything else, including the upper and lower chassis, is constructed of a much cheaper (and more pliable) plastic.
The desk easily deforms when pressing on it, and the whole laptop flexes with minimal effort, twisting it from corner to corner. The overall feel of the laptop doesn’t quite seem up to par with what I’d expect from a gaming laptop priced over $2,000.
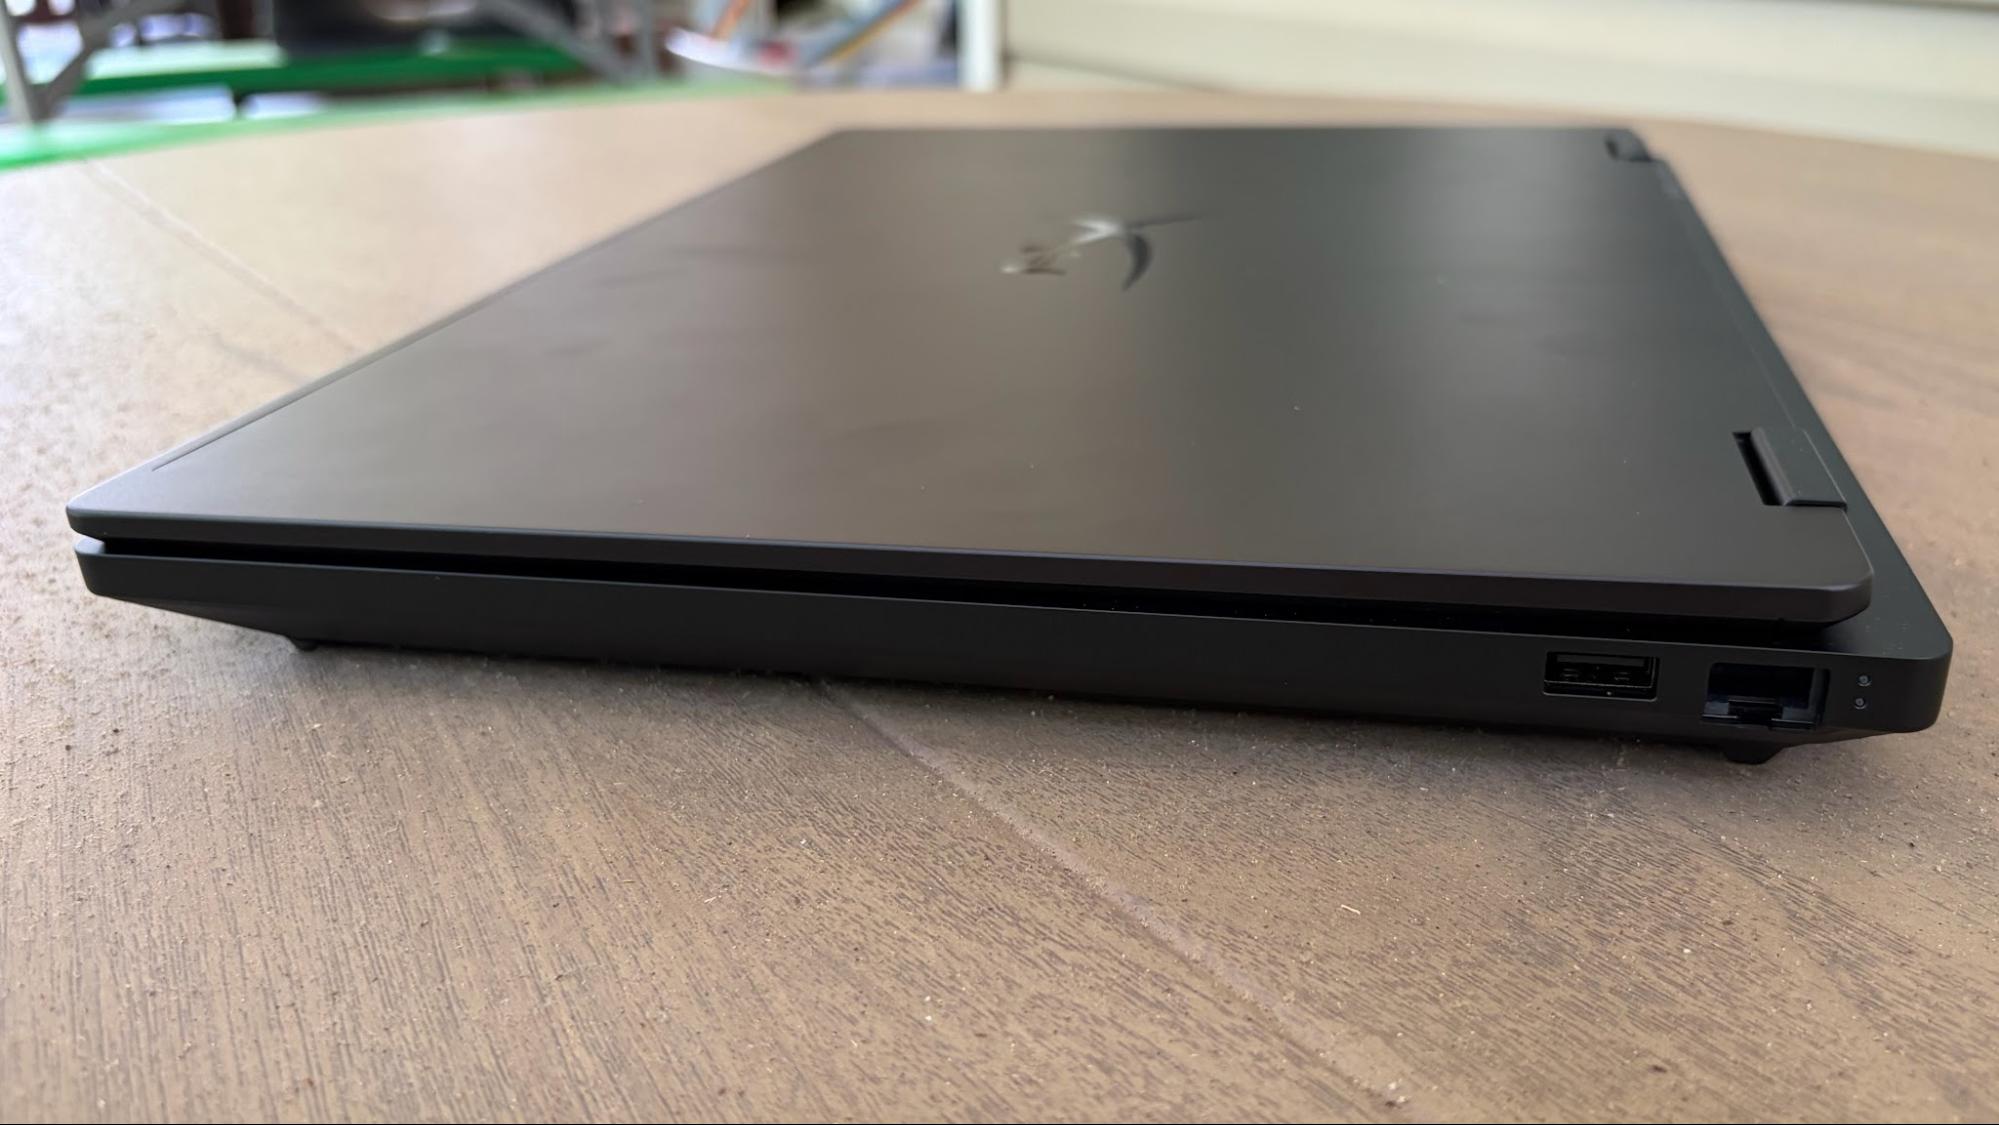
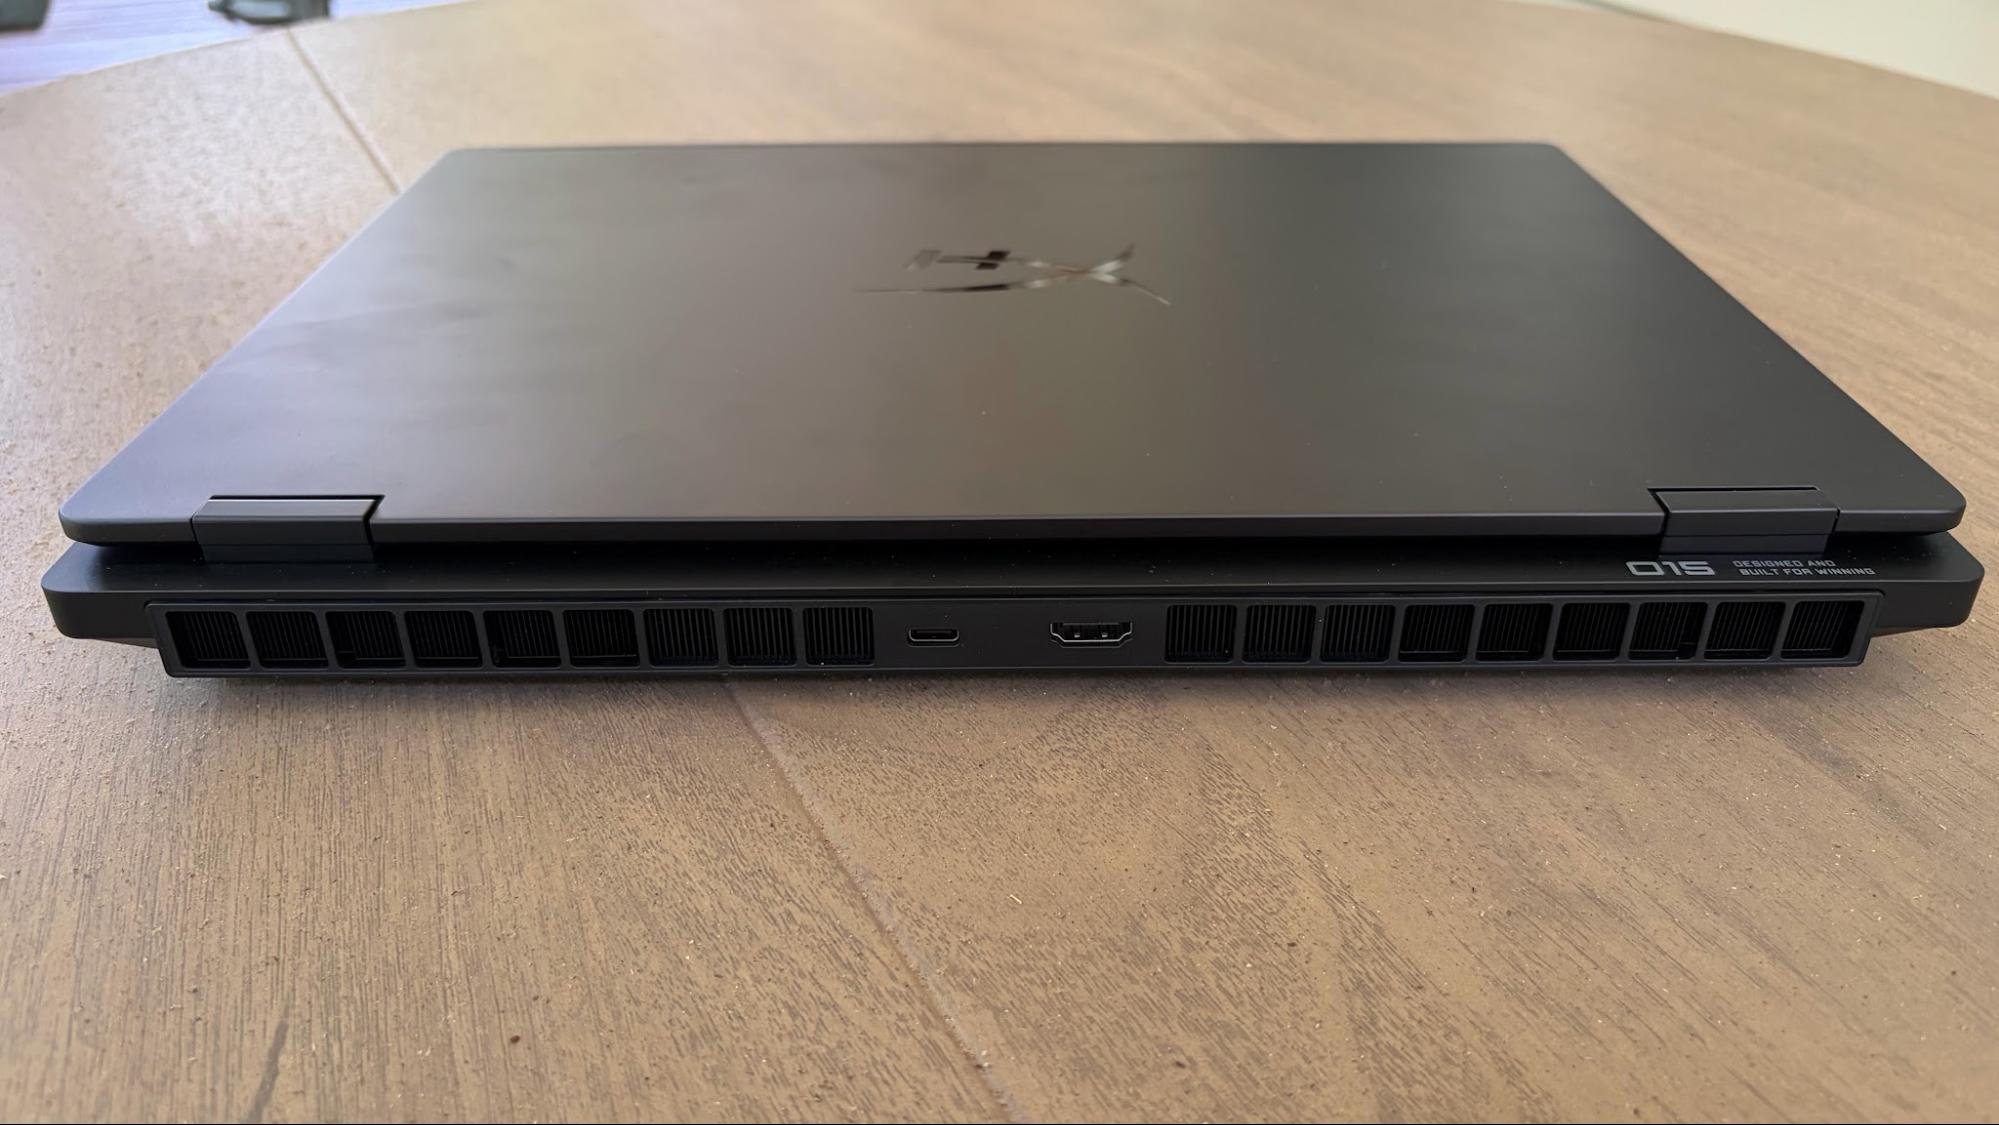
There’s also another interesting omission when looking around the chassis. Despite its price tag, there are no Thunderbolt ports. And you only get one USB-C 3.2 Gen 1 port on the back, beside an HDMI 2.1 port. There’s a GbE Ethernet port and a USB-A 3.2 Gen 1 port on the right side of the chassis, while a proprietary barrel-style power port, another USB-A port, and a 3.5 mm combo audio jack are on the left.
Our Omen 15 review unit measures 13.5 x 9.96 x 0.93 inches and weighs 4.89 pounds. For comparison, the Gigabyte Aero X16 is 14 x 9.9 x 0.78 inches and 4.2 pounds, while the Framework Laptop 16 measures 14.03 x 11.43 x 0.82 inches and 5.29 pounds. Finally, the Predator Triton 14 AI is 12.68 x 8.84 x 0.71 inches and 3.5 pounds (due to its smaller 14.5-inch display).
HyperX Omen 15 Specifications
CPU
Intel Core Ultra 9 386H
Graphics
Nvidia GeForce RTX 5070 Laptop GPU (8GB GDDR7, 1,642 MHz Boost Clock, 85 W Max TGP)
Our Omen 15 review unit came configured with an Intel Core Ultra 9 386H processor, 32GB of DDR5-5600 memory, and a GeForce RTX 5070 GPU (85W TGP).
As for the assembled competitors, we have the Aero X16 (Ryzen AI 7 350, 32GB, RTX 5070 85W), Predator Triton 14 AI (Core Ultra 9 288V, RTX 5070 110W), and Framework Laptop 16 (Ryzen AI 7 350, RTX 5070 100W).
I’ve been playing a lot of Battlefield 6 recently, and I tend to run at native resolution in Overkill detail mode, with DLSS Quality and frame generation enabled. However, I dialed it back to High detail mode instead of Overkill to accommodate just 8GB of memory on the RTX 5070. Using these settings, I was able to average between 70 and 85 frames per second.
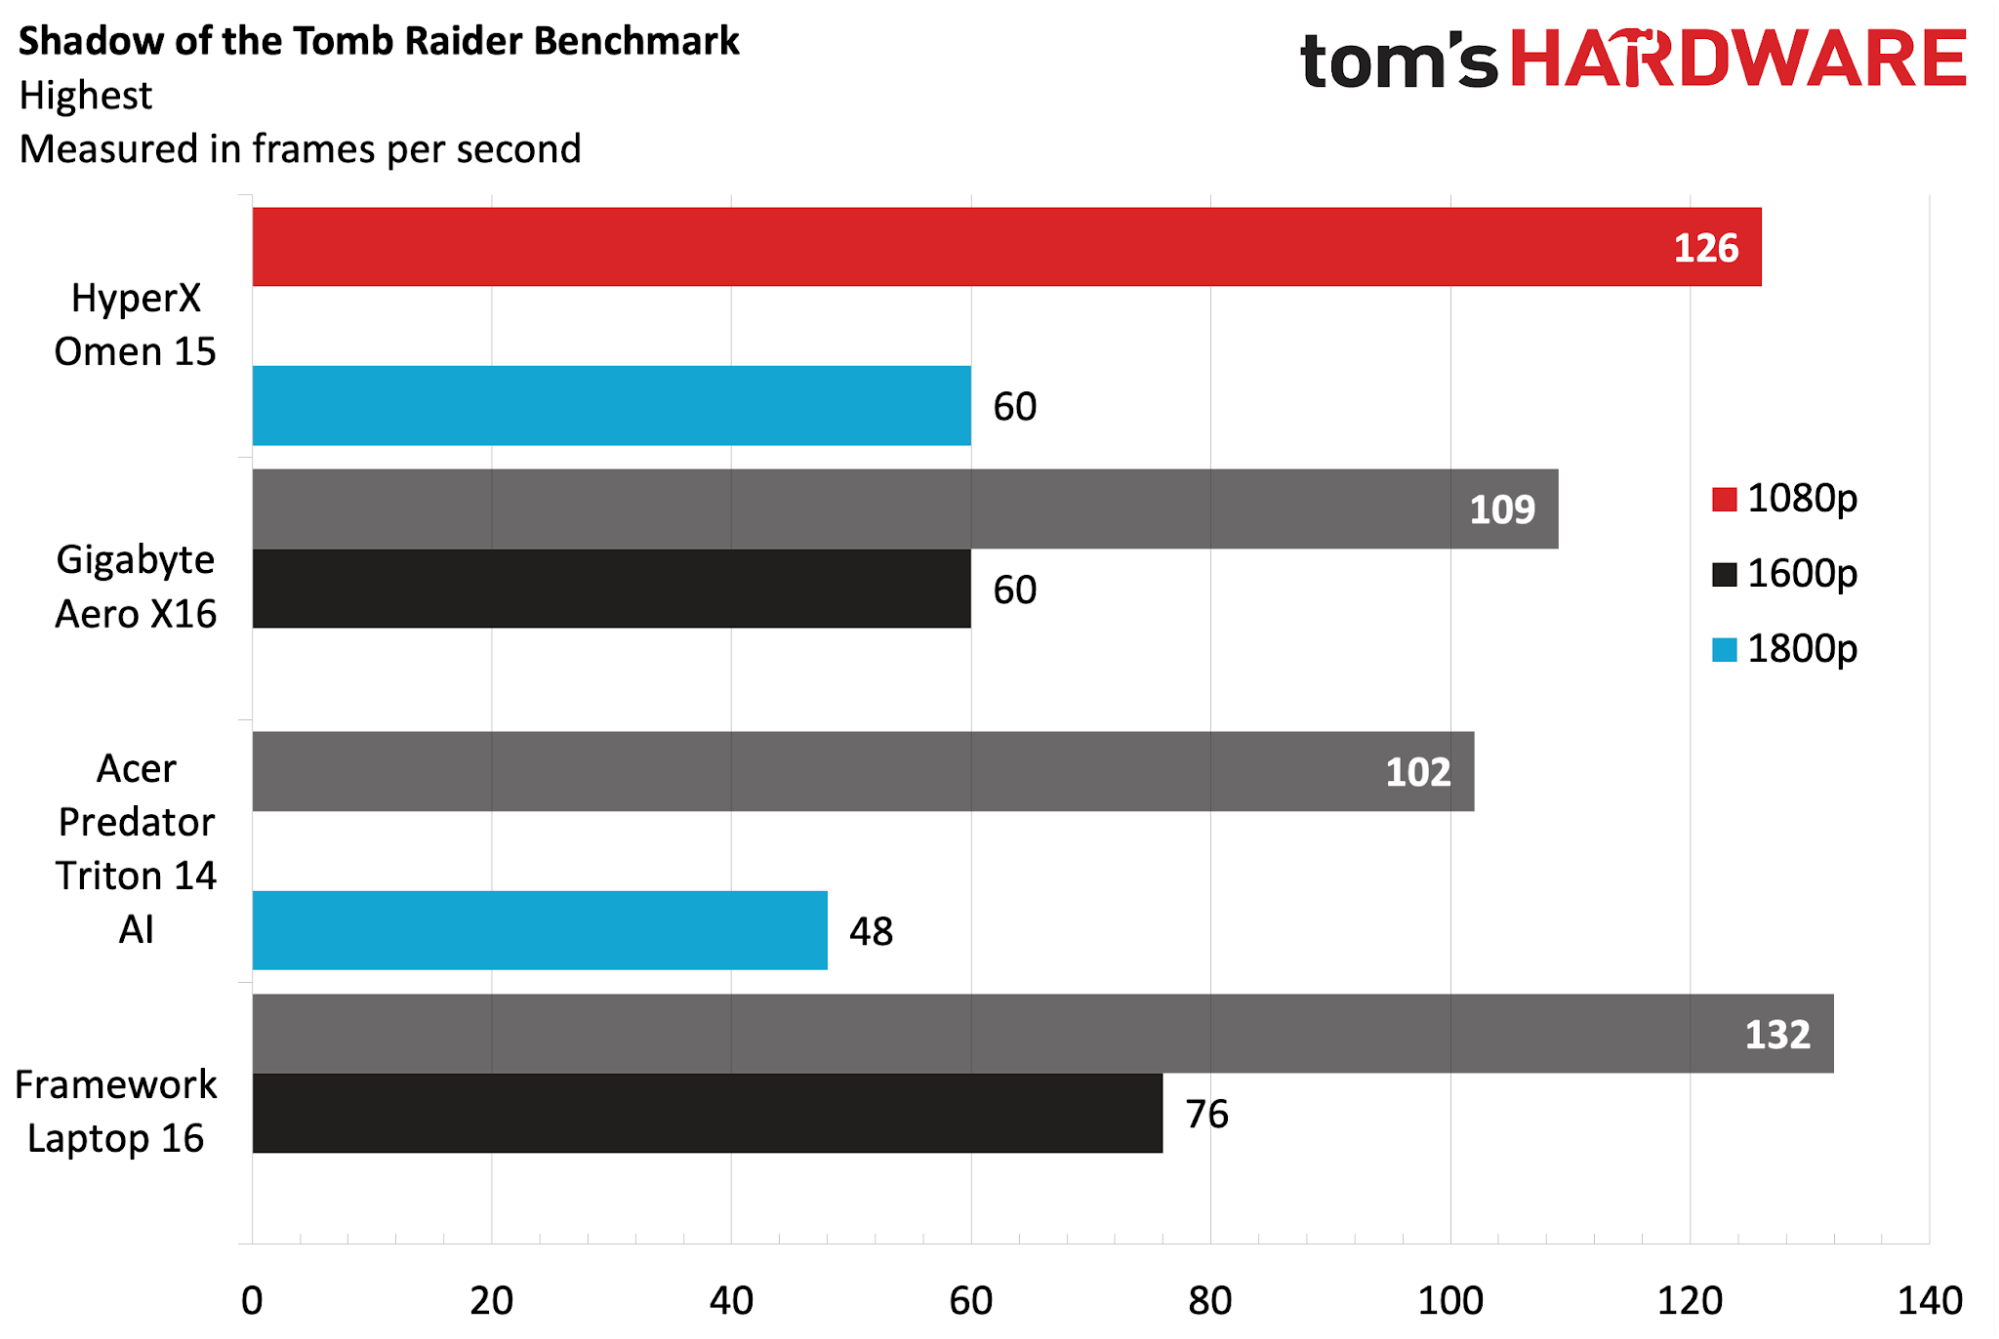
We start off our gaming benchmarks with Shadow of the Tomb Raider (Highest settings), where the Omen 15 started off on the right foot with 126 FPS at 1080p resolution and 60 FPS at 1800p. The Framework Laptop 16 eked out 6 additional FPS at 1080p and another 17 at its native resolution. However, we still consider it a good showing, given that the RTX 5070 in the Omen 15 operates at a 85W TGP (versus 100W for the Framework) and at a higher native resolution (1800p versus 1600p).
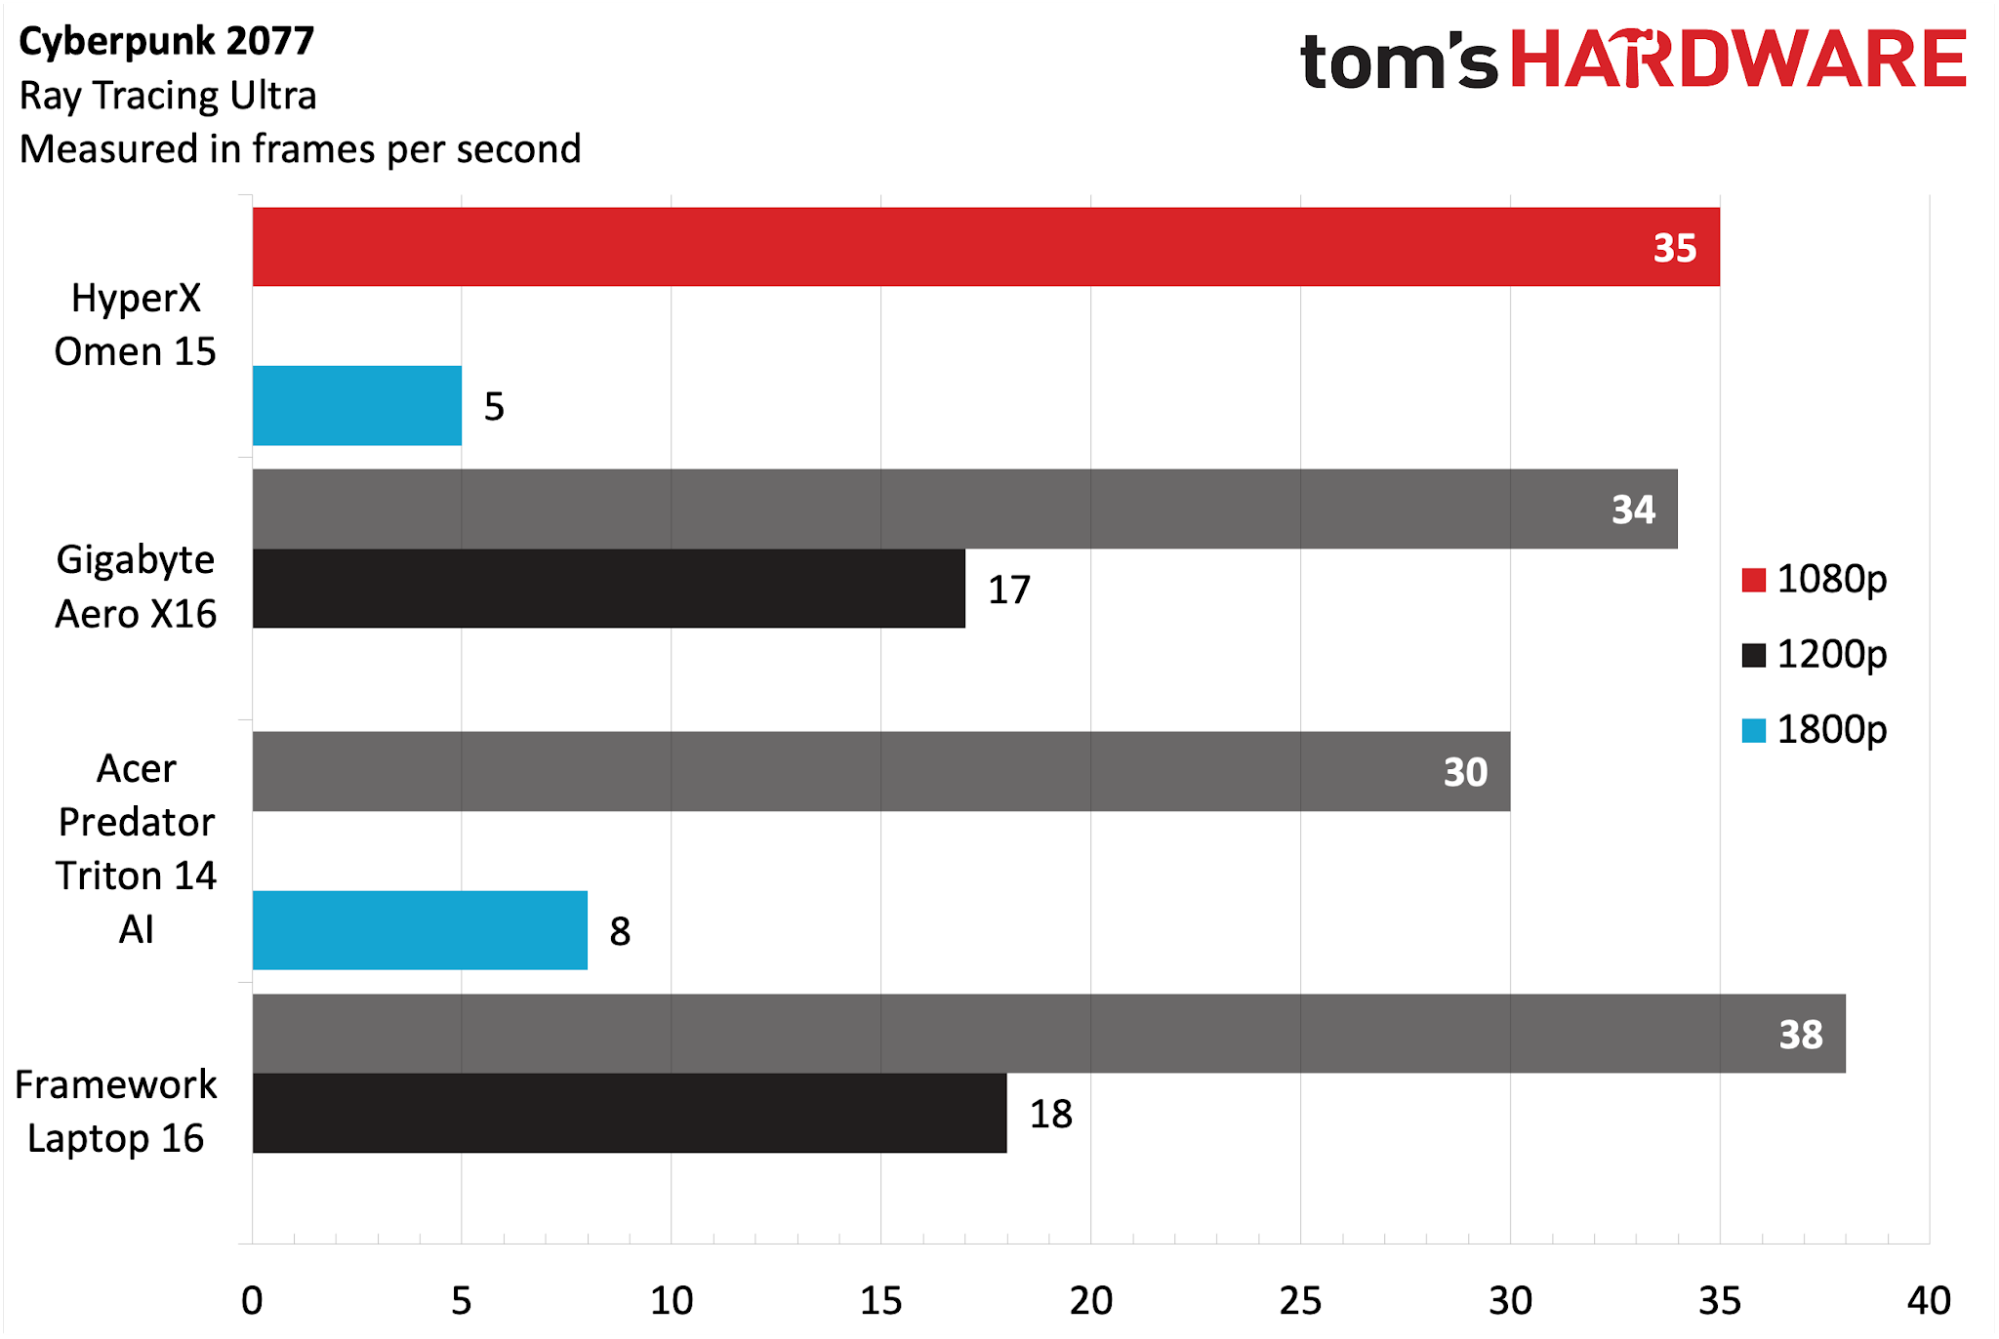
Cyberpunk 2077 (Ray Tracing Ultra settings) again saw the Omen 15 in second place to the Laptop 16. This time, it hit 35 FPS at 1080p resolution compared to 38 FPS for the Laptop 16. Performance at 1800p was in the single digits for the Omen 15, while the Laptop 16 managed 18 FPS. Both are slideshow-worthy numbers that are nothing to brag about.
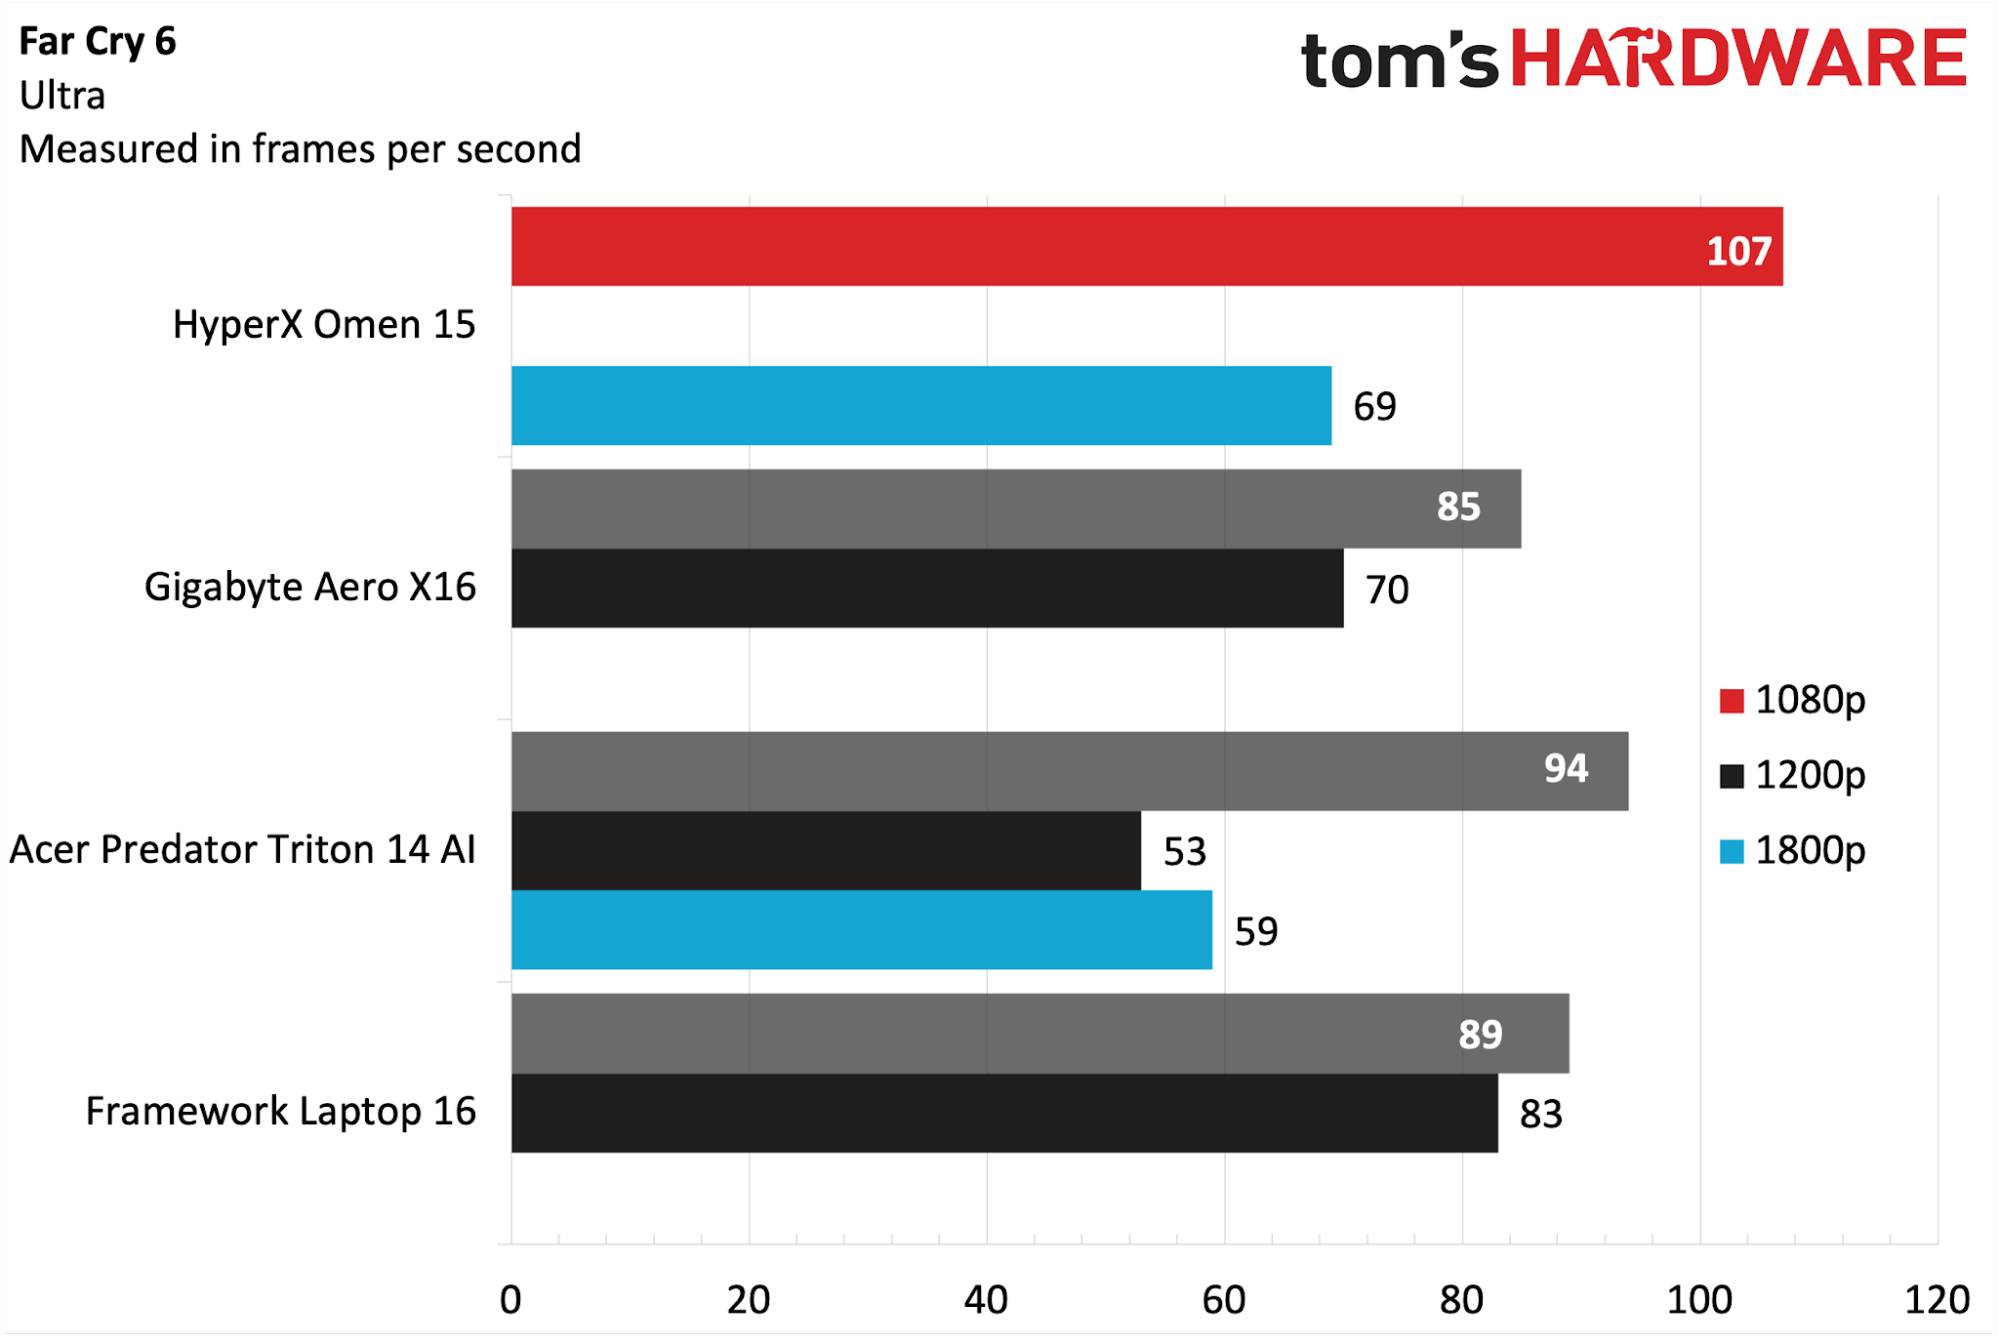
Far Cry 6 (Ultra settings) was a high point for the Omen 15, which bested all competitors with 107 FPS at 1080p resolution. Cranking the dial to 1800p, that figure dropped to 69 FPS, compared to 70 FPS for the Aero X16 running at 1600p. The Laptop 16 forged ahead with 83 FPS at 1600p.
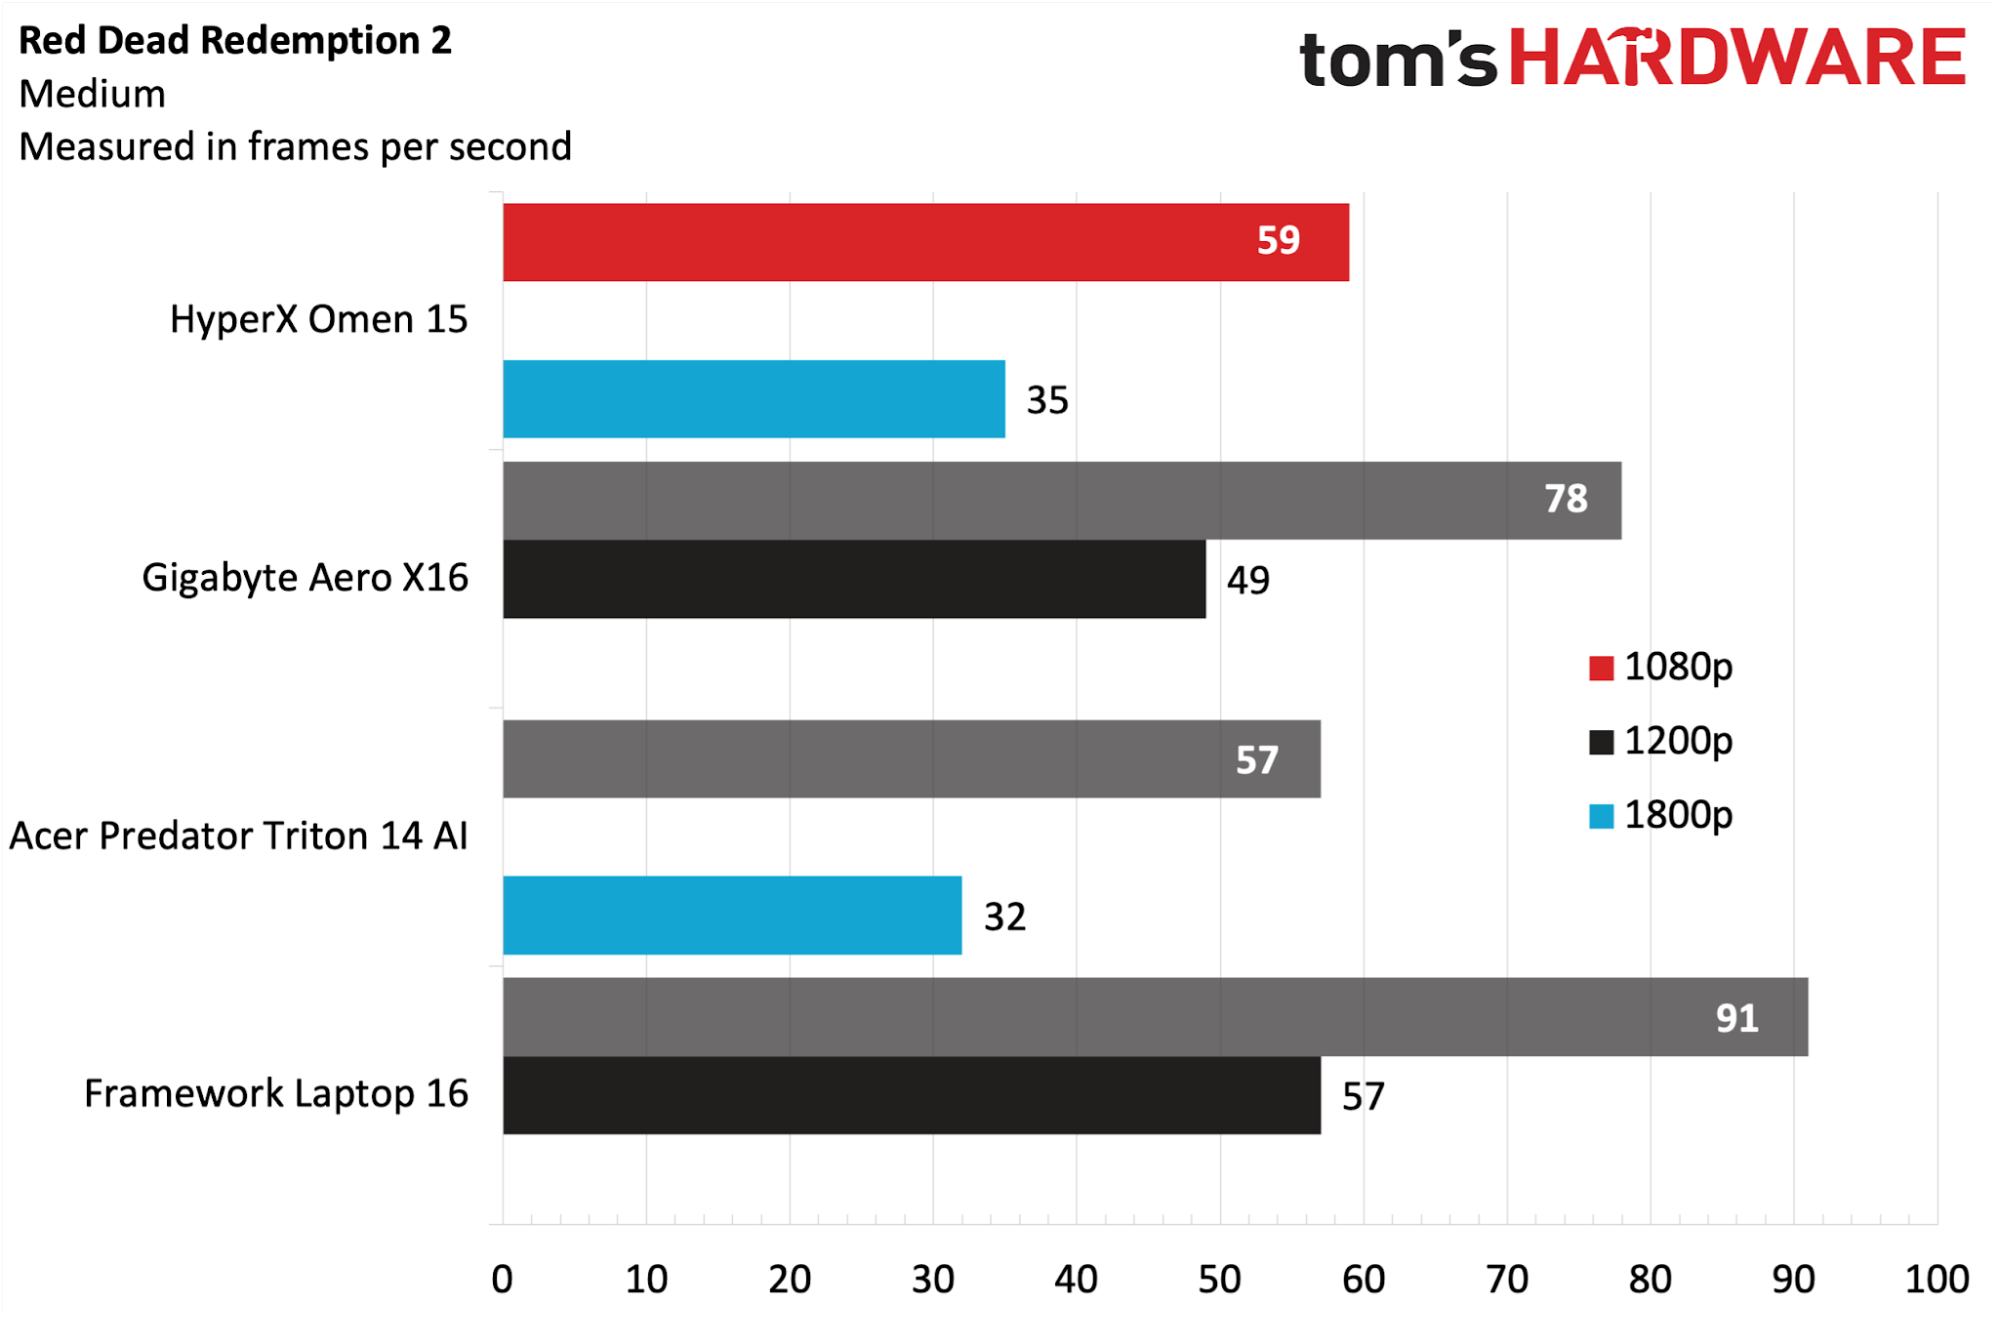
Red Dead Redemption 2 (Medium settings) was something of a sore spot for the Omen 15 (59 FPS at 1080p), which fell well below the Aero X16 (78 FPS) and the Laptop 16 (91 FPS). Boosting the resolution to 1800p also saw the Omen 15 in third place, with 35 FPS, well off the pace set by the Laptop 16 (57 FPS).
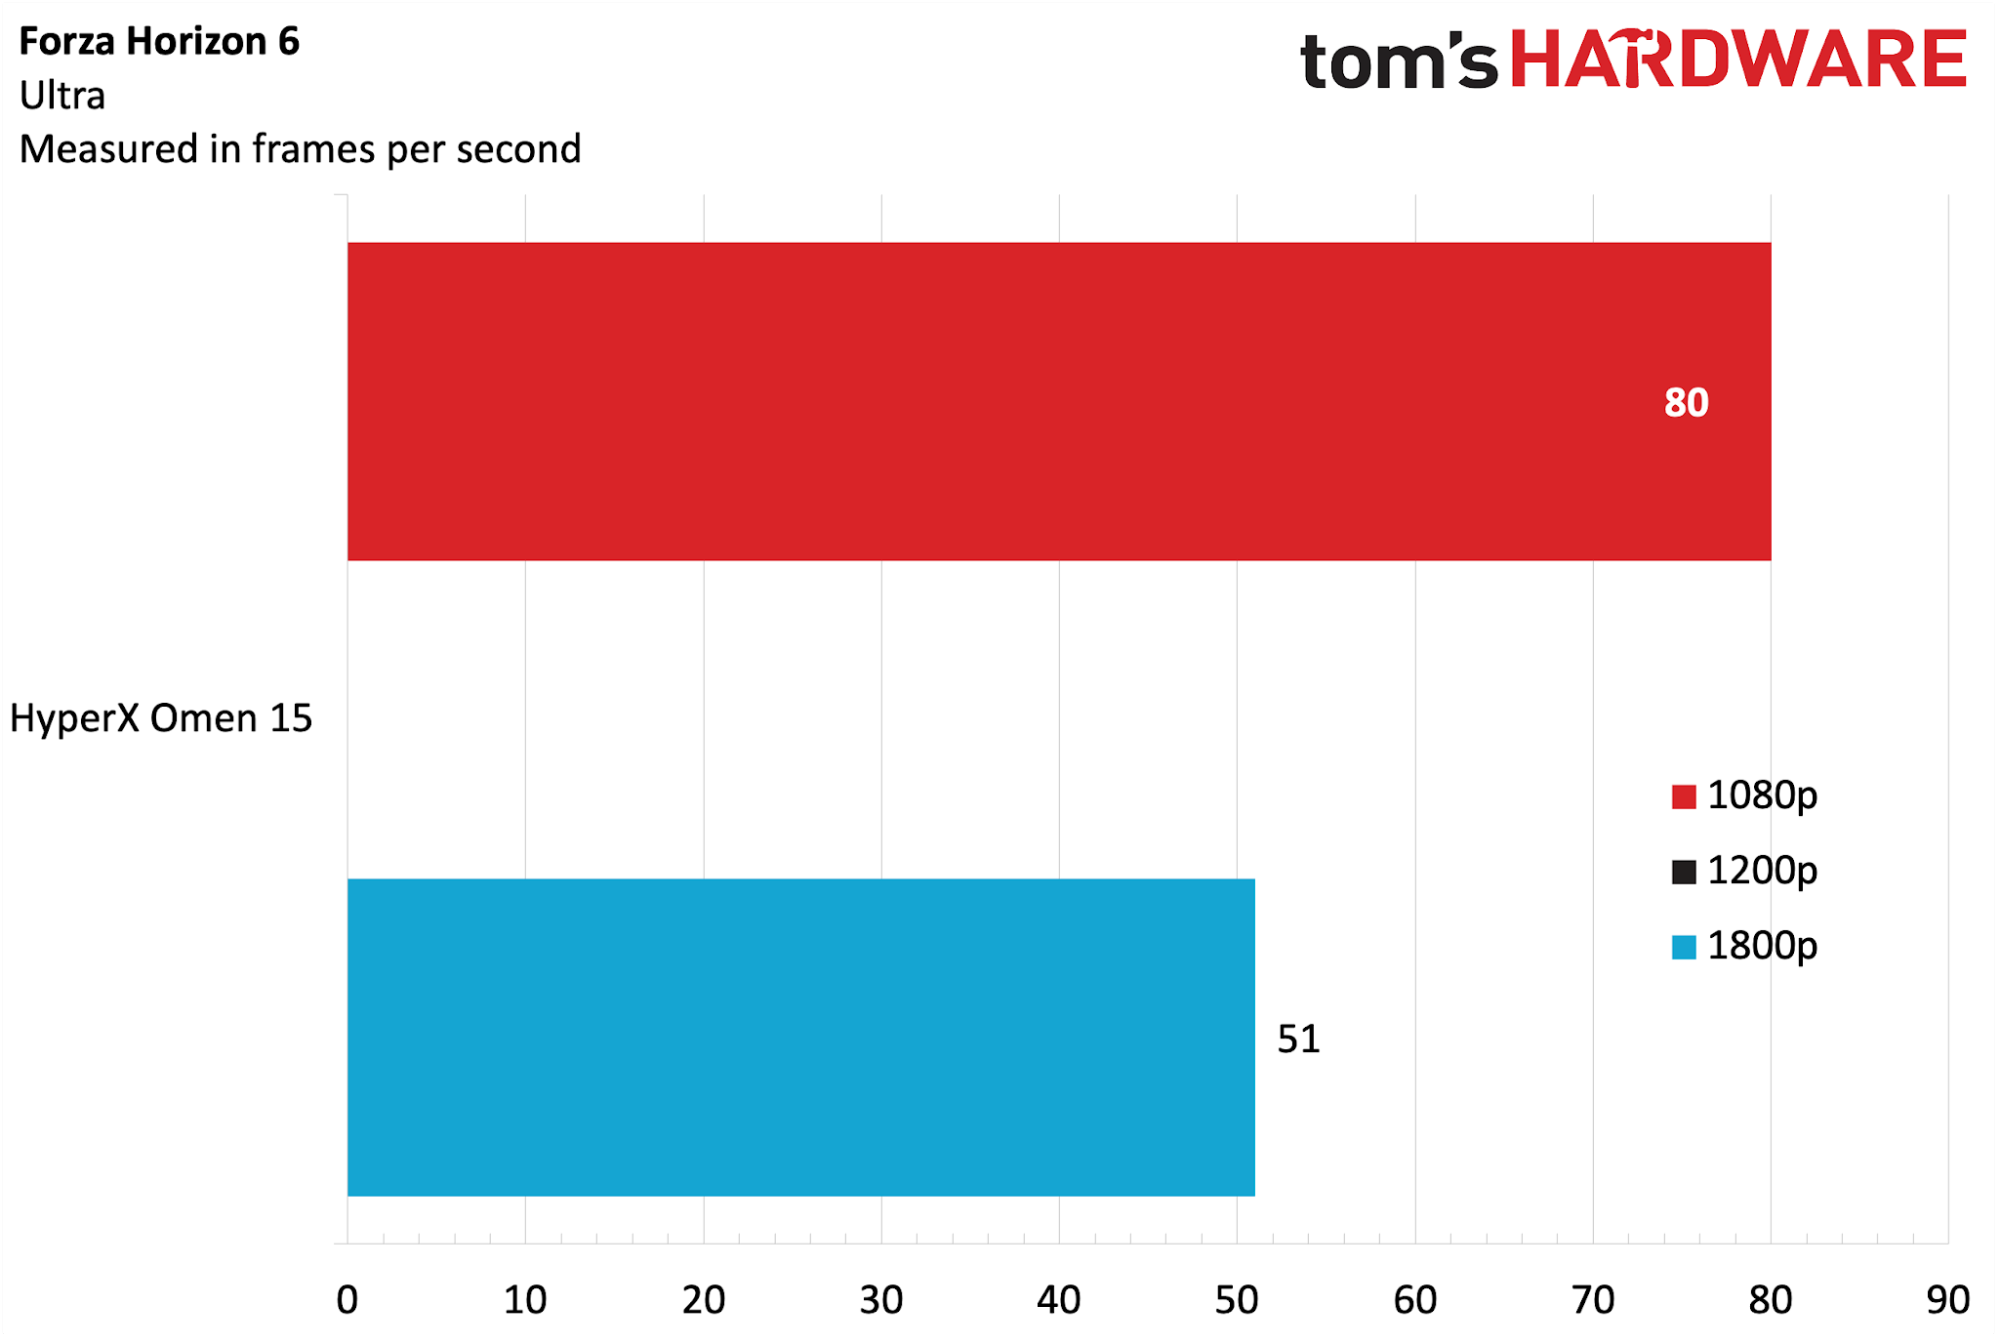
Forza Horizon 6 (Ultra settings) is a more recent benchmark in our testing suite, and so far, the Omen 15 is the only entry in this class of gaming laptops. With that said, the Omen 15 achieved 80 FPS at 1080p and 51 FPS at 1800p.
On our Metro Exodus stress test, the Omen 15 review unit averaged 141.62 FPS at 1080p across 15 loops using the RTX preset. The CPU performance cores averaged 3.52 GHz, the efficiency cores averaged 2.82 GHz, and the low-power efficiency cores ran at 1.9 GHz. The RTX 5070 GPU averaged 2.0 GHz.
Productivity Performance on the HyperX Omen 15
With a Core Ultra 9 386H processor, 32GB of DDR5-5600 memory, and a 1TB PCIe 4.0 SSD onboard, we expected solid performance from the Omen 15. Those expectations were met in terms of CPU performance, while storage performance lagged a bit behind the competition.
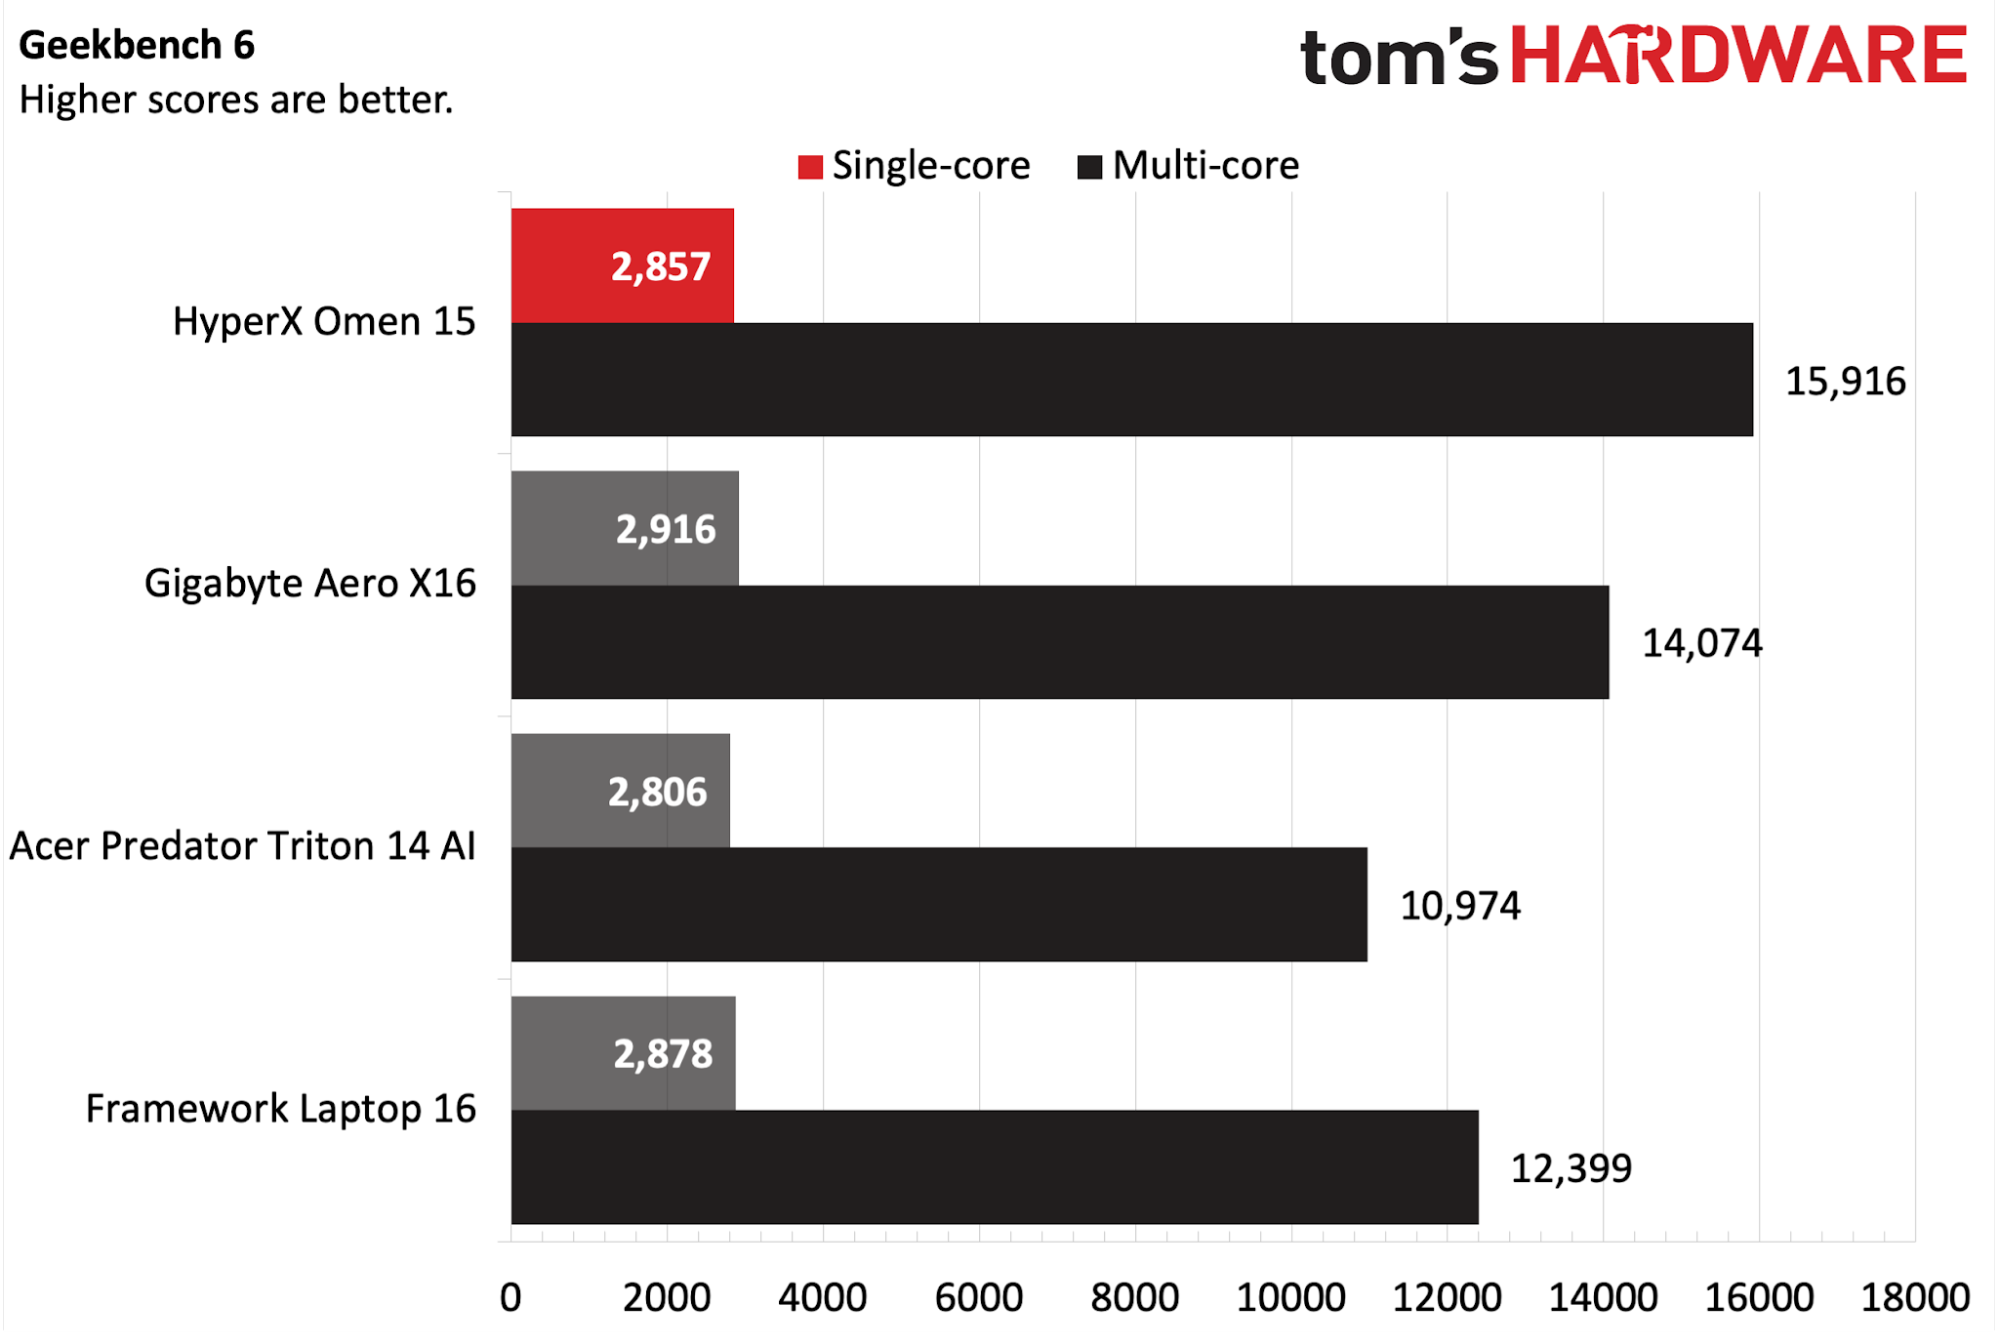
The Omen 15 performed well in Geekbench 6, hitting 2,857 in the single-core benchmark, keeping it right in the mix with the other competitors. However, it sprinted out ahead of the pack in multi-core, delivering 15,916 compared to 14,074 on the second-place Aero X16.
Tom's HardwareTom's HardwareTom's Hardware
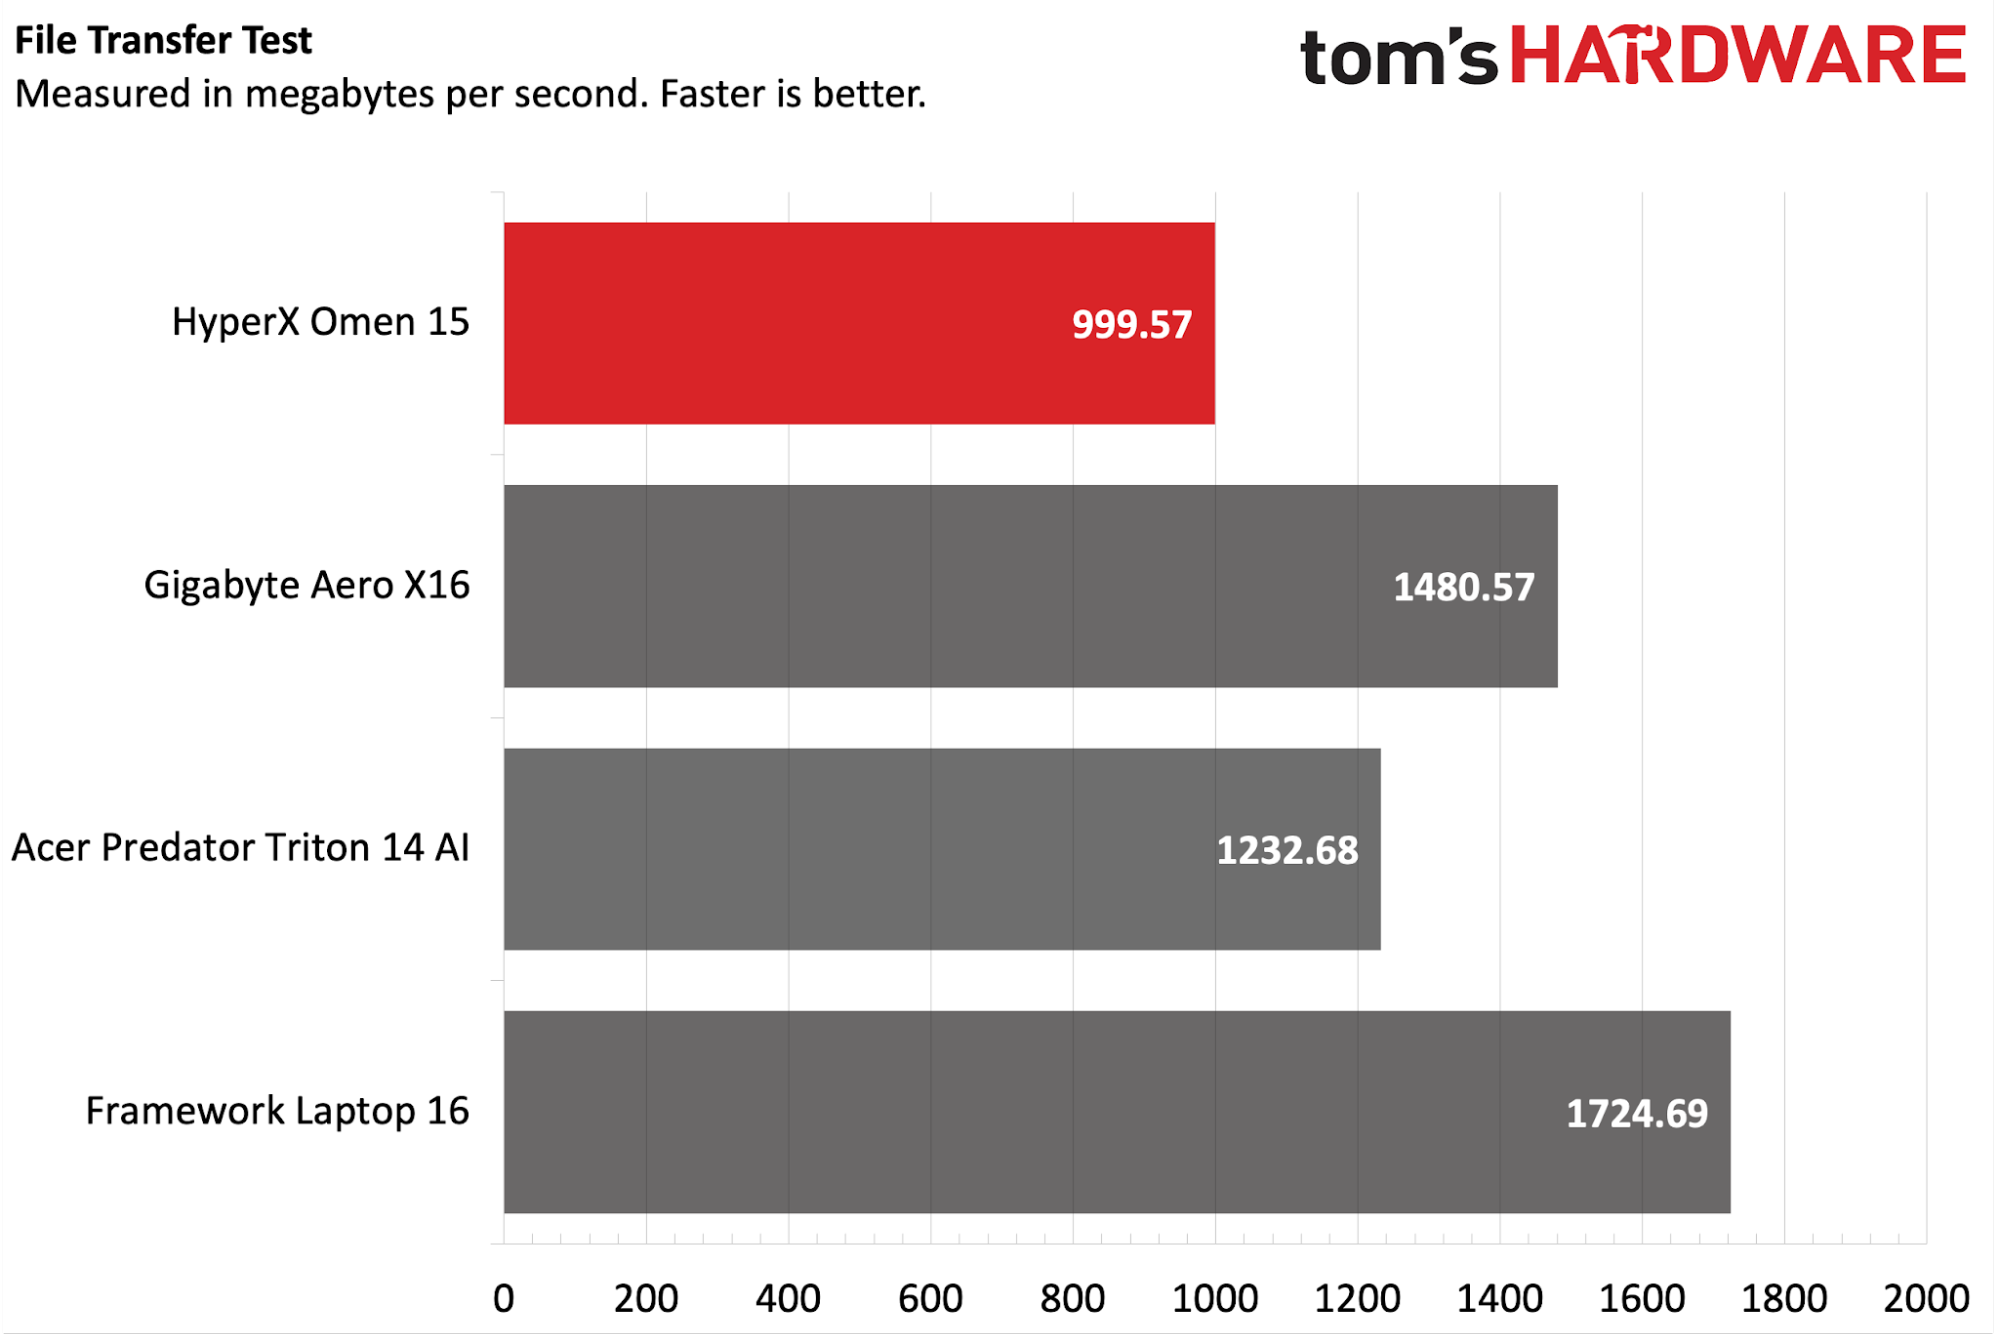
The Omen 15 was at the back of the pack on our file transfer test, coming in at 999 MBps from the Samsung MZVMX1T0HCLD-00BH1 SSD versus an average of around just under 1,500 MBps for the other three competitors.
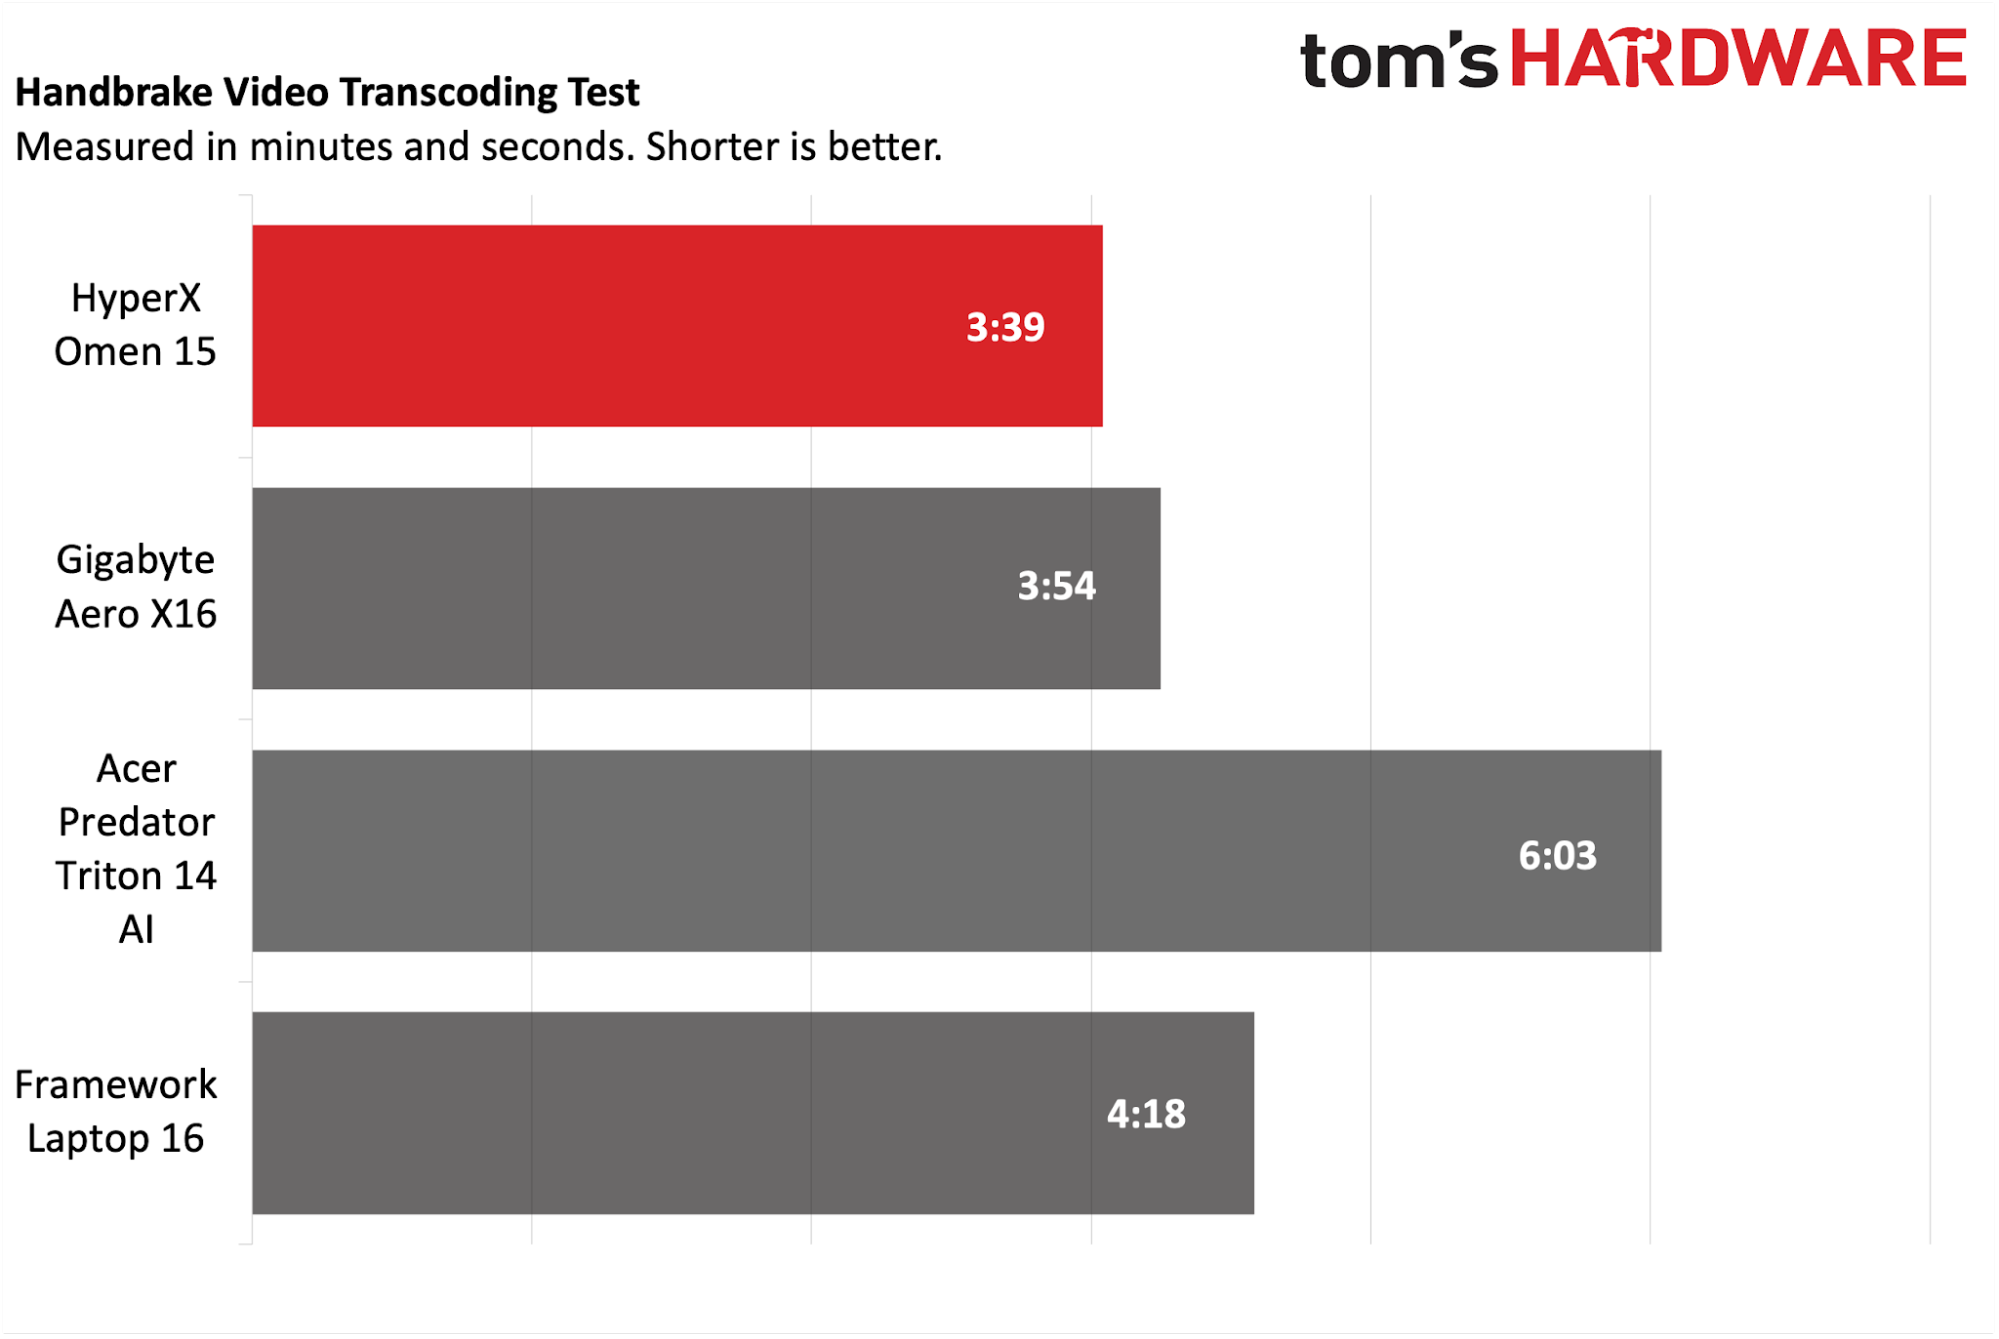
Moving on to our HandBrake test, where we transcode a 4K video file to 1080p, the Omen 15 took the top spot, finishing the task in 3 minutes and 39 seconds. That was about 15 seconds faster than the second-place Aero X16.
Display on the HyperX Omen 15
Our review unit came equipped with a 15.3-inch 2880 x 1800 OLED display. Interestingly, the refresh rate is limited to just 120 Hz, compared to the faster 144 Hz to 165 Hz that we see in competitors like the Aero X16 and Laptop 16.
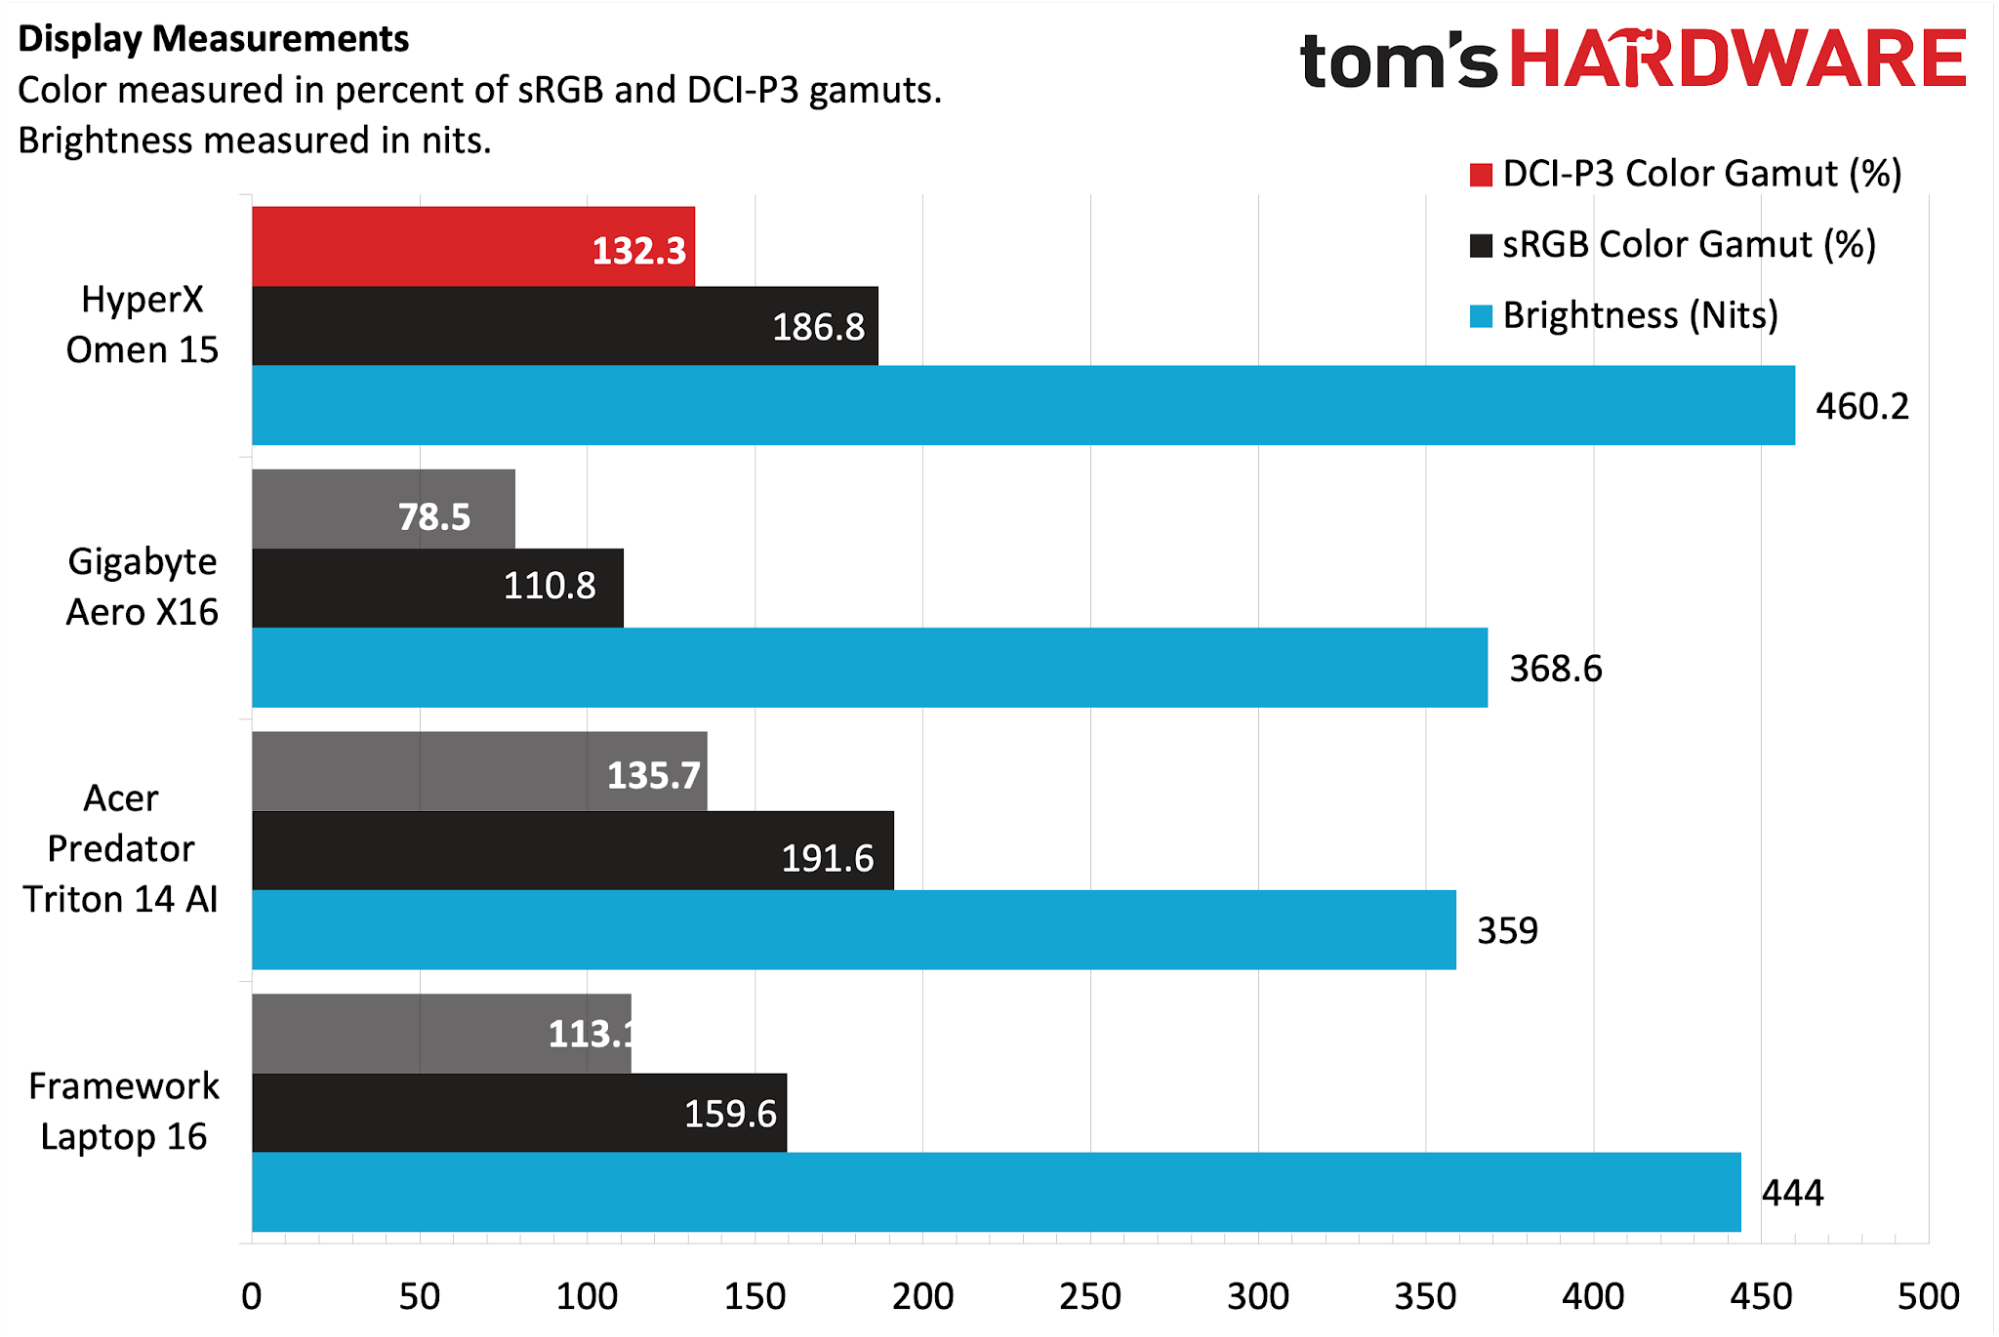
The Omen 15’s OLED panel performed roughly on par with the rest of the laptops in this segment, as it covered 132.3 percent of the DCI-P3 color space and 186.8 percent of sRGB. It even managed to take the top spot in the brightness category, hitting 460.2 nits compared to 444 nits for the Laptop 16.
(Image credit: Tom's Hardware)
I love OLED panels, and the 1800p unit on the Omen 15 just proves that that love shows no sign of abating. Colors looked rich, blacks were jet black, and brightness levels in my home office setting (with an abundance of overhead lighting) were more than adequate.
I played quite a bit of Forza Horizon 6 using the Omen 15, and marveled at the bright, colorful, and reflective car bodies as I competed in various events.
Keyboard and Touchpad on the HyperX Omen 15
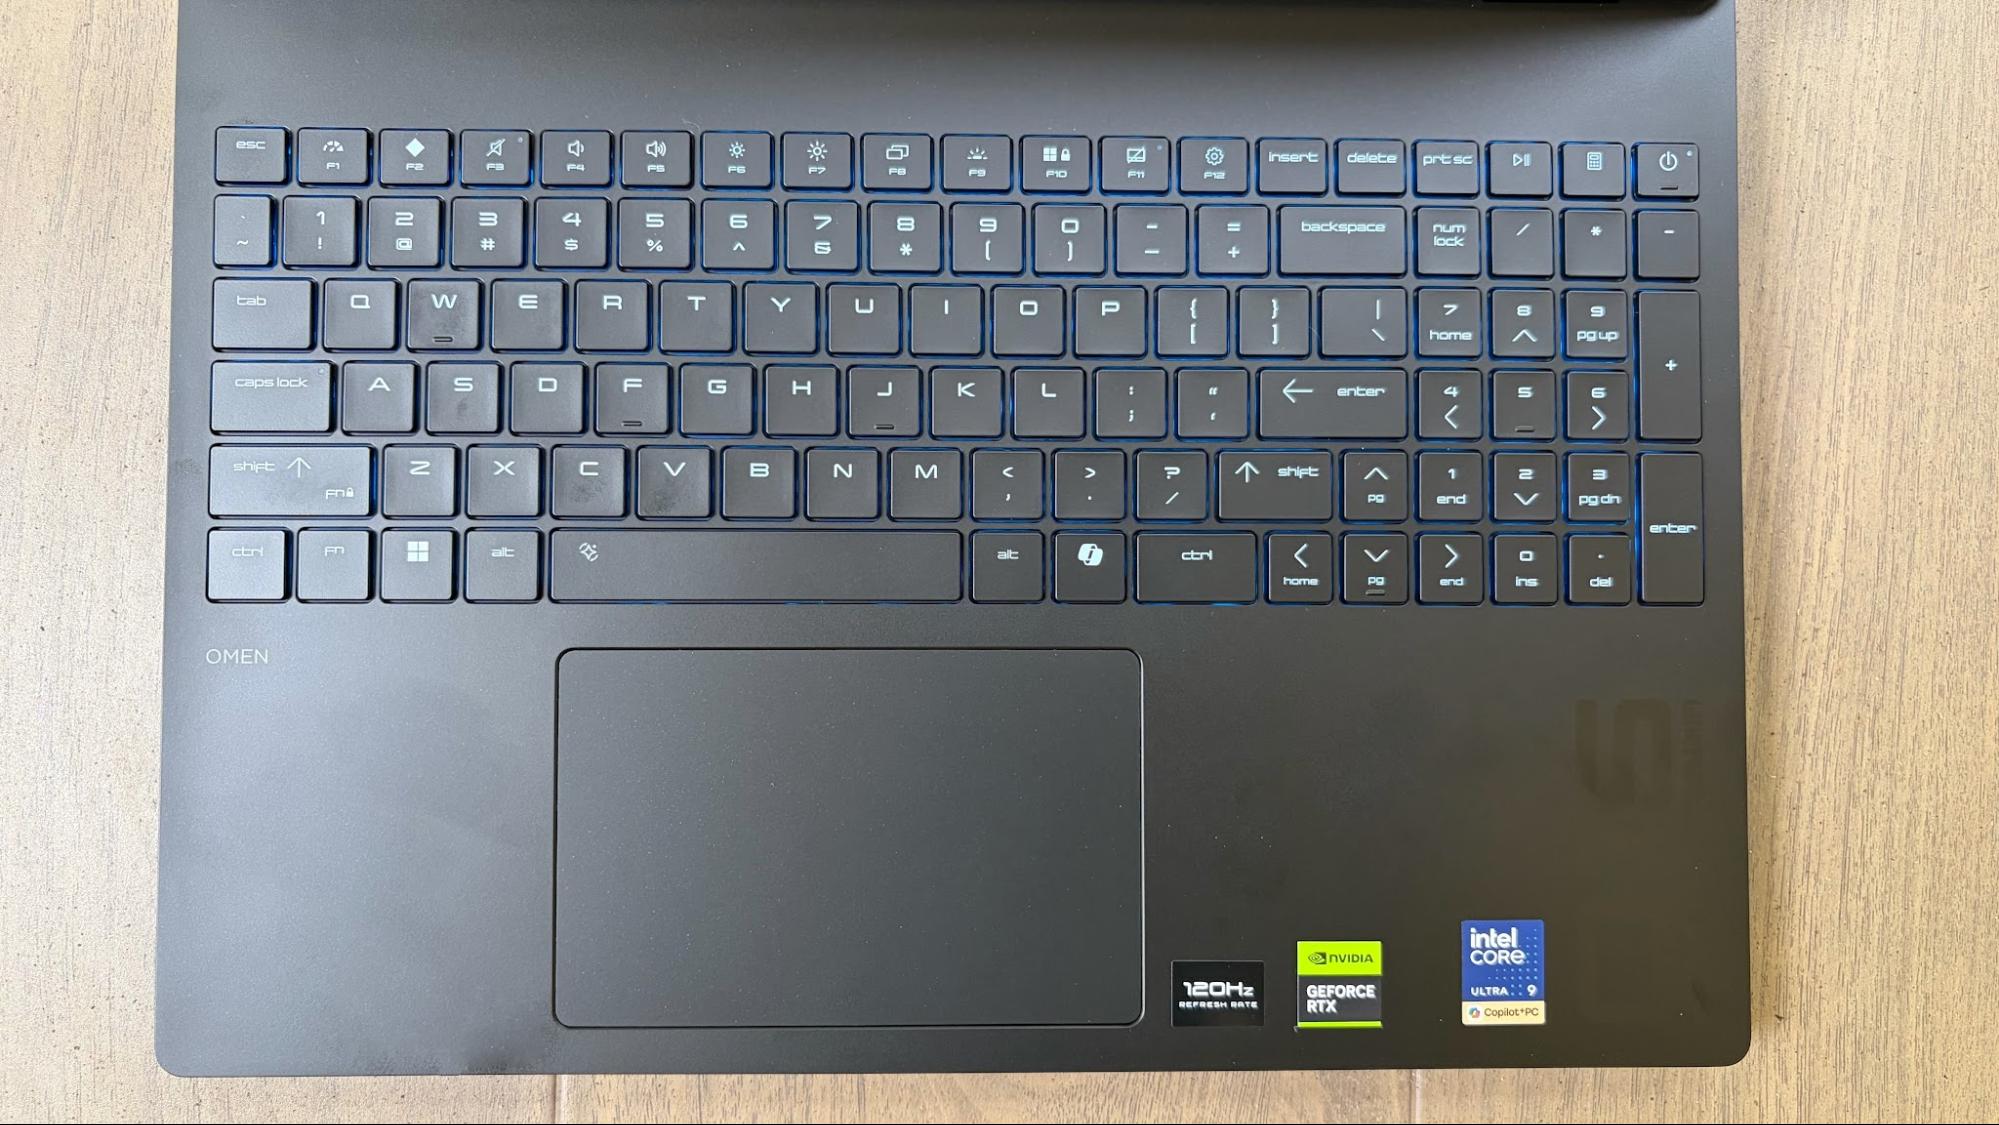
There have been noticeable improvements made to the Omen 15’s keyboard, at least compared to the previous Victus 15. The biggest change is the move from half-height arrow keys to full-size. The tiny, half-height function keys have also been enlarged.
HP also boasts of an 8K polling rate for the Omen 15’s keyboard (equating to a response time of 0.125 ms). I wouldn’t consider myself to be a highly competitive gamer, so any upgrades in this area are lost on me. The keyboard also features 4-zone RGB backlighting.
(Image credit: Tom's Hardware)
Using the Keyhero.com typing test, I averaged around 87 words per minute with 95% accuracy, which is on par with my typical typing speed. I found the keyboard comfortable for typing and gaming.
There’s nothing particularly noteworthy about the touchpad, which features a top-hinged design. Its surface allowed my finger to glide smoothly, although it is a bit loud and clanky when clicked.
Audio on the HyperX Omen 15
The Omen 15 features stereo speakers supporting DTS:X Ultra and HyperX Audio Control. I was pleasantly surprised by the sound emanating from the speaker, which was rich in volume and clarity. While lacking any real semblance of bass, the underlying output was clean.
I took the opportunity to fire up “Mujahadin and Opium,” which is a horn- and string-filled track by John Barry from The Living Daylights soundtrack. There is just something very chilling about the interplay of the strings and horns; the former of which starts the track, while the latter beautifully fills in classic James Bond tradition.
The speakers also did well to mimic engine sounds as I went corner carving in Forza Horizon 6, be it a high-strung flat-6 or a burbling V8.
Upgradeability of the HyperX Omen 15
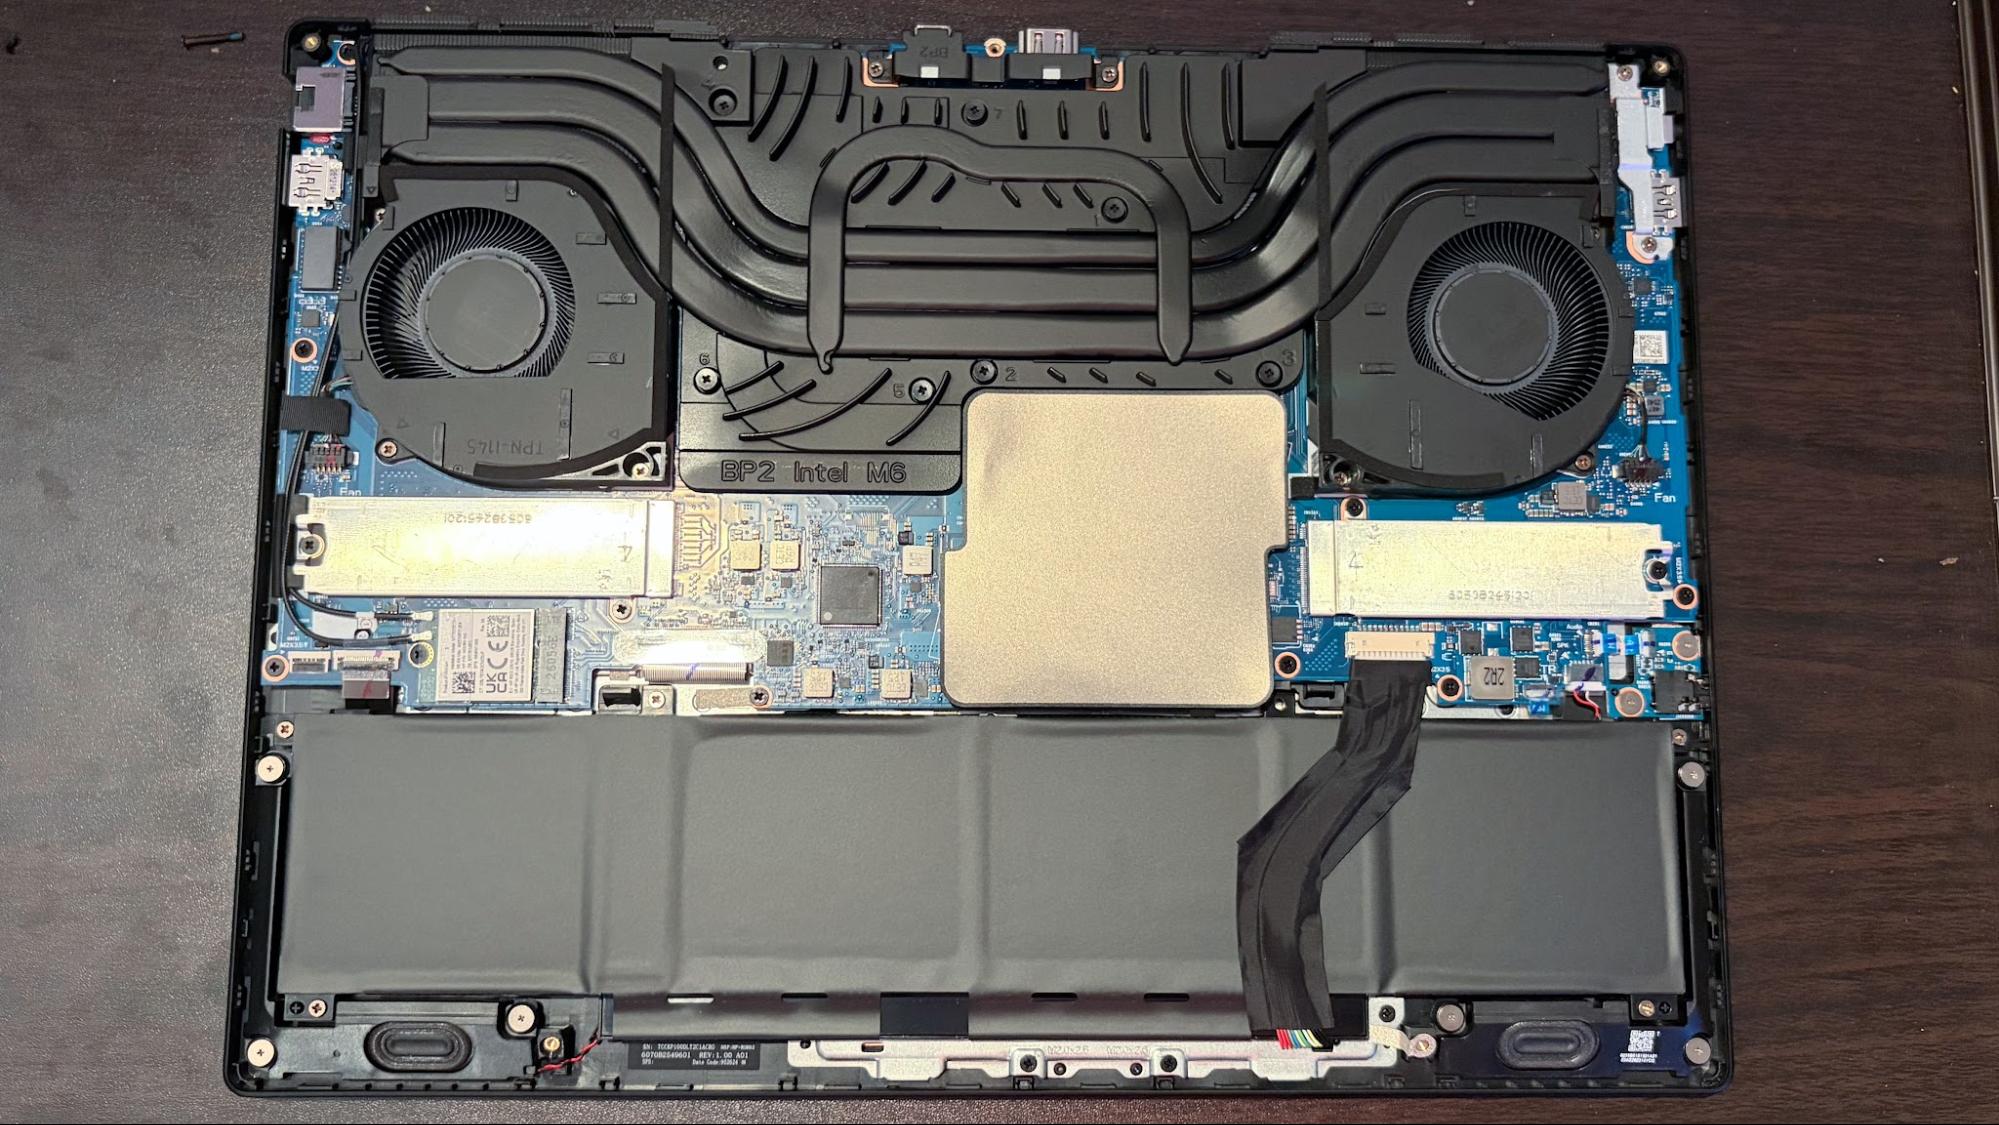
Flipping the Omen 15 over to reveal its bottom panel, you’ll find five screws holding it in place. Three of the screws are exposed, while the two corner screws at the back are hidden beneath tiny rubber plugs. I needed to use a safety pin to pry them out, which was annoying.
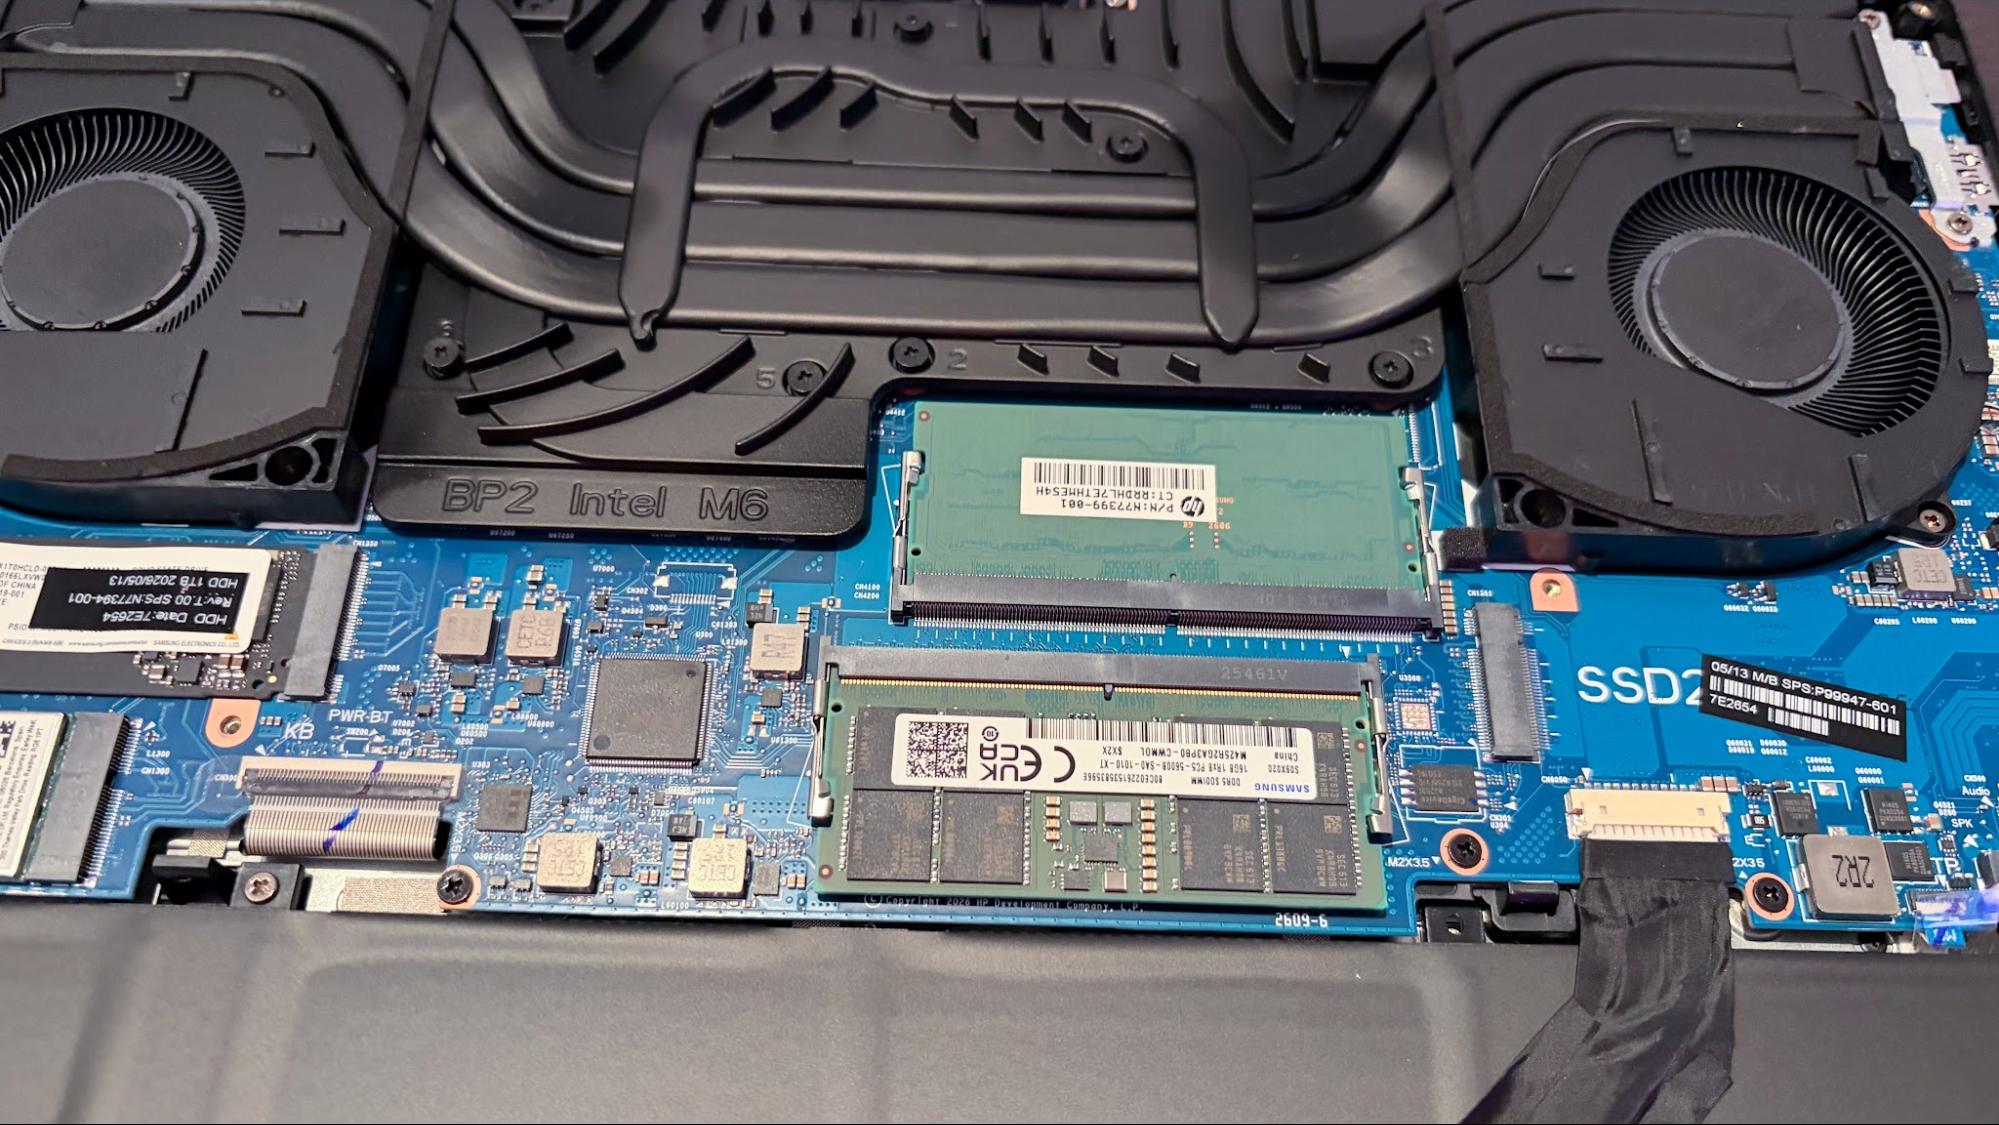
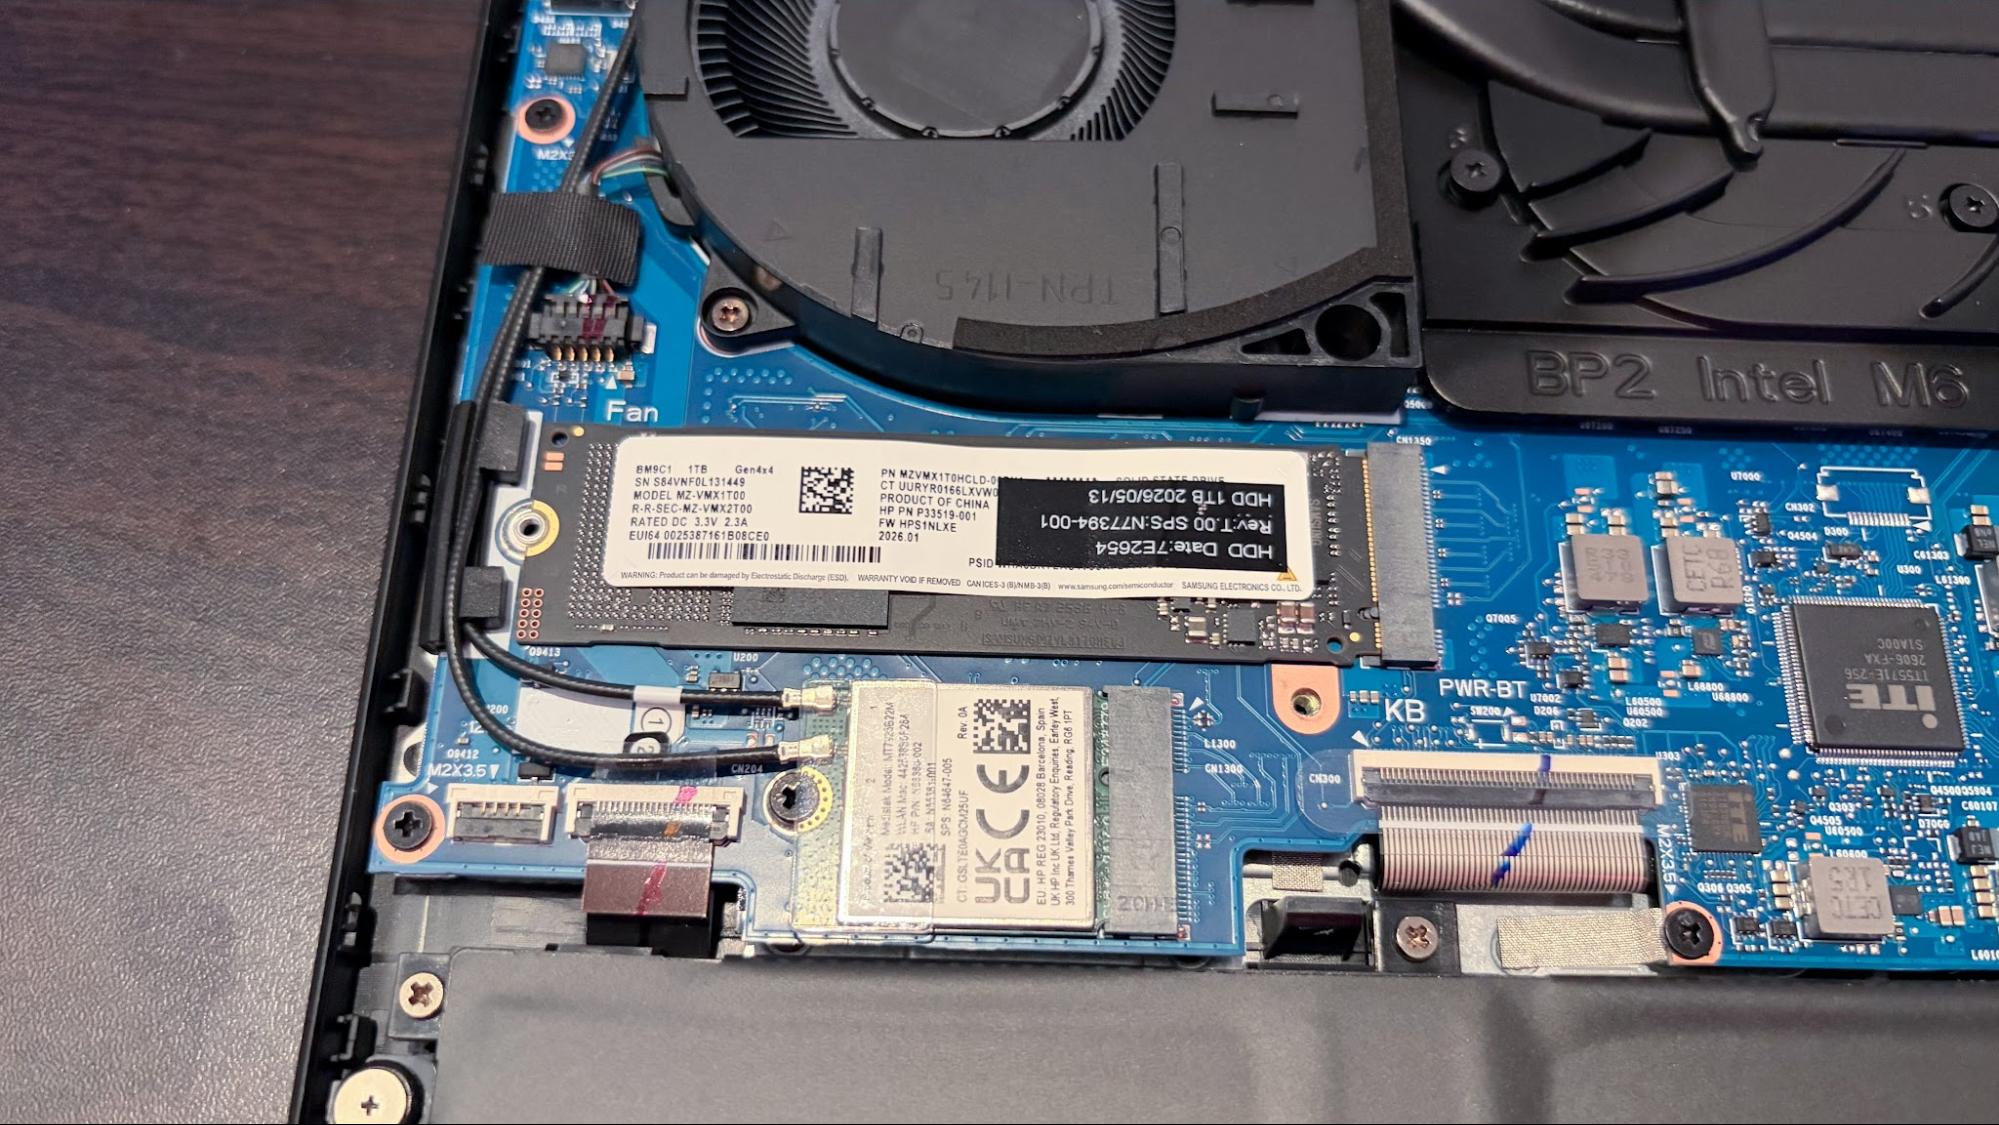
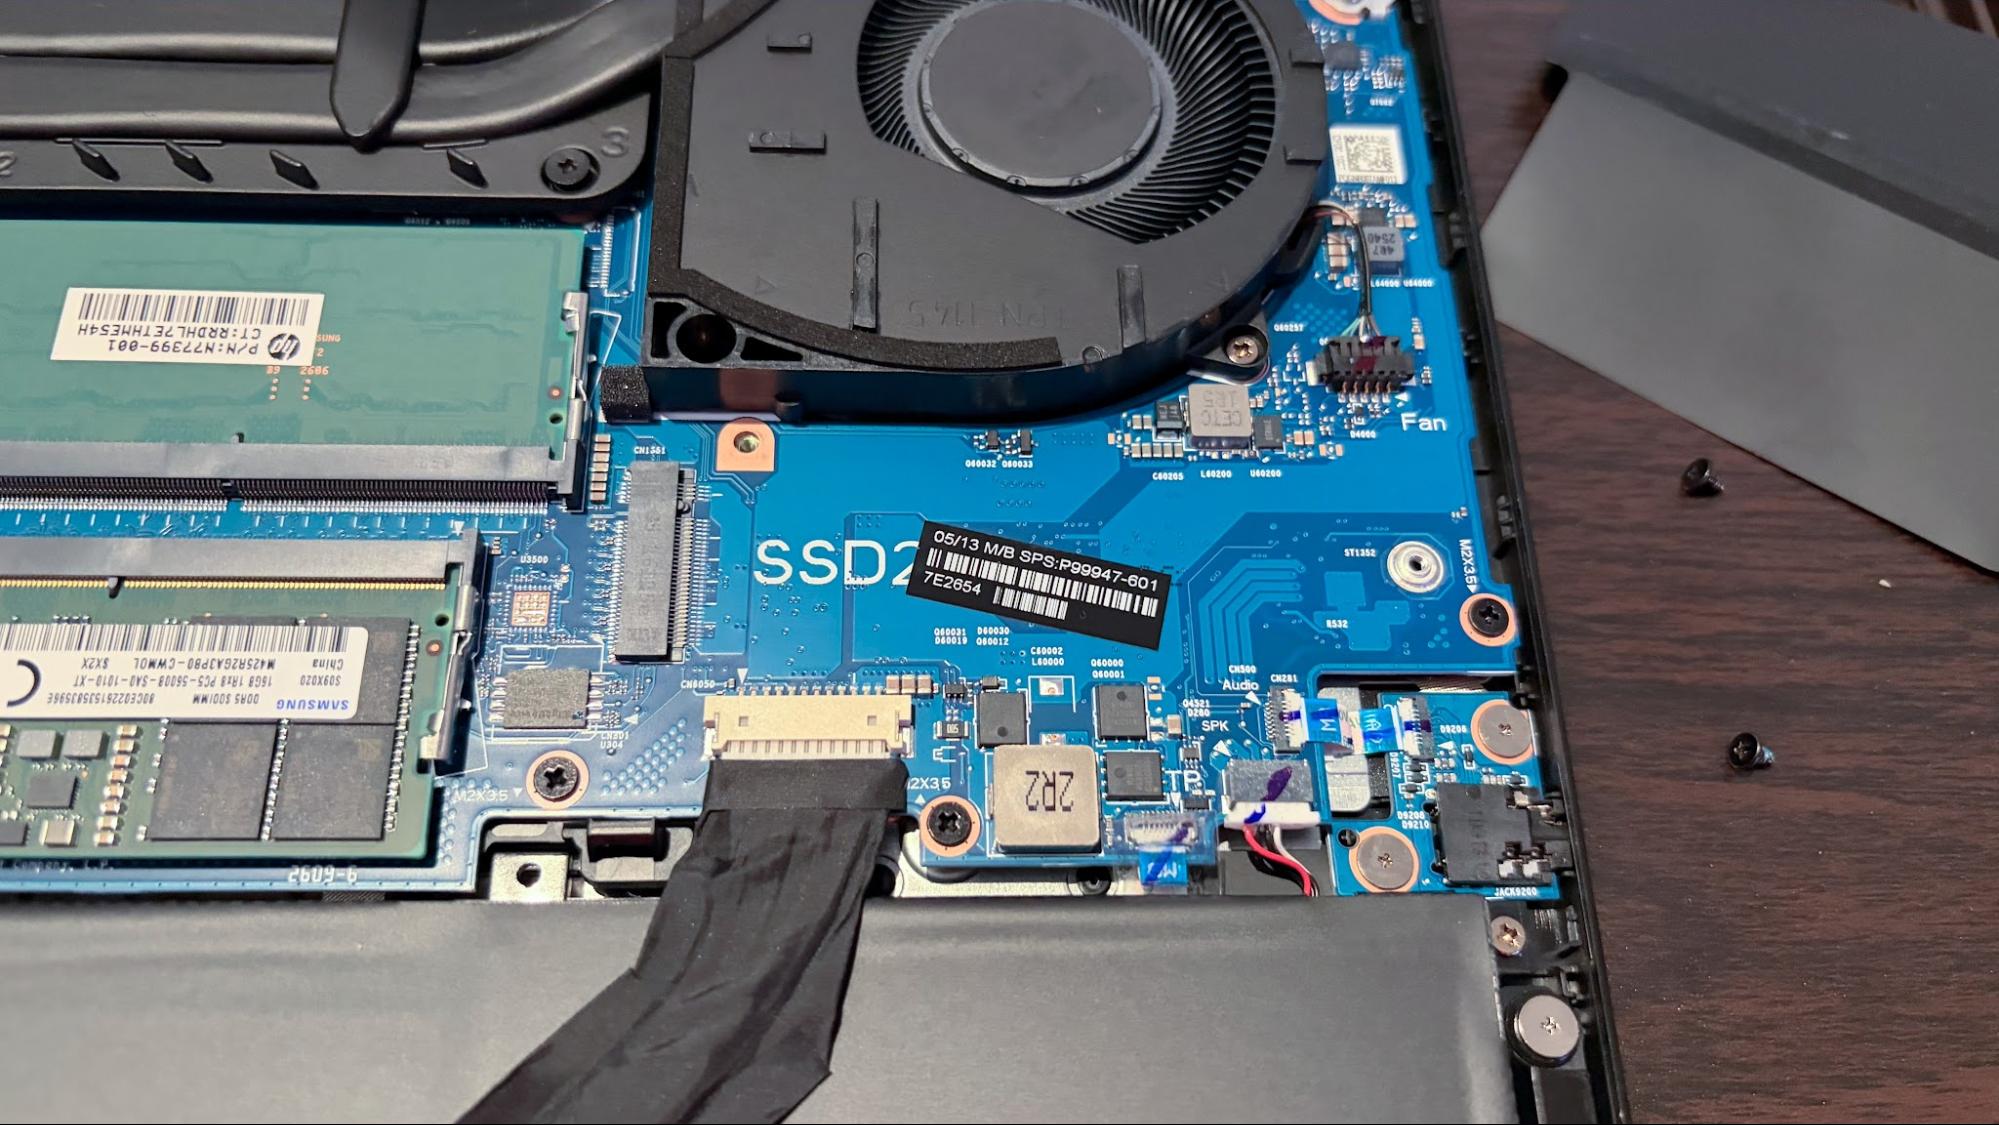
With the panel removed, you’ll find easy access to the battery, both M.2 SSD bays, the Wi-Fi card, and the two SO-DIMM slots (which are covered by a flexible I/O shield).
Battery Life on the HyperX Omen 15
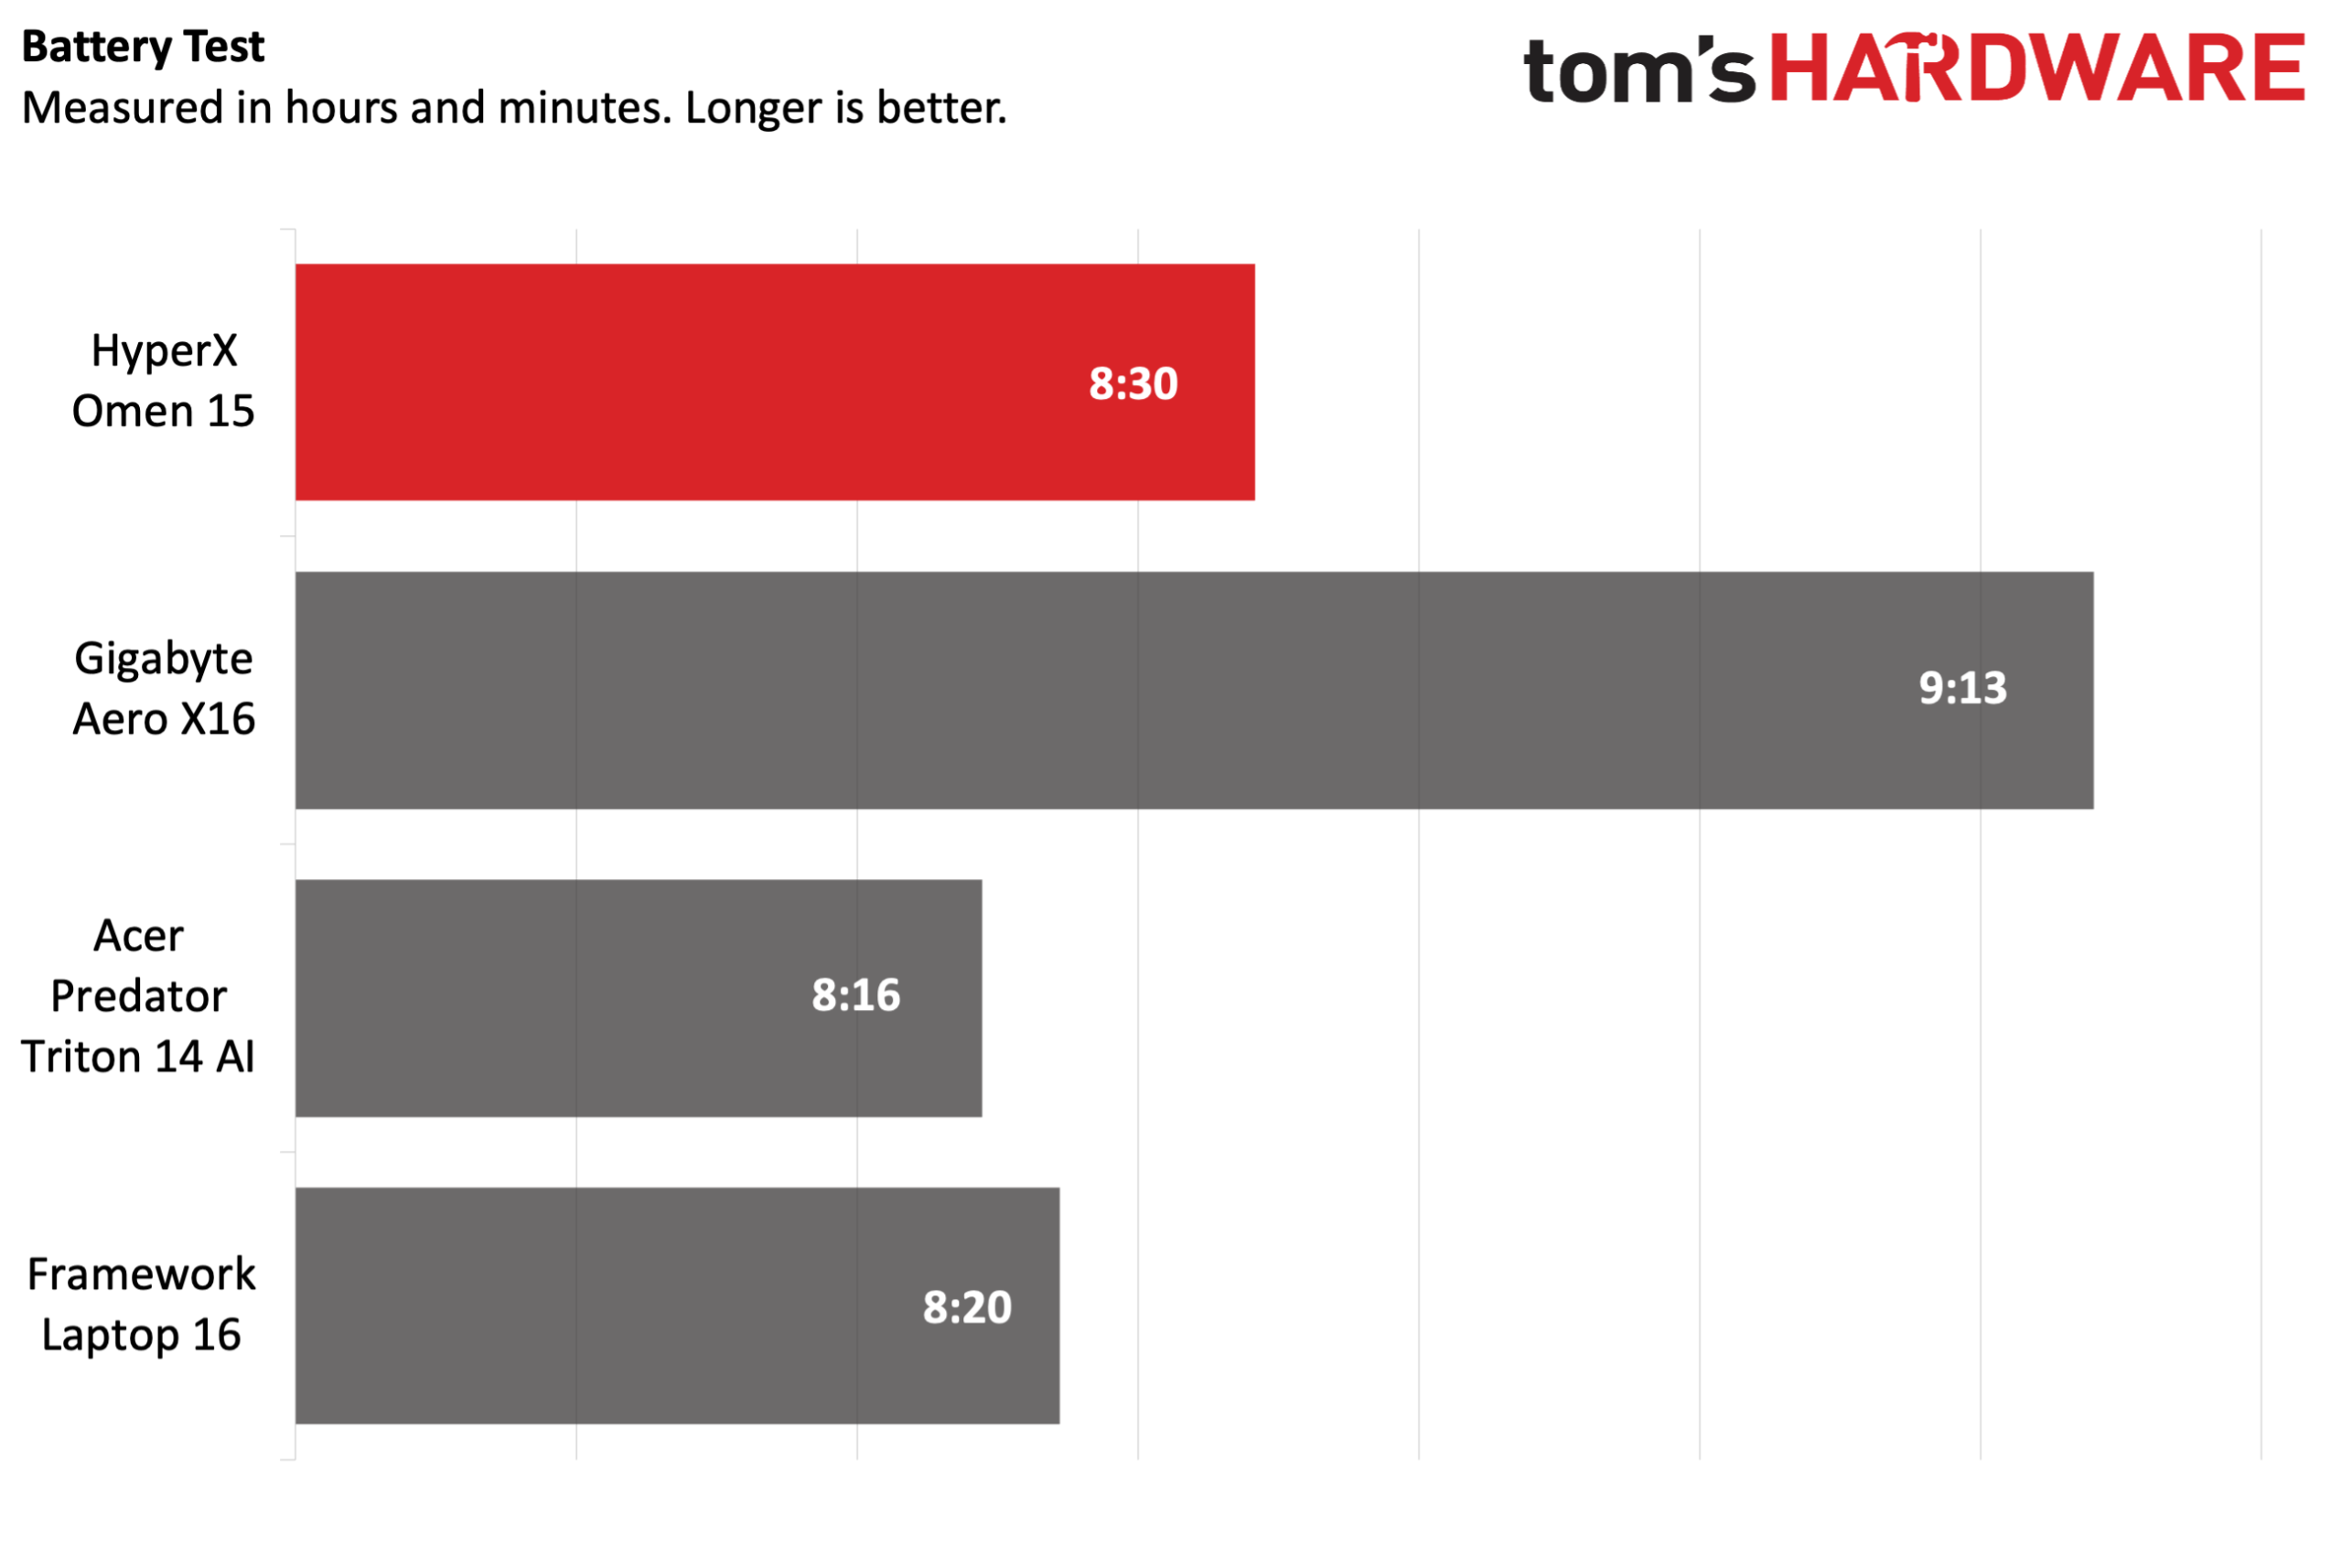
The Omen 15 is powered by a 70 WHr battery, and it performed well against its peers. Our battery test leverages web browsing, video streaming over Wi-Fi, and OpenGL testing with the screen brightness set at 150 nits.
(Image credit: Tom's Hardware)
The HyperX laptop endured for 8 hours and 30 minutes, which was 10 minutes longer than the Laptop 16 and 14 minutes longer than the Predator Triton 14 AI. However, it was no match for the Aero X16, which lasted 9 hours and 13 minutes.
Heat on the HyperX Omen 15
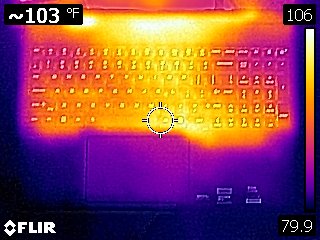
During the Metro Exodus stress test, we measured the Omen 15's keyboard at 95.4 degrees Fahrenheit (F) between the G and H keys, while the touchpad was 85.1 F.
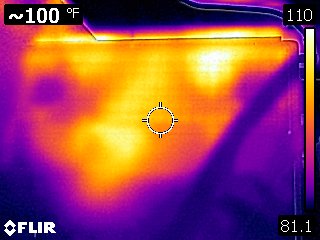
Tom's HardwareTom's Hardware
The hottest part of the laptop was near the bottom-rear of the chassis, measuring 110 F.
While running the Metro Exodus stress test, the CPU measured 63.4 degrees Celsius (C). Meanwhile, the RTX 5070 came in at 63.2 C.
Webcam on the HyperX Omen 15
The Omen 15 uses a standard 1080p webcam with IR capabilities, meaning it can be used with Windows Hello biometric authentication in Windows 11.
The camera is fine, and by no means a standout in any particular area. It covers the basics, offering decent color reproduction, and did a passable job of picking out my facial hair. However, I did notice a fair amount of noise in the image. However, if you mainly use the camera to hop on a few Zoom calls here and there, it’s more than adequate.
HyperX Omen 15 Software and Warranty
HP has no qualms about loading up its systems with a copious amount of apps, as you'll find a variety of software including HP, HP Documentation, HP PC Hardware Diagnostics, HP Smart, HP Privacy Settings, and HP TV+ (and that's not even all of them).
However, the HP utility that you'll probably interact with the most is the Omen Gaming Hub. Here you'll find controls for tweaking nearly every aspect of the system, from power modes to RGB lighting for the keyboard.
The Omen 15 comes with a one-year manufacturer warranty.
HyperX Omen 15 Configurations
Our Omen 15 review unit came configured with an Intel Core Ultra 9 386H processor, 32GB of DDR5-5600 memory, a 1TB PCIe 4.0 SSD, GeForce RTX 5070 GPU, and a 2880 x 1800 OLED 120 Hz display. It’s listed on HP’s website with an MSRP of $2,799, but is currently available for $2,099 with a 25% off coupon.
There are various configurations available with slightly different specs, but the 15-ga0762nr SKU features a Core i7-14650HX processor, 16GB of DDR5-5600 RAM, a 1TB PCIe 4.0 SSD, an RTX 5060 GPU, and a 2560 x 1600 OLED with a 180 Hz refresh rate. This system is priced at $1,999, or just a $100 discount compared to our review unit’s sale price. However, the price disparity makes more sense when you consider our review unit’s MSRP.
Bottom Line
On the one hand, the HyperX Omen 15 has solid gaming performance across the board, and its CPU performance in productivity tasks is top-of-the-class. In addition, the 15.3-inch OLED display looks great and offers an expansive 2880 x 1800 resolution.
On the other hand, the chassis is constructed of cheap and flexy plastic, while SSD performance lags behind its competitors. In addition, the display is limited to a 120 Hz refresh rate, and you don’t get any Thunderbolt ports (if that’s something that’s important to you at this price point).
Where things get even more complicated is with pricing. Our review unit carries an MSRP of $2,799, but HP is currently selling it for $2,099 after discounts. At MSRP, our review unit is an absolute non-starter, while the sale price makes it a much more palatable option. But even at its sale price, we feel that the Gigabyte Aero X16 makes a far more compelling buy at just $1,799.
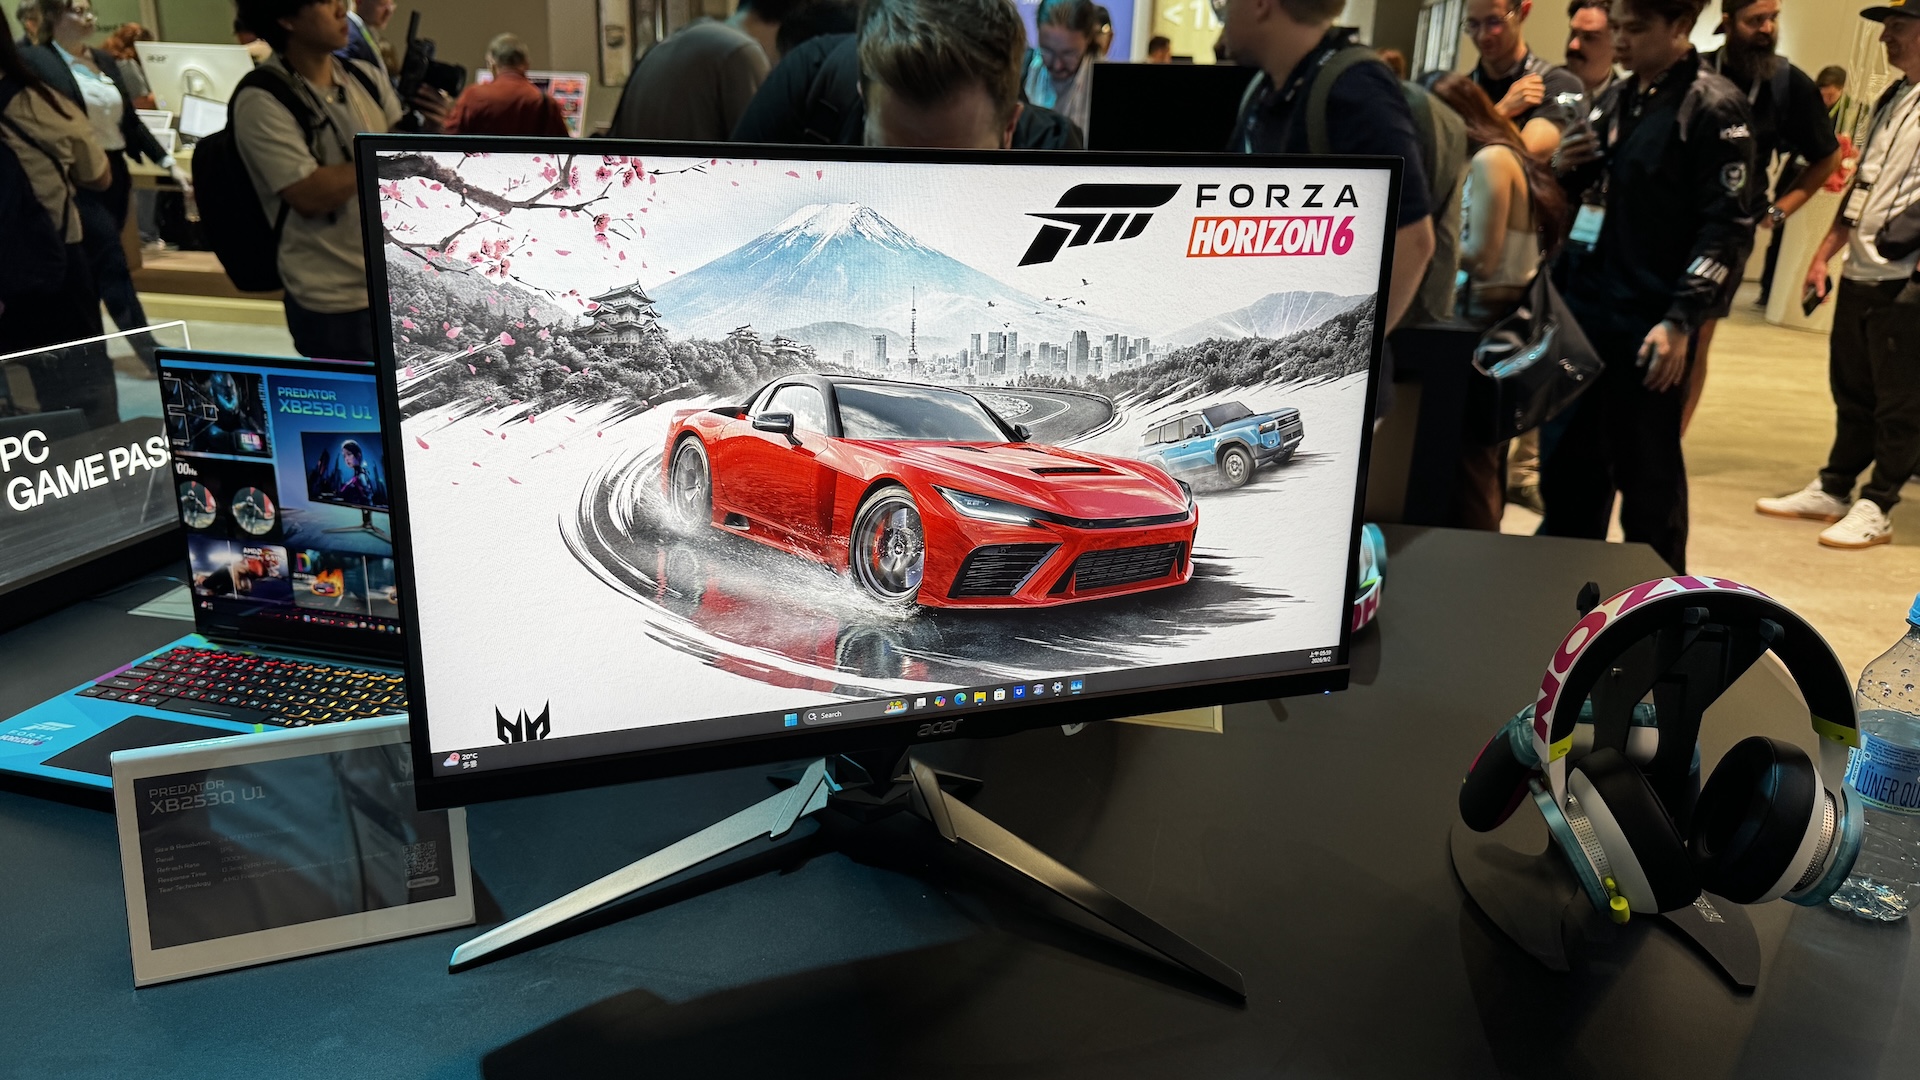
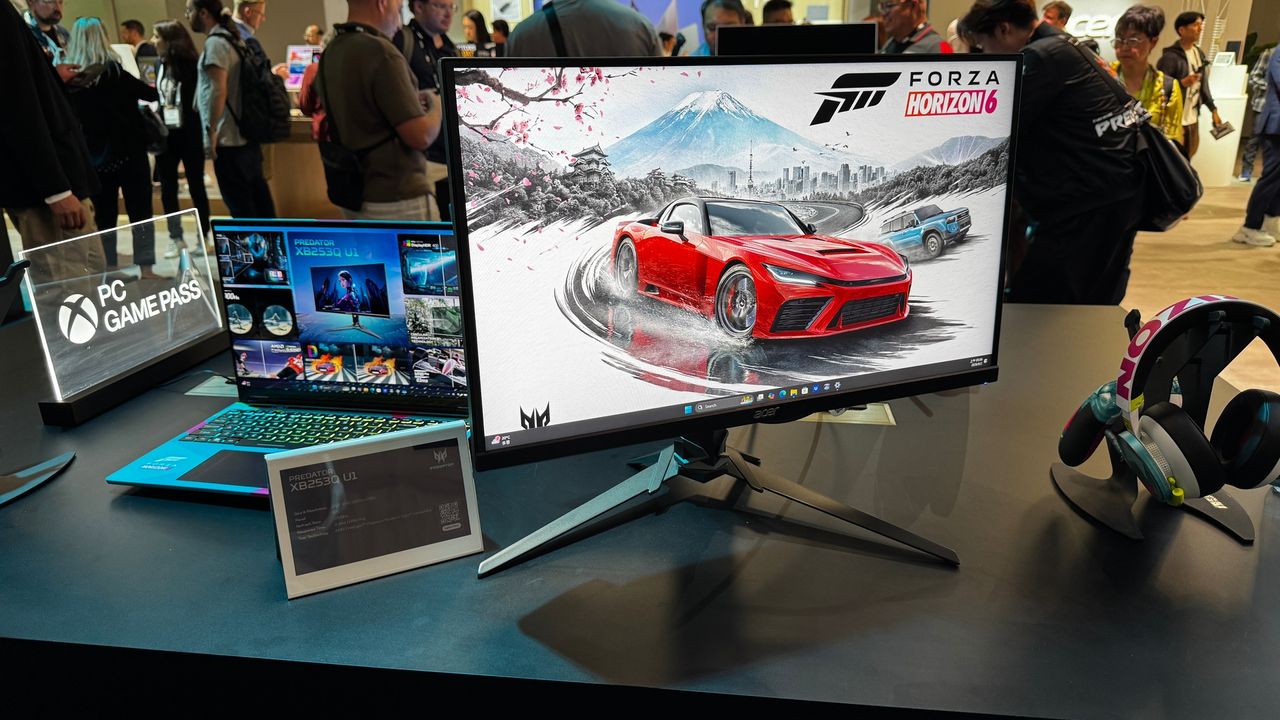
IFA 2026 is upon us, and Acer has unleashed a whole onslaught of new products across various categories. One specific category is monitors, where Acer announced no less than seven new Nitro- and Predator-branded products to satisfy nearly every price point and gaming niche. With prices ranging from $299 to $1,199, there’s something for everyone with today’s announcements.
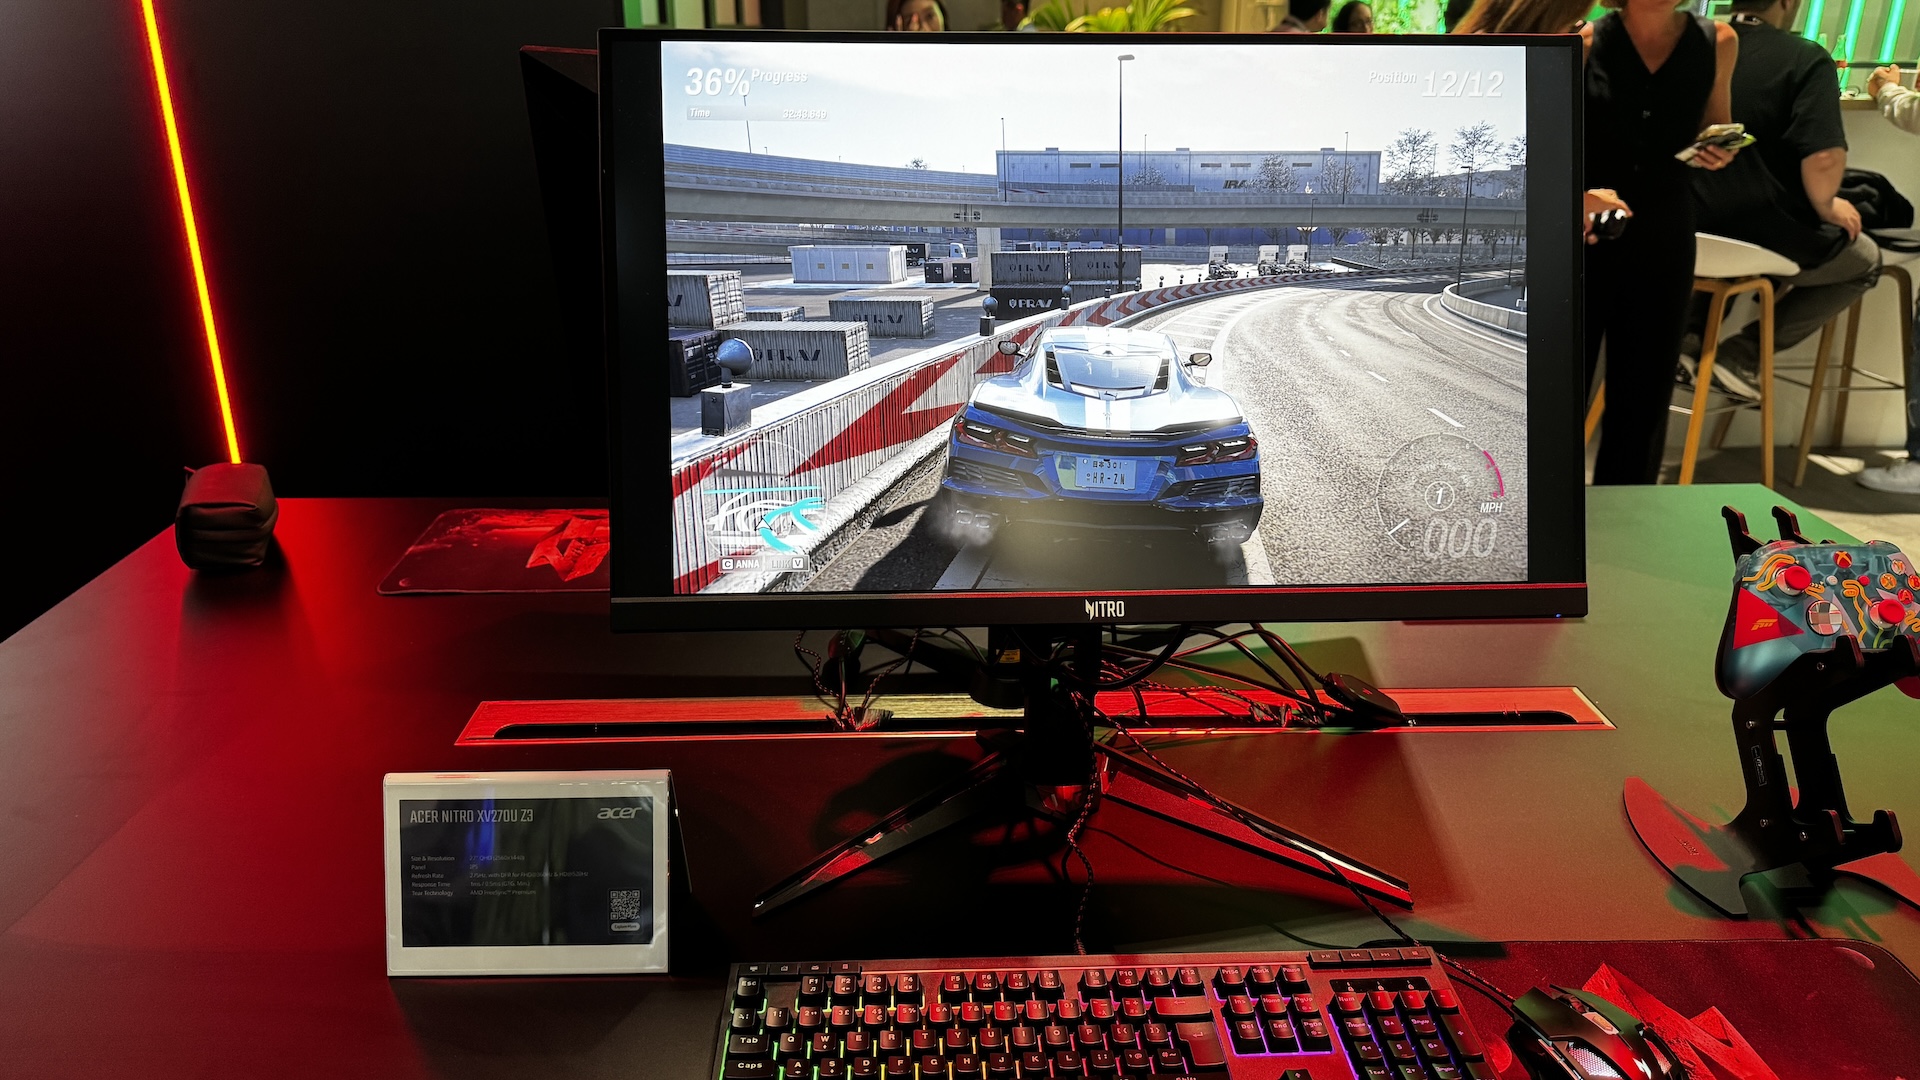
We’ll start our coverage with the Nitro family, which has four new members, the cheapest of which is the Nitro XV270U Z3 at $299. The XV270U Z3 is a tri-mode monitor, offering three distinct resolution/refresh rate presets. This is a 27-inch monitor with an IPS panel, QHD resolution, and a 275 Hz refresh rate. However, you can switch to two additional modes: 1080p at 360 Hz or 720p at 520 Hz. I haven’t gamed at 720p since the turn of the century, but the resolution is here for folks who crave frame rates over everything else.
The Nitro XV275U Z2 is another 27-inch tri-mode monitor with an IPS panel, but it is upgraded with 1,152-zone Mini LED backlighting. The available resolutions and refresh rates mirror those of the XV270U Z3, but there are a few additional perks. The XV275U Z2 offers a typical brightness of 500 nits (twice that of the XV270U Z3) and reaches 1,000 nits in HDR mode. Despite the pretty substantial upgrades, the Nitro XV275U Z2 is only $30 more expensive at $329.
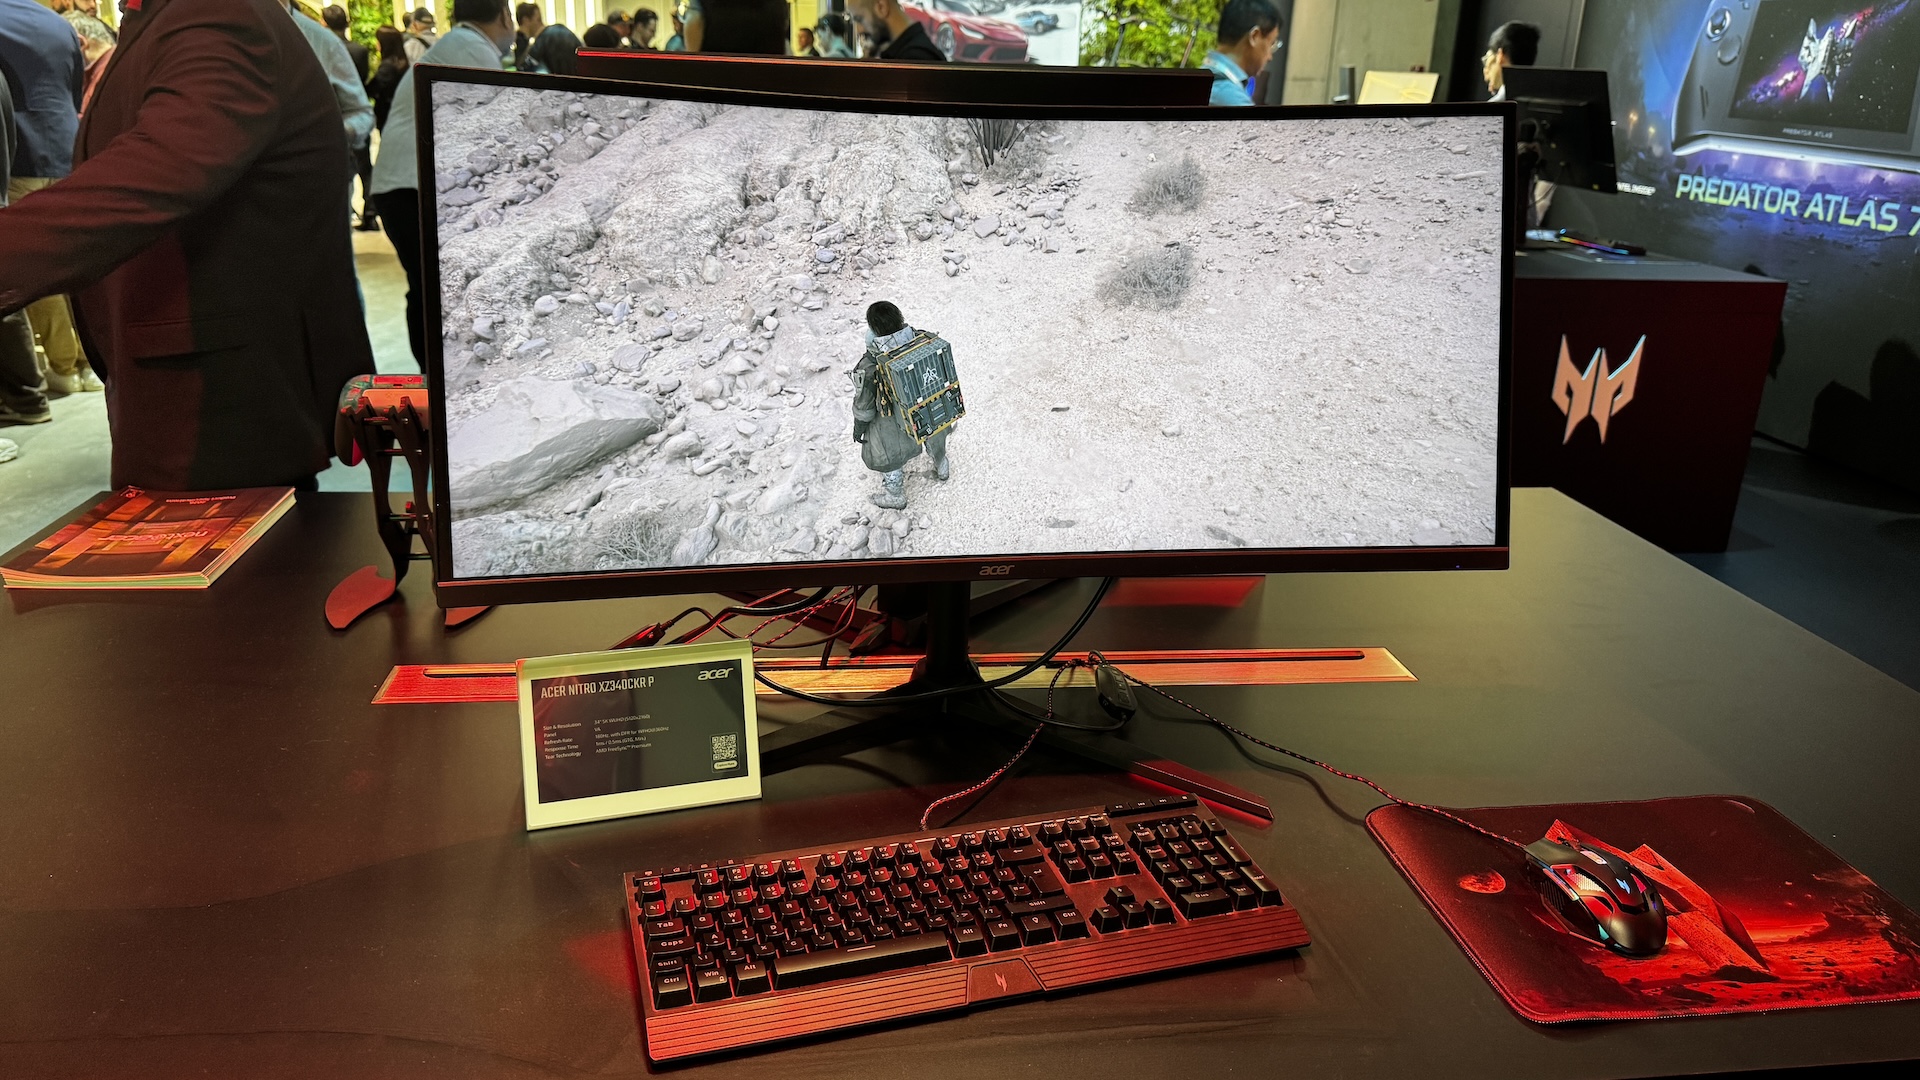
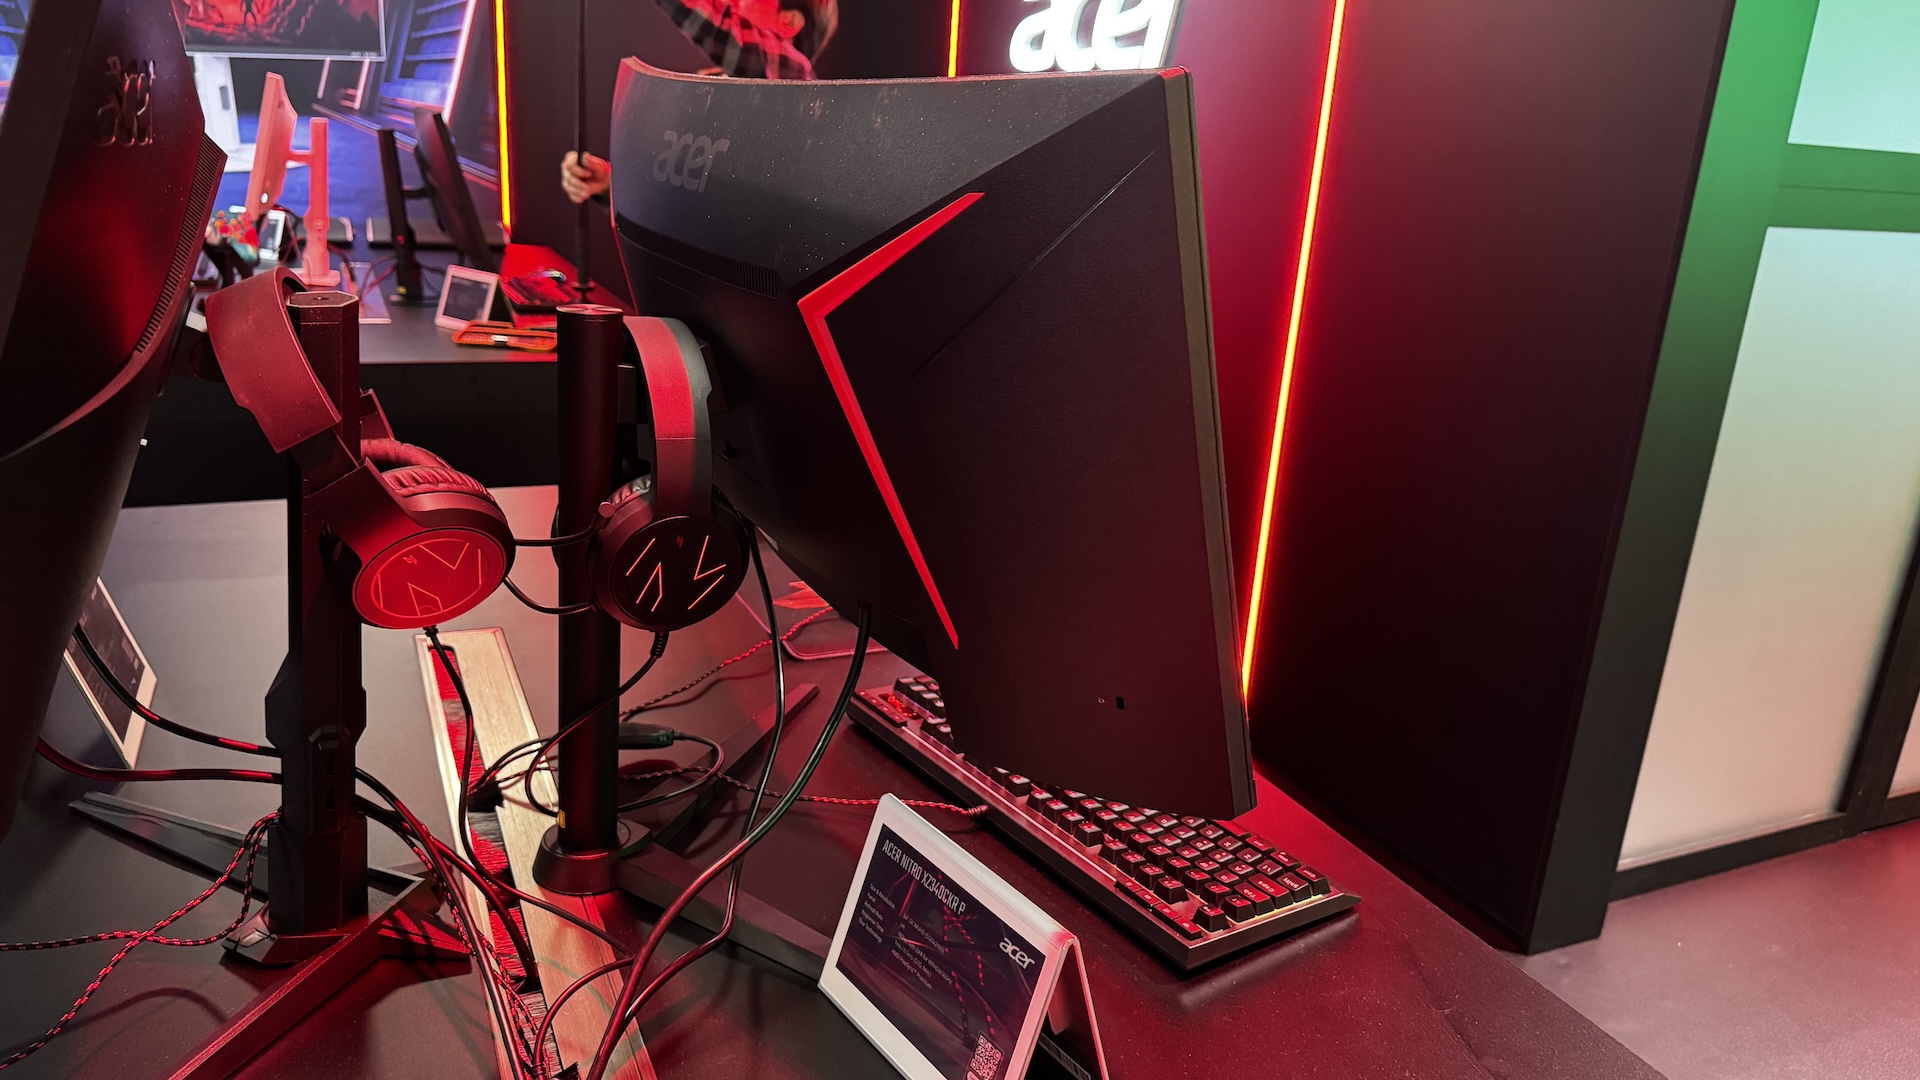
The next two Nitro monitors also offer 5K resolution, and we'll start with the $699 Nitro XZ340CKR P. It features a 34-inch IPS panel with 5120 x 2160 resolution (21:9 aspect ratio) and a maximum refresh rate of 180 Hz. However, Acer also infuses the Nitro XZ340CKR P with a dual-mode switch, allowing it to operate at WFHD (2560 x 1880) at 360 Hz.
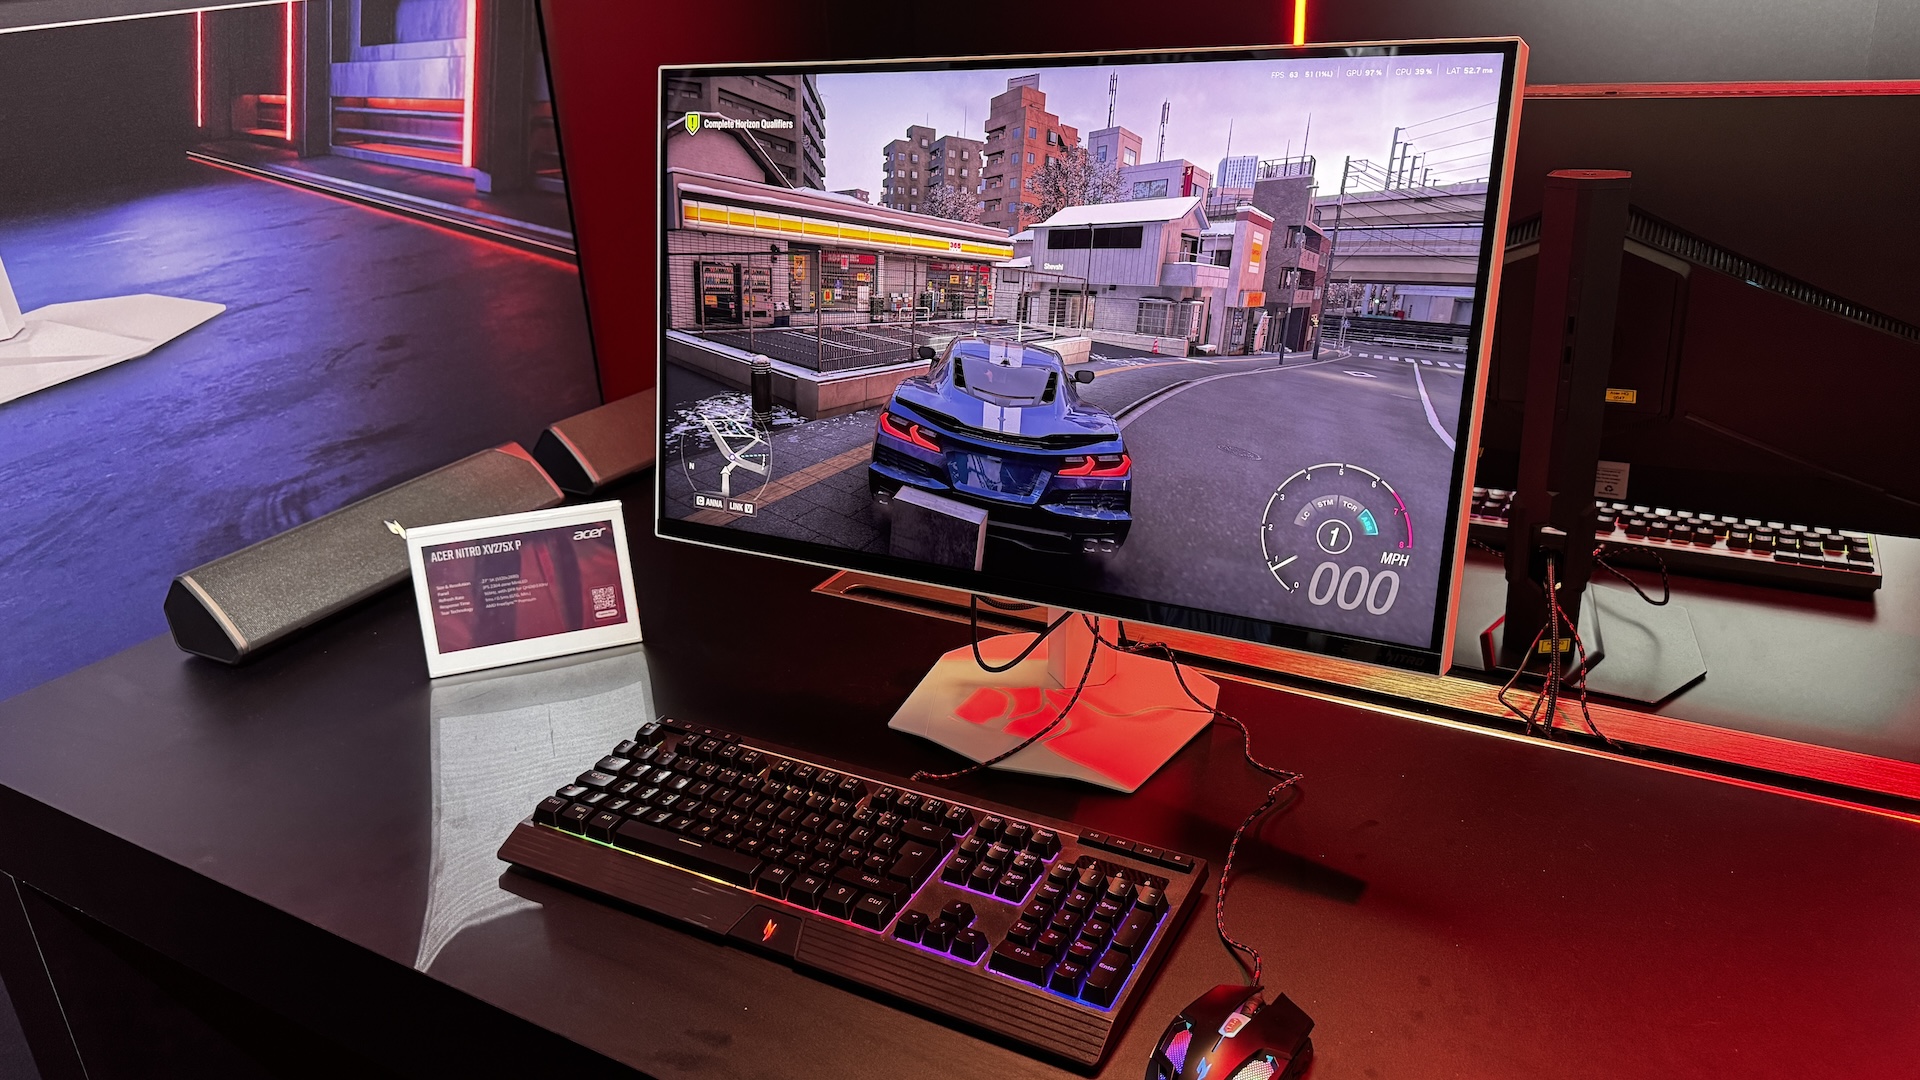
Rounding out the new additions to the family is the Nitro XV275X P, which squeezes a 5120 x 2880 resolution (16:9 aspect ratio) in a 27-inch IPS panel. For those who crave the ultimate in pixel density, the Nitro XV275X P should tick all the right boxes. The panel tops out at 165 Hz at native resolution, but if you're willing to drop down to 2560 x 1440, you can bump the max refresh rate to 330 Hz. The monitor has a typical brightness of 450 nits, but can jump up to 1,400 nits in HDR mode. However, you'll pay for that density and performance with a price tag of $1,199.
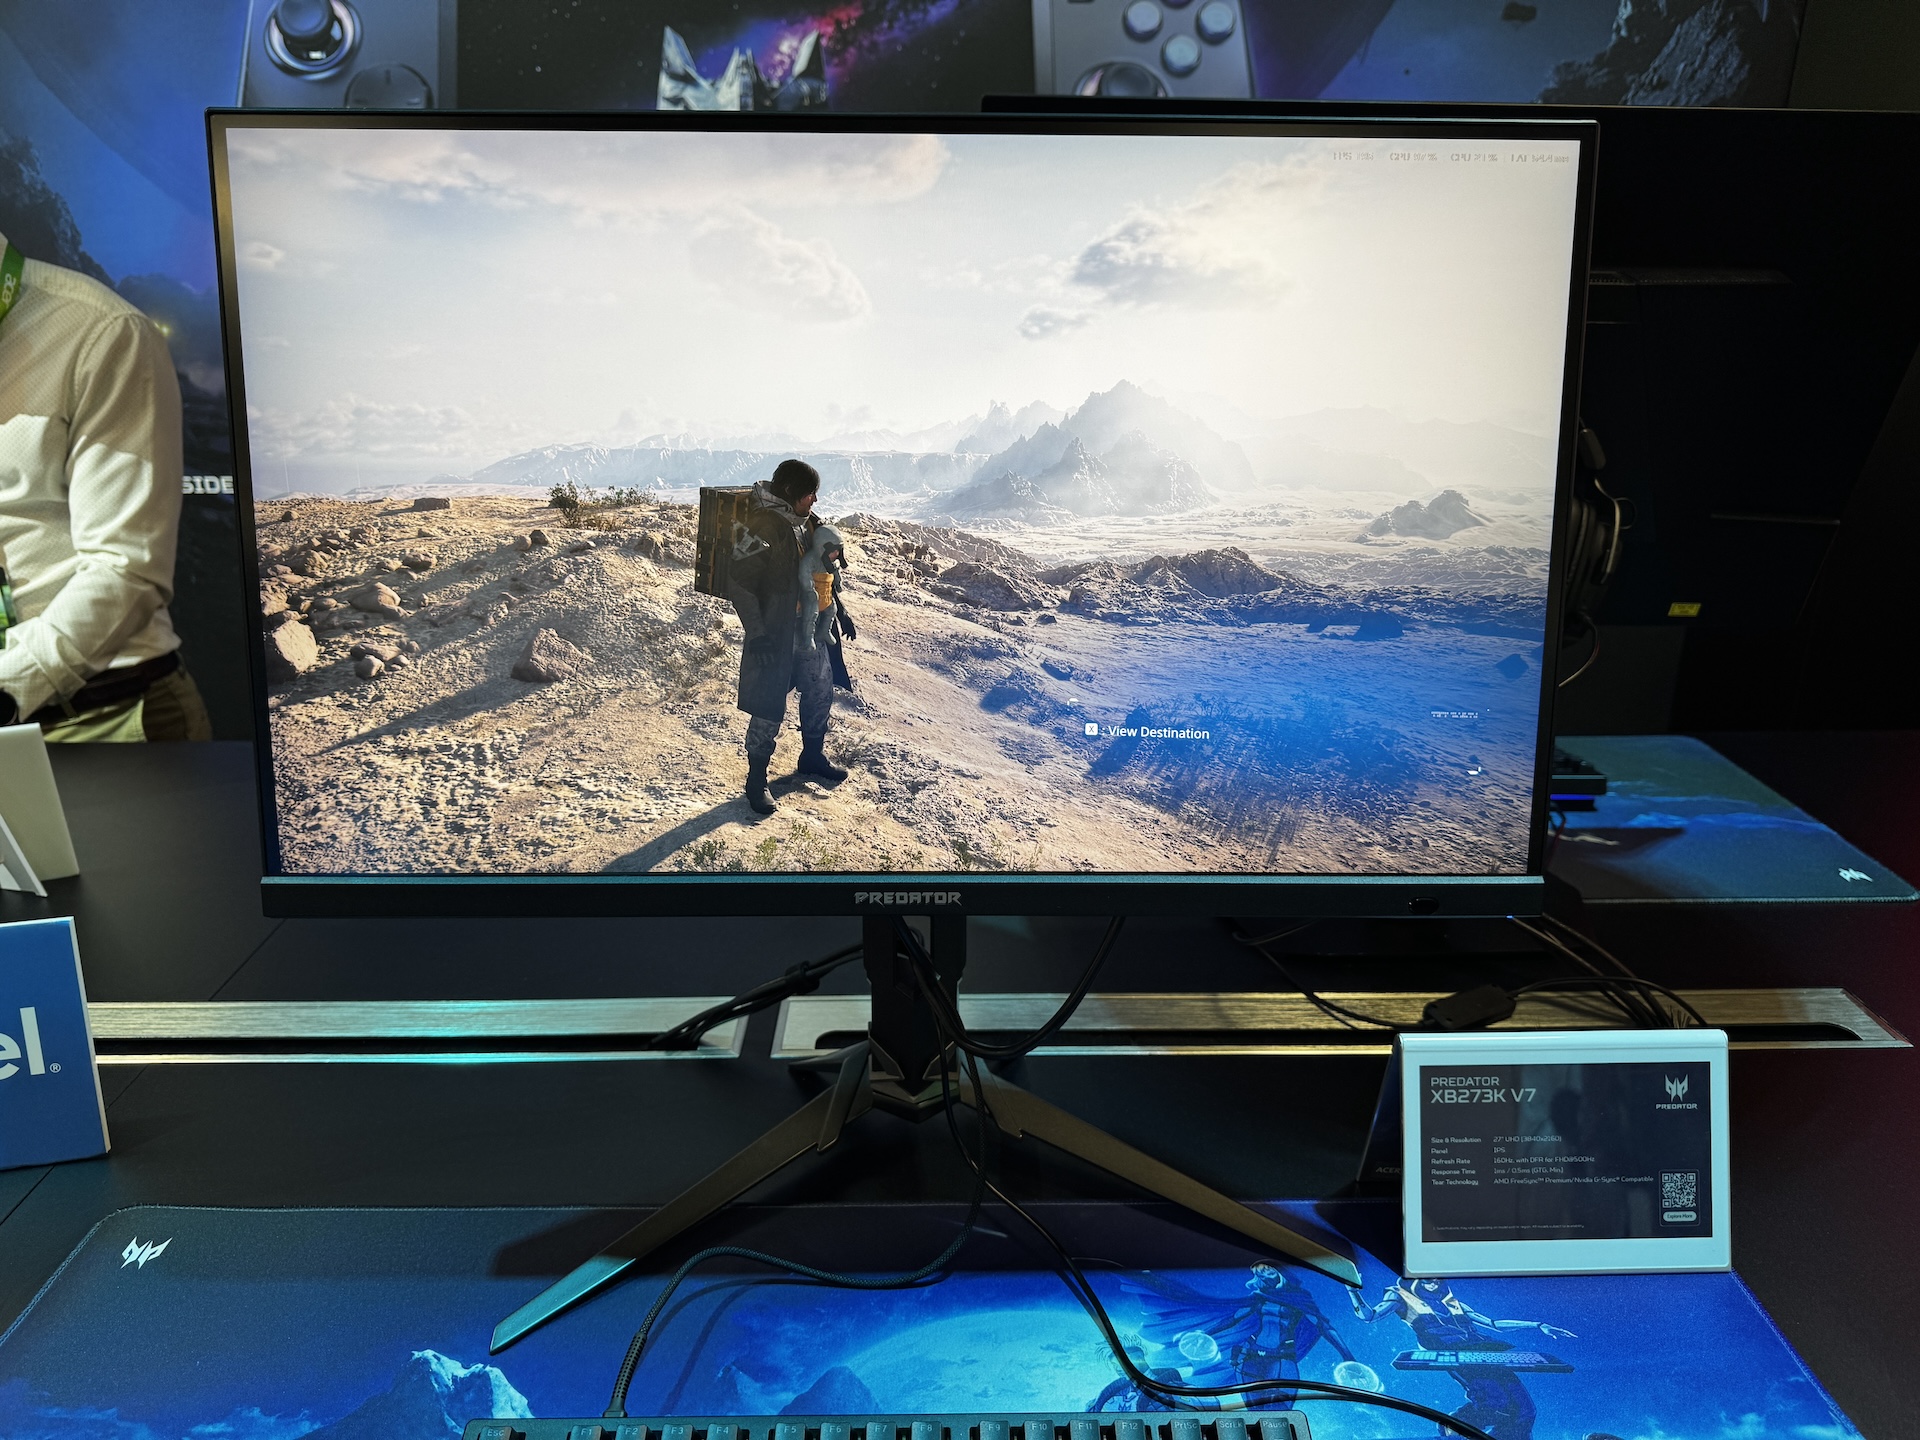
Shifting gears to the Predator family, we start at the lower end of the price spectrum with the $449 XB273K V7. The XB273K V7 natively runs at 4K resolution with a 160 Hz refresh rate. However, thanks to Dynamic Frequency and Resolution, you can switch to 1080p resolution and more than triple the maximum refresh rate to 500 Hz.
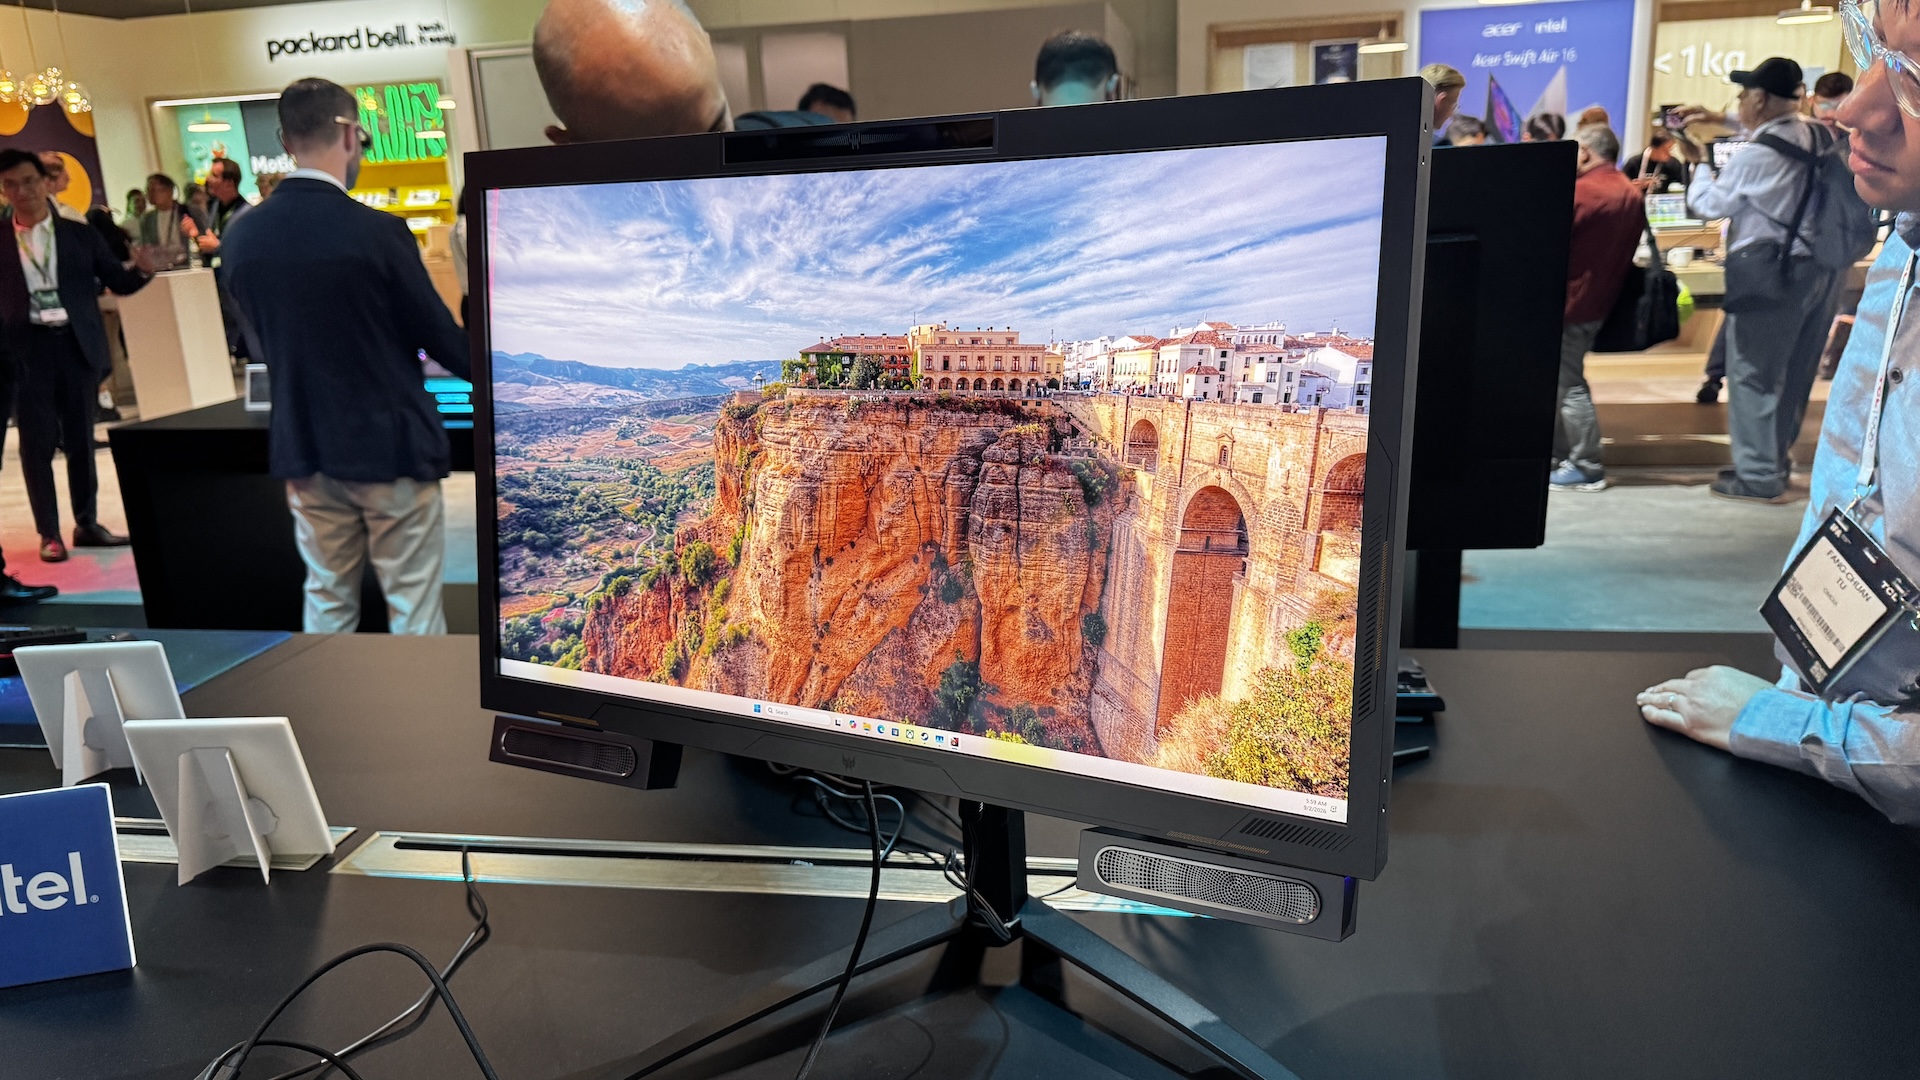
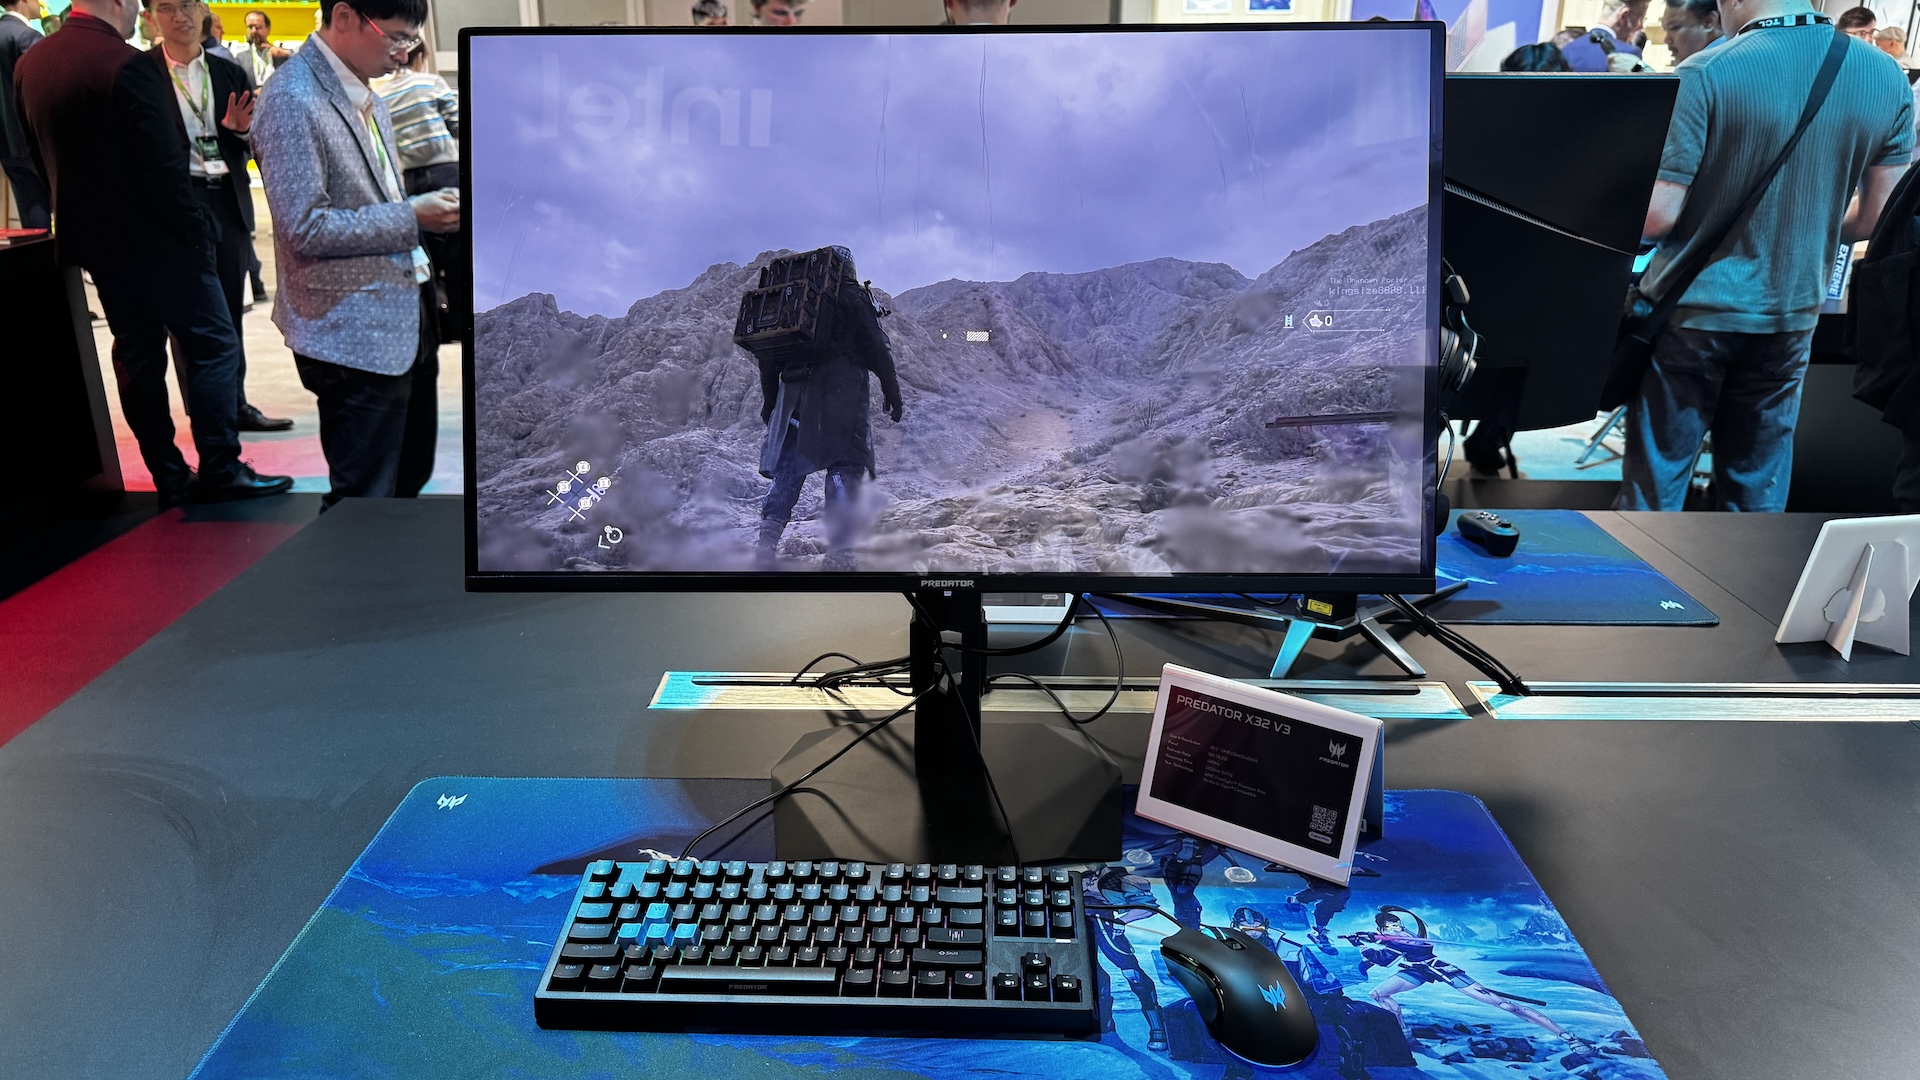
Stepping up the price ladder, we come to the $899 Predator X32 V3, the first of Acer's monitors announced today that use Penta Tandem QD-OLED panel technology. The 31.5-inch panel has a native 4K (3840 x 2160) resolution and a 180 Hz maximum refresh rate. Unlike the other multi-mode monitors that are launching, you're stuck with 180 Hz no matter which resolution you choose.
Finally, we come to the Predator XB253Q U1, which is the smallest of the announced monitors, with a 24.5-inch diagonal. But don't let its small size fool you, the Predator XB253Q U1 is the most performant of the bunch, and is aimed squarely at the elite eSports gamers. The monitor has a native 1080p resolution with a maximum refresh rate of 1,000 Hz from its IPS panel.
You'll find the usual support for AMD FreeSync Premium and Nvidia G-Sync, along with a 0.3 ms response time. Acer quotes typical brightness of 400 nits, while HDR mode squeezes out just a bit more at 450 nits. The added performance of the Predator XB253Q U1 doesn't come cheap, as you're looking at a suggested retail price of $1,099 when it launches.
Most of the monitors announced today will launch in Q4 2026, with a few stragglers extending the launch window to Q1 2027.
While gamers are definitely feeling the pricing pinch when it comes to memory and storage, some segments of the consumer tech sector are seeing more favorable trends. Advances in screen technology for gaming monitors are accelerating, while OLED prices are steadily falling. Dell is part of this trend with a pair of new Alienware monitors, the AW3226Q and AW2527HX, that take differing approaches to appeasing gamers.
We start with the AW3226Q, which is aimed at gamers who crave higher-resolution 4K gaming over outright speed. At its heart is a 32-inch panel that uses an RGB Stripe Tandem OLED technology (previously seen on the AW3926QW that we recently reviewed). The use of a four-stack tandem layer within the panel addresses one of the few criticisms leveled against traditional QD-OLED panels: slightly blurry/soft text upon close inspection. Another added benefit is that brightness levels are higher than on previous-generation QD-OLED monitors (1,000-nit peak brightness).
Blazing-fast refresh rates aren't the goal here, since the AW3226Q tops out at 165 Hz. With that said, you do get a 0.03 ms response time, AMD FreeSync Premium Pro and Nvidia G-Sync support, VESA DisplayHDR True Black 400 and Dolby Vision compliance, and a built-in USB-C/USB-A hub.
Alienware AW2527HX (Image credit: Dell)
For the most discerning speed freaks, there's the AW2527HX. Instead of the larger 32-inch 4K panel's 165 Hz refresh rate, the AW2527HX uses a 24.5-inch panel with a 560 Hz refresh rate. While many of the higher-refresh-rate monitors we've seen can reach upwards of 1,000 Hz with IPS or TN panels, the AW2527HX offers the color performance and black-level improvements afforded by a QD-OLED panel. However, what you gain in speed, you lose in pixel density — the AW2527HX makes do with 1920 x 1080 resolution. With that said, you do get VESA DisplayHDR True Black 600 support, a matte panel finish, and DisplayPort 2.1 connectivity.
Alienware worked together with the folks at Team Liquid to develop the monitor, ensuring that it ticks all the major boxes for eSports gamers. There's a graphene sheet integrated into the display that helps distribute heat more evenly to mitigate pixel burn-in. An integrated stand is there to hang your headset, and there's a dedicated button that lets you switch between 4:3 and 3:2 aspect ratios depending on how you want to game. The base of the AW2527HX has even been minimized to ensure there's enough space under the monitor for your keyboard.
Both the AW3226Q and AW2527HX launch with a three-year OLED pixel burn-in warranty. Although pricing hasn't been announced yet, the former will launch this fall, while the latter is promised in Q1 2027.
Earlier this year, TP-Link announced its intentions to launch the first members of its Wi-Fi 8 (802.11bn) networking family. At the time, the company revealed that it would first launch a standalone Archer 8 consumer router this fall, followed by a Deco 8 mesh router. And right on cue, TP-Link stated today that the Archer 8 Ultra BN19000 tri-band router will launch on September 30.
TP-Link is going light on the details at this time, but this is what we know so far. The Archer 8 Ultra BN19000 will come equipped with 18 internal antennas and deliver up to 19 Gbps aggregate wireless speeds. In addition, it will have 10 Gbps wired connectivity, though we don’t know whether that includes WAN and LAN ports or just the latter.
For users who require broader coverage in larger homes or offices, the Deco 8 Ultra BN22000 tri-band mesh router offers aggregate speeds of up to 22 Gbps and includes 10 Gbps wired connectivity. TP-Link typically sells its mesh systems in two- or three-pack configurations, and the Deco 8 Ultra BN22000 3-pack covers up to 9,800 square feet. Unfortunately, the Wi-Fi 8 mesh system won’t be available until Q1 2027, according to TP-Link.
TP-Link plans to expand its Wi-Fi 8 portfolio by Q2 2027 with a new Roam 8 travel router, along with range extenders and PCIe/USB client adapters. Although we don’t know which specific chipsets will power Archer 8 Ultra, Deco 8 Ultra, and other unannounced Wi-Fi 8 devices, the company says its products will use hardware from Broadcom, MediaTek, and Qualcomm.
Wi-Fi 8 is shaping up to be more of a quality-of-life improvement over Wi-Fi 7 than a substantial theoretical speed improvement. Put simply, Wi-Fi 8 hardware devices should be able to come closer to fulfilling the real-world performance metrics that Wi-Fi 7 devices originally promised.
To this end, TP-Link says that its so-called StabilityEngine leverages core Wi-Fi technologies including Enhanced Long Range (ELR) and Distributed Resource Units (DRU). These features together help improve wireless connectivity, primarily for low-power IoT devices that are typically positioned at the edge of your home’s wireless coverage. There are also additional technologies at play, such as Unequal Modulation (UEQM) and Modulation and Coding Schemes (MCS), to ensure uninterrupted wireless traffic in high-interference situations.
A new design language is also being ushered in with the Archer 8 and Deco 8 products, which was teased during TP-Link’s May 2026 announcement. “We stopped building a piece of networking equipment and started designing for the home,” explained TP-Link industrial design chief Gary Chang. “When a router’s design becomes something people want to display, it ends up exactly where it performs best.”
What remains unclear is how or when these new Wi-Fi 8 products will launch in the U.S. As of today, TP-Link has yet to obtain FCC approval to release all-new products in the country. Unlike competitors Amazon and Netgear, which received conditional approval from the FCC Covered List, the U.S. government is still playing hardball with TP-Link. For its part, TP-Link only says that preorders for the Archer 8 Ultra will open in “select regions” on September 30.

 Anmelden