Ingenieure der ETH Zürich haben einer Roboterhand das eigenständige Laufen auf ihren Fingern beigebracht. Das mit einem Raspberry Pi ausgestattete System meistert sogar verschiedene Untergründe. Später soll das Konstrukt als abnehmbares Modul dienen. (Weiter lesen)
Raspberry Pi users are effectively being blocked from swapping the RAM chips on their SBCs for repairs or upgrades. In a reply on the firm’s forums, Raspberry Pi Engineer & Forum Moderator PhilE told users that the company has been “locking devices to their original RAM size” for some time. This decision was made for the sake of device reliability, says the rep. However, the move seems to go against the grain for a company so involved in the maker, DIY, and tinkerer side of computing.
PhilE explains the problem that faced Raspberry Pi and some users, airing the company’s side of the argument. “If labor is cheap enough then there may be a minor financial gain in buying a part with say a 2GB part, swapping it for an 8GB part of dubious origin, and reselling it as an 8GB device,” says the forum mod. “However, this brings an element of risk to the user - the board hasn't been tested by us - and is a potential support burden for us, with customers complaining of unreliable devices. We therefore remove the commercial incentive by locking devices to their original RAM size.”
In addition, the Pi’s firmware currently “program in some other device attributes, meaning that switching parts of the same size may not work,” says PhilE. This isn’t great for genuine users who might want to tinker with or upgrade the RAM chips or have to replace an IC for repair. The forum mod underlines the effective block by telling would-be RAM MacGyvers to “don't waste your time trying - it won't work.”
Some readers might feel sympathetic towards Raspberry Pi’s RAM tinkering blockade, given PhilE’s reasoned explanation. One surprising aspect of the decision, though, is that the firmware locks of RAM IC swaps began to roll out in updates from late 2024 onwards. So, this change was made well before the crazy RAM chip pricing upswing precipitated by the AI data center boom. Also, it means that if you want to sidestep this RAM tinkering block, you would need to grab and flash a pretty old firmware to your Pi model (if available).
Naturally, the Pi community isn’t celebrating this RAM upgrade/repair block. Some high-profile Pi advocates like Jeff Geerling suggest that implementing a ‘warranty bit’ (similar to older models), or a one-time firmware flag to void support for modified boards, would have been a more agreeable path for Raspberry Pi to take. Here’s a lookup table that you can use to check your Pi’s factory RAM configuration.
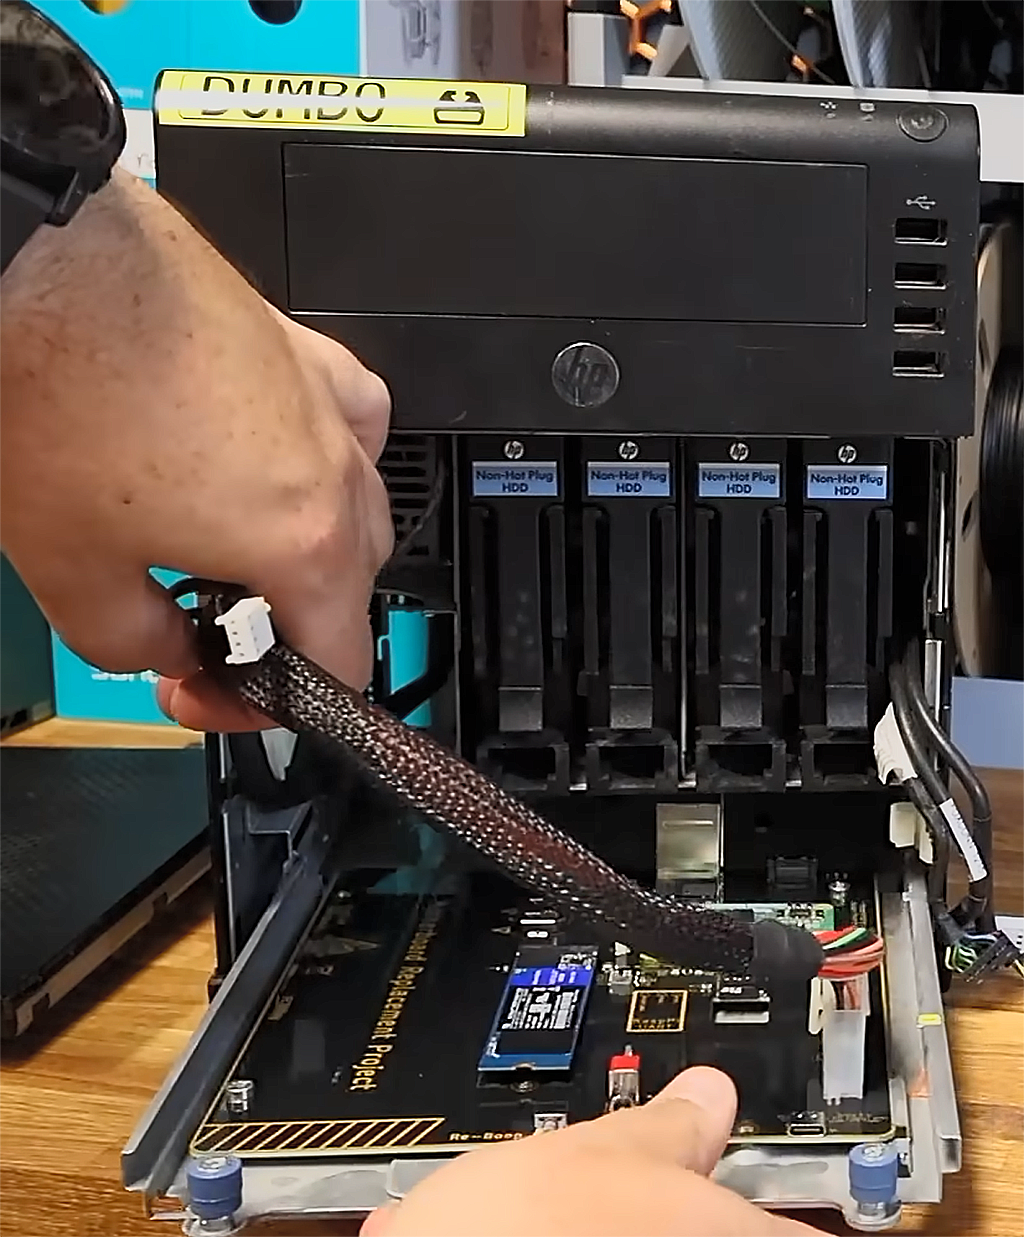
Nobody likes throwing away old hardware with a lot of usable parts, and most everyone loves a nice DIY electronics project. Those two things dovetailed nicely into YouTuber EastMakes' project to repurpose his ancient HP ProLiant N40L micro-server. The machine's integrated motherboard-and-SoC was far too long in the tooth, so he did the logical thing: designed his own around a Raspberry Pi Compute Module 5 (CM5).
EastMakes didn't want to trash the N40L, but it had zero NVMe slots, only USB 2.0 ports, and its once-laudable power consumption figures are rather unimpressive today. Needless to say, the computing power on offer was, at lack of a better word, minimal, as even back then the onboard AMD Turion II chip barely outran a pocket calculator. Even a contemporary Raspberry Pi can outperform the original hardware on all fronts, plus use a frugal amount of watts while doing so.
The CM5 is exactly the same as a standard Raspberry Pi 5, except it doesn't have any ports and is meant to be used with external accessories that provide them. Oftentimes, budding enthusiasts will use it with its premade corresponding I/O PCB. EastMakes did start with that board, but taking advantage of the Raspberry Pi project's open-source nature, he took the original diagrams and documentation and rolled his own variation.
(Image credit: EastMakes @ Youtube)
The tech wizard extended the board to fit the area the original ProLiant N40L used, and printed a simple plastic 3D prototype to ensure he got the port and screw-hole locations just right. From thereon, he moved onto optimizations like trimming down to just the one HDMI port, and adding a connector stack with the Ethernet port and two USB 3.0 Type-A connectors.
He also wired an NVMe slot to the PCB for a system drive, and spent some time with trace lengths to ensure they all matched, as to not come up against any timing issues. Although EastMakes didn't go as far as adding RGB lighting, he did add a little pizzazz by way of choosing a yellow-on-black finish for his new motherboard, using PCBWay's custom configurator. Boop and Reboop switches were added as well.
After he got the freshly minted PCB, he tested it, and it worked right on the first try. We do have to add that while EastMakes found this to be a positive, any grizzled greybeard knows that when a complicated project or piece of code works fine the first time, it means there's definitely a nasty bug hidden somewhere.
Nevertheless, he put it into the N40L box, and presto, it fit just right and booted just fine, and EastMakes tested USB and Ethernet connection speeds to ensure everything was up to spec. He did stop short of adding the requisite SFF-8087 port for the hard drive bay, so we venture he has plans for that later on.
Die Entwickler des nunmehr gut zehn Jahre alten Raspberry-Pi-Desktops mit dem Charme von Windows 95, ursprünglich ein Abkömmling von LXDE, haben der Oberfläche eine Verjüngungskur verpasst.

 Anmelden

 Ingenieure der ETH Zürich haben einer Roboterhand das eigenständige Laufen auf ihren Fingern beigebracht. Das mit einem Raspberry Pi ausgestattete System meistert sogar verschiedene Untergründe. Später soll das Konstrukt als abnehmbares Modul dienen. (Weiter lesen)